Springboot启动流程
Springboot版本 https://start.spring.io/
Project:Gradle - Groovy
Language: Java
Spring Boot: 4.0.6
Project Metadata:
- Package: Jar
- Configuration: YAML
- Java: 25
Dependencies: Spring Web
启动类
1
2
3
4
5
6
7
8
@SpringBootApplication
public class DemoApplication {

	public static void main(String[] args) {
		SpringApplication.run(DemoApplication.class, args);
	}

}
Spring Boot 打包成可执行 JAR 后,通常通过 java -jar xxxx.jar 命令来启动应用。JAR 包的启动入口为DemoApplication.main()方法。
进入SpringApplication.run()方法
1
2
3
public static ConfigurableApplicationContext run(Class<?>[] primarySources, String[] args) {
    return new SpringApplication(primarySources).run(args);
}
先创建SpringApplication类然后执行其run方法。
创建 SpringApplication 实例
1
2
3
4
5
6
7
8
9
10
11
12
13
14
15
16
17
18
public SpringApplication(@Nullable ResourceLoader resourceLoader, Class<?>... primarySources) {
    // 1. resourceLoader 默认为 null
    this.resourceLoader = resourceLoader;
    Assert.notNull(primarySources, "'primarySources' must not be null");
    // 2. primarySources = DemoApplication.class
    this.primarySources = new LinkedHashSet<>(Arrays.asList(primarySources));
    // 3. 判断 application 的类型
    this.properties.setWebApplicationType(WebApplicationType.deduce());
    // 4. 从 META-INF/spring.factories 读取 key 为 BootstrapRegistryInitializer 的类名称
    this.bootstrapRegistryInitializers = new ArrayList<>(
            getSpringFactoriesInstances(BootstrapRegistryInitializer.class));
    // 5. 从 META-INF/spring.factories 读取 key 为 ApplicationContextInitializer 的类名称
    setInitializers((Collection) getSpringFactoriesInstances(ApplicationContextInitializer.class));
    // 6. 从 META-INF/spring.factories 读取 key 为 ApplicationListener 的类名称
    setListeners((Collection) getSpringFactoriesInstances(ApplicationListener.class));
    // 7. 自动推断出启动 Spring Boot 应用的主类
    this.mainApplicationClass = deduceMainApplicationClass();
}
3.判断 application 的类型
1
 this.properties.setWebApplicationType(WebApplicationType.deduce());
其中WebApplicationType.deduce()判断Application的Type。
1
2
3
4
5
6
7
8
9
10
11
12
13
14
15
16
17
18
public static WebApplicationType deduce() {
    for (Deducer deducer : SpringFactoriesLoader.forDefaultResourceLocation().load(Deducer.class)) {
        WebApplicationType deduced = deducer.deduceWebApplicationType();
        if (deduced != null) {
            return deduced;
        }
    }
    return isServletApplication() ? WebApplicationType.SERVLET : WebApplicationType.NONE;
}

private static boolean isServletApplication() {
    for (String servletIndicatorClass : SERVLET_INDICATOR_CLASSES) {
        if (!ClassUtils.isPresent(servletIndicatorClass, null)) {
            return false;
        }
    }
    return true;
}
SpringFactoriesLoader.forDefaultResourceLocation().load(Deducer.class)通过SPI机制,从META-INF/spring/org.springframework.boot.WebApplicationType$Deducer加载Deducer.class,并执行其deduceWebApplicationType 方法(如果第三方没有在META-INF/spring/自定义Deducer.class,那么for循环并不会进入)。
注:遍历这些外置的推断器,调用它们的 deduceWebApplicationType() 方法。如果某个推断器返回了一个非空的类型(说明它明确识别出了应用类型),就直接采纳并返回。这为第三方框架或自定义逻辑提供了干预应用类型判断的机会。
兜底的代码是isServletApplication() ? WebApplicationType.SERVLET : WebApplicationType.NONE,Springboot会使用类路径扫描模式判断类路径下是否有jakarta.servlet.Servlet和ConfigurableWebApplicationContext,如果有加载为SERVLET 模式,如果没有加载为NONE模式。
Java通过
Class.forName(name, false, clToUse)判断路径中是否有某类,但不初始化该类,只会加载,链接(在Metaspace中存储元数据,在堆中存储class对象,在堆中开辟静态变量空间赋予默认值)
4 5 6.从META-INF/spring.factories中读取并加载类
getSpringFactoriesInstances()方法使用SpringFactoriesLoader.forDefaultResourceLocation(getClassLoader()).load(type, argumentResolver)读取META-INF/spring.factories中的类并加载。然后分别被存储到this.bootstrapRegistryInitializers,this.initializers,this.listeners中,以上均为ArrayList<>结构。
SpringFactoriesLoader 是Springboot提供的读取META-INF/spring.factories的工具类(本质上是Java SPI的扩展类)。
其中的数据有
public static final String FACTORIES_RESOURCE_LOCATION = “META-INF/spring.factories”;
SpringFactoriesLoader.forDefaultResourceLocation(getClassLoader())创建SpringFactoriesLoader对象:
创建对象时,会读取META-INF/spring.factories中的信息,并将其以字符串String的形式存储到
this.factories和this.cache中。
SpringFactoriesLoader.forDefaultResourceLocation(getClassLoader()).load(type, argumentResolver)的 load(type,xx)会将key=type的对应类加载并实例化。load()方法的流程:
- 从
this.factories获取对应factoryType的类名(字符串)- 调用
instantiateFactory(implementationName, factoryType, argumentResolver, failureHandlerToUse);根据类名实例化某个类instantiateFactory()方法的流程:
- 调用
ClassUtils.forName(implementationName, this.classLoader);加载链接该类,但不初始化- 调用
FactoryInstantiator.forClass(factoryImplementationClass);获取该类的构造器- 调用
factoryInstantiator.instantiate(argumentResolver)使用构造器初始化该类
4 5 6三步分别加载了BootstrapRegistryInitializer,ApplicationContextInitializer,ApplicationListener
BootstrapRegistryInitializer:用于在 Spring Boot 应用启动的最早期阶段(即引导上下文 Bootstrap Context 初始化时)注册组件到BootstrapRegistry。如Spring Cloud Config。ApplicationContextInitializer:在ConfigurableApplicationContext刷新(refresh)之前,允许对上下文(容器)进行编程式初始化或修改。ApplicationListener:Spring的监听器,Spring Boot 启动时会发布大量事件,如ApplicationStartingEvent,ContextRefreshedEvent。
7. 自动推断Spring Boot的主类
1
2
3
4
5
6
7
8
9
10
11
private @Nullable Class<?> deduceMainApplicationClass() {
    return StackWalker.getInstance(StackWalker.Option.RETAIN_CLASS_REFERENCE)
        .walk(this::findMainClass)
        .orElse(null);
}

private Optional<Class<?>> findMainClass(Stream<StackFrame> stack) {
    return stack.filter((frame) -> Objects.equals(frame.getMethodName(), "main"))
        .findFirst()
        .map(StackWalker.StackFrame::getDeclaringClass);
}
StackWalker:Java 9 新增的用于遍历当前线程调用栈的工具类其
walk(Consumer<Stream<StackFrame>>)方法接收一个函数,该函数作用于一个Stream<StackWalker.StackFrame>自定义的
findMainClass()方法,filter()筛选出方法名为main的栈帧;findFirst()选出找到的第一个方法(调用栈从上到下是「当前方法 → 调用者 → … → main → JVM 启动类」,所以findFirst()实际找到的是用户定义的main方法(而非 JVM 内部的));map()将栈帧转换为其所属的Class<?>对象。
执行SpringApplication的run方法
1
2
3
4
5
6
7
8
9
10
11
12
13
14
15
16
17
18
19
20
21
22
23
24
25
26
27
28
29
30
31
32
33
34
35
36
37
38
39
40
41
42
43
44
45
46
47
48
49
50
51
52
53
54
55
56
57
58
59
60
61
62
63
64
65
66
67
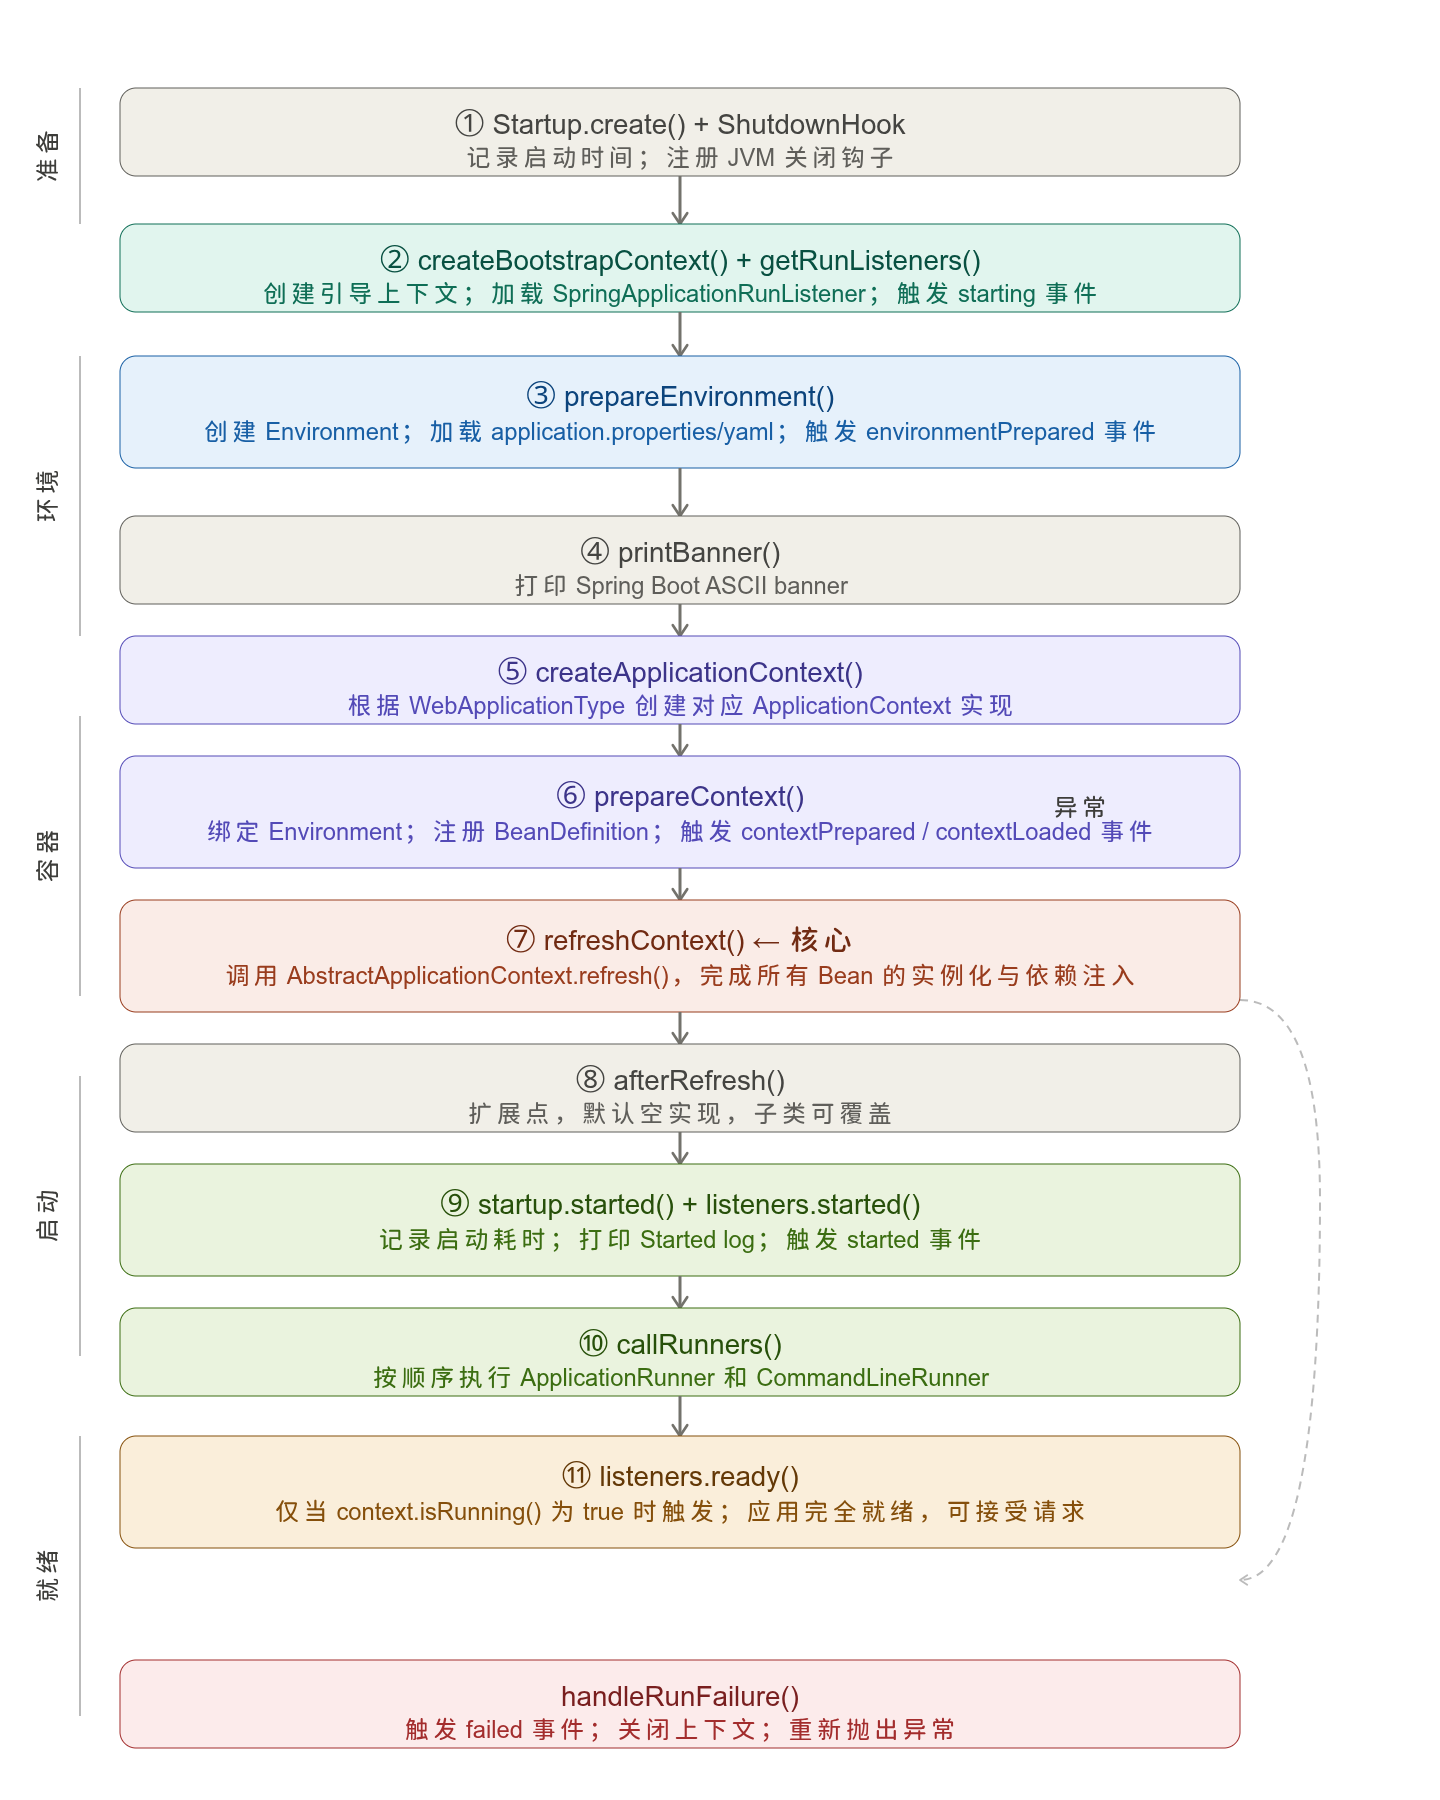
public ConfigurableApplicationContext run(String... args) {
// 1.记录启动时间
Startup startup = Startup.create();
// 2.注册 JVM 关闭钩子,确保应用退出时能优雅地关闭 Spring 容器
if (this.properties.isRegisterShutdownHook()) {
SpringApplication.shutdownHook.enableShutdownHookAddition();
}
// 3.BootstrapContext 是一个轻量级的早期容器
// 用于在正式 ApplicationContext 创建之前提供少量基础服务(如配置数据源)
DefaultBootstrapContext bootstrapContext = createBootstrapContext();
ConfigurableApplicationContext context = null;
// 4.让 Spring Boot 应用在无图形界面的服务器环境中也能安全使用 AWT 相关的图形能力
//(图片处理、字体渲染等)
configureHeadlessProperty();
// 5.通过 SpringFactoriesLoader 从 META-INF/spring.factories 加载所有 SpringApplicationRunListener 实现
SpringApplicationRunListeners listeners = getRunListeners(args);
// 6.发布 ApplicationStartingEvent 事件,但 Spring 容器还没创建
listeners.starting(bootstrapContext, this.mainApplicationClass);
try {
// 7.把 main 方法的原始字符串数组解析成结构化对象,供后续的环境配置和 Runner 扩展点使用
ApplicationArguments applicationArguments = new DefaultApplicationArguments(args);
// 8.准备环境变量
// 构建 Spring Boot 应用最终可用的配置环境(Environment)
ConfigurableEnvironment environment = prepareEnvironment(listeners, bootstrapContext, applicationArguments);
// 9.打印 Banner
Banner printedBanner = printBanner(environment);
// 10.根据应用类型创建ApplicationContext (AnnotationConfigApplicationContext)
context = createApplicationContext();
// 11.将默认的DefaultApplicationStartup 赋值给 context.applicationStartup
// 用于收集和记录应用启动过程中的关键事件(如 Bean 初始化、自动配置等)的性能指标
context.setApplicationStartup(this.applicationStartup);
// 12. 填充/配置容器,上下文准备阶段
prepareContext(bootstrapContext, context, environment, listeners, applicationArguments, printedBanner);
// 13. (核心)刷新上下文
refreshContext(context);
// 14. (一个空钩子)不建议使用(推荐使用监听器ApplicationStartedEvent)
afterRefresh(context, applicationArguments);
// 15. 计算并打印启动耗时
Duration timeTakenToStarted = startup.started();
// 16. 将启动成功的信息和耗时打印到控制台
if (this.properties.isLogStartupInfo()) {
new StartupInfoLogger(this.mainApplicationClass, environment).logStarted(getApplicationLog(), startup);
}
// 17. 广播已启动事件
// 通知所有注册的 SpringApplicationRunListener 监听器 Spring Boot 已经启动成功
// 会发布 ApplicationStartedEvent
listeners.started(context, timeTakenToStarted);
// 18. 执行自定义的 Runner 代码
// 找出 Spring 容器中所有实现了 CommandLineRunner 或 ApplicationRunner 接口的 Bean,并依次调用它们的 run 方法
// 在项目启动成功后,立即依次执行开发者的 Runner 代码
callRunners(context, applicationArguments);
}
catch (Throwable ex) {
throw handleRunFailure(context, ex, listeners);
}
try {
// 19. 检查 Spring 容器当前是否还在正常运行
if (context.isRunning()) {
// 20. 记录从启动到完全就绪的总时间 并 向所有监听器广播 ApplicationReadyEvent
listeners.ready(context, startup.ready());
}
}
catch (Throwable ex) {
throw handleRunFailure(context, ex, null);
}
return context;
}
全流程:
8.准备环境变量
应用运行环境(Environment)包含:
| 内容 | 作用 |
|---|---|
| PropertySources | 所有配置来源 |
| Profiles | 当前激活环境 |
| ConversionService | 类型转换 |
| Properties解析 | getProperty() |
1
2
3
4
5
6
7
8
9
10
11
12
13
14
15
16
17
18
19
20
21
22
23
24
25
26
27
28
29
30
31
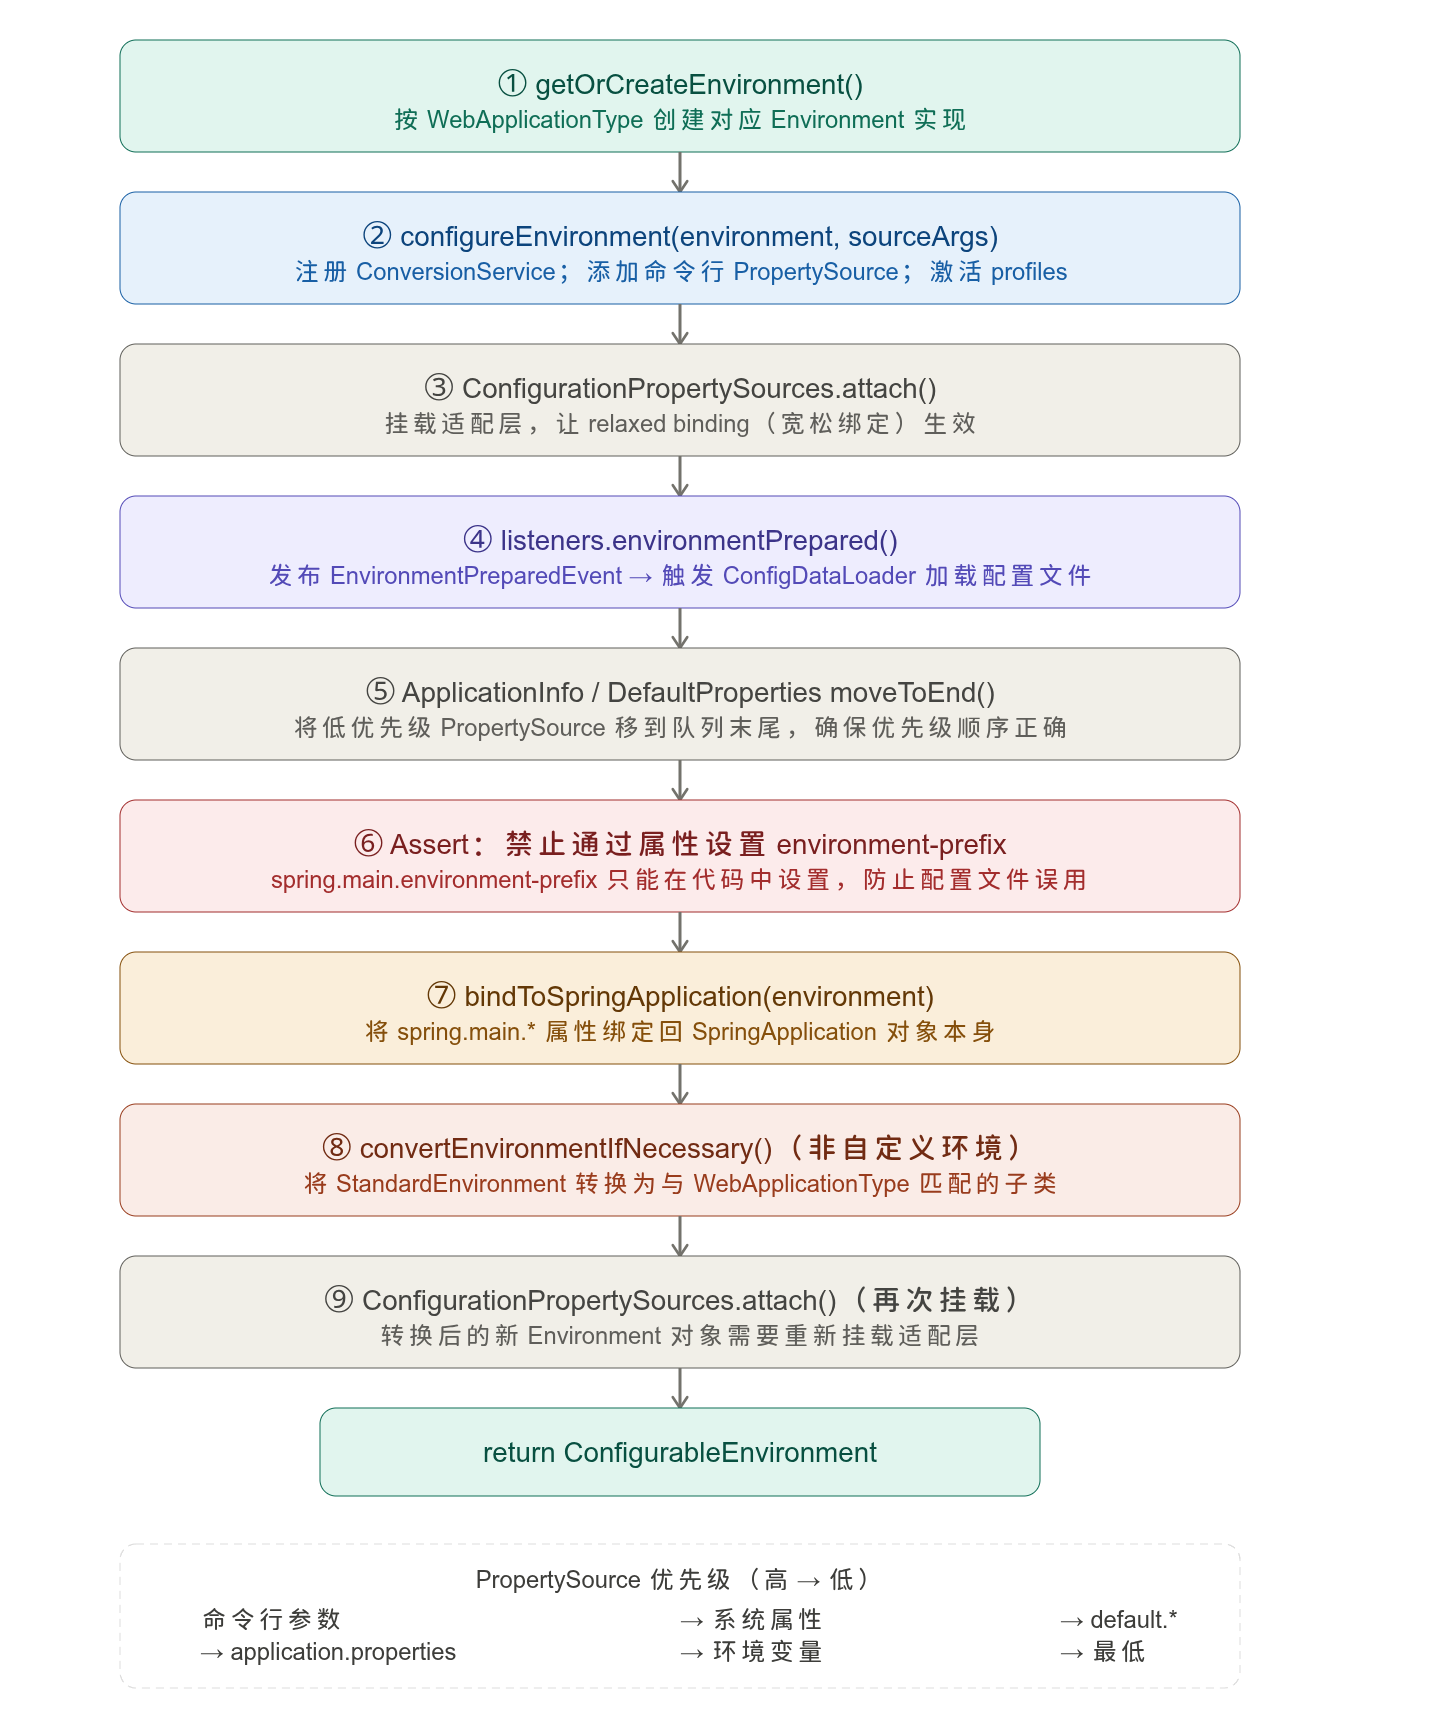
private ConfigurableEnvironment prepareEnvironment(SpringApplicationRunListeners listeners,
DefaultBootstrapContext bootstrapContext, ApplicationArguments applicationArguments) {
// Create and configure the environment
// 8.1 根据创建SpringApplication时推断的类型,创建不同的环境类
ConfigurableEnvironment environment = getOrCreateEnvironment();
// 8.2 配置 命令行参数 到创建的环境类
configureEnvironment(environment, applicationArguments.getSourceArgs());
// 8.3 把 Environment 中所有 PropertySource 重新封装为 ConfigurationPropertySourcesPropertySource。给 ConfigDataEnvironmentPostProcessor 中的Binder使用
ConfigurationPropertySources.attach(environment);
// 8.4 发布 ApplicationEnvironmentPreparedEvent 事件,触发一系列 EnvironmentPostProcessor 来加载配置文件(主要为ConfigDataEnvironmentPostProcessor 加载配置文件)。
listeners.environmentPrepared(bootstrapContext, environment);
// 8.5 确保配置加载的优先级顺序
// 将 applicationInfo 放入倒数第二个
ApplicationInfoPropertySource.moveToEnd(environment);
// 将 defaultProperties 放入倒数第一个
DefaultPropertiesPropertySource.moveToEnd(environment);
// 8.6 配置文件中不允许出现 spring.main.environment-prefix
Assert.state(!environment.containsProperty("spring.main.environment-prefix"),
"Environment prefix cannot be set via properties.");
// 8.7 将 Environment 中与 spring.main 前缀相关的配置属性,读取出来并赋值到 SpringApplication 对象的 this.properties 字段中
bindToSpringApplication(environment);
// 8.8 确保最后的environment类型与当前应用类型(servlet, reactive, none)一致
// 正常模式下,是没有作用的(历史遗留+兜底代码)
if (!this.isCustomEnvironment) {
EnvironmentConverter environmentConverter = new EnvironmentConverter(getClassLoader());
environment = environmentConverter.convertEnvironmentIfNecessary(environment, deduceEnvironmentClass());
}
// 8.9 重新同步更新 ConfigurationPropertySourcesPropertySource
ConfigurationPropertySources.attach(environment);
return environment;
}
8.1 getOrCreateEnvironment()
1
2
3
4
5
6
7
8
9
10
11
12
13
14
15
private ConfigurableEnvironment getOrCreateEnvironment() {
    if (this.environment != null) {
        return this.environment;
    }
    // 8.1.1 获取 创建SpringApplication时 的容器推断类型
    WebApplicationType webApplicationType = this.properties.getWebApplicationType();
    // 8.1.2 使用工厂模式,applicationContextFactory(默认DefaultApplicationContextFactory,可自定义) 根据 容器类型 创建对应的环境类 (内部遍历所有子工厂)
    ConfigurableEnvironment environment = this.applicationContextFactory.createEnvironment(webApplicationType);
    // 8.1.3 若使用了自定义applicationContextFactory,则用DefaultApplicationContextFactory兜底一次
    if (environment == null && this.applicationContextFactory != ApplicationContextFactory.DEFAULT) {
        environment = ApplicationContextFactory.DEFAULT.createEnvironment(webApplicationType);
    }
    // 8.1.4 使用ApplicationEnvironment兜底 环境类
    return (environment != null) ? environment : new ApplicationEnvironment();
}
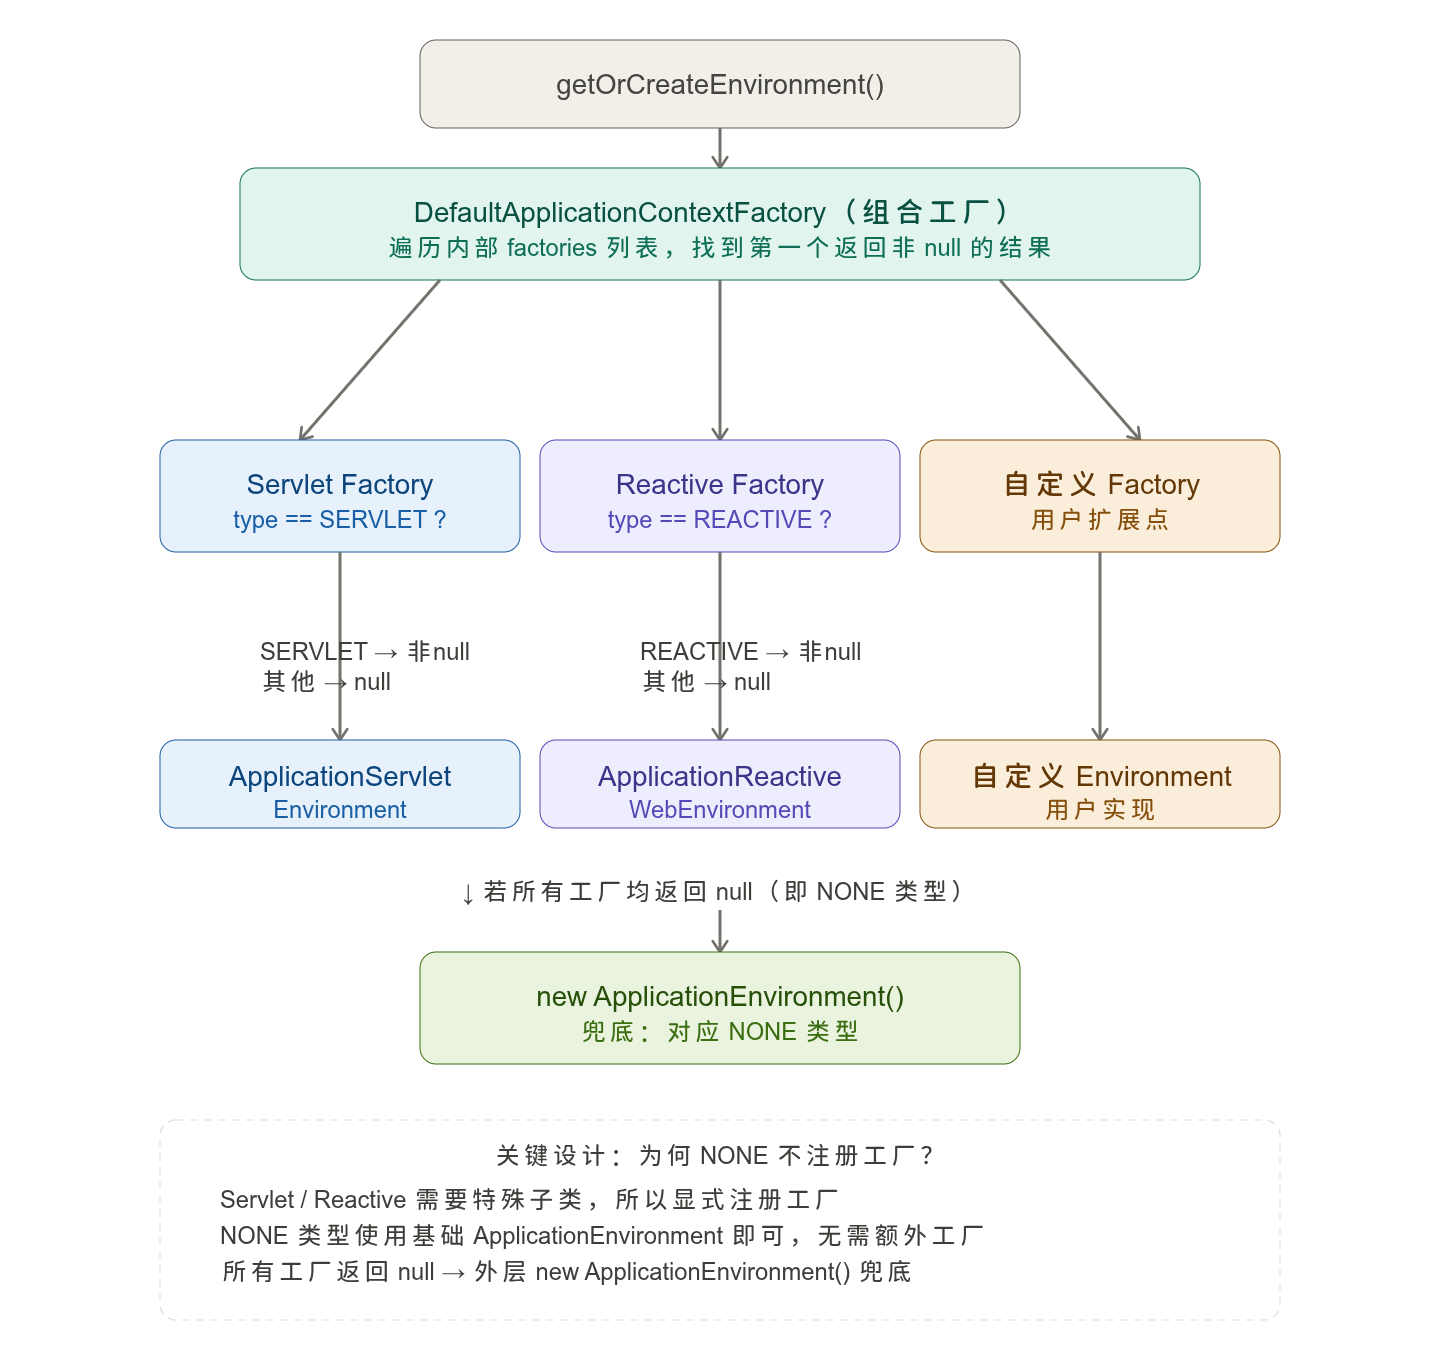
| WebApplicationType | 创建的 Environment |
|---|---|
| SERVLET | ApplicationServletEnvironment |
| REACTIVE | ApplicationReactiveWebEnvironment |
| NONE | ApplicationEnvironment |
在ApplicationServletEnvironment执行构造函数时,其父类AbstractEnvironment执行
1
2
3
4
5
protected AbstractEnvironment(MutablePropertySources propertySources) {
    this.propertySources = propertySources;
    this.propertyResolver = createPropertyResolver(propertySources);
    customizePropertySources(propertySources);
}
其中AbstractEnvironment.customizePropertySources(propertySources);在StandardEnvironment.customizePropertySources()中会将 “systemProperties”(JVM参数) 和 “systemEnvironment” (操作系统变量) 的配置加载进来
这是典型的Template Method(模板方法模式)
1
2
3
4
5
6
7
8
// StandardEnvironment.java
@Override
protected void customizePropertySources(MutablePropertySources propertySources) {
    propertySources.addLast(
            new PropertiesPropertySource(SYSTEM_PROPERTIES_PROPERTY_SOURCE_NAME, getSystemProperties()));
    propertySources.addLast(
            new SystemEnvironmentPropertySource(SYSTEM_ENVIRONMENT_PROPERTY_SOURCE_NAME, getSystemEnvironment()));
}
继承关系:
1
2
3
4
5
6
7
ApplicationServletEnvironment
    ↓
StandardServletEnvironment
    ↓
StandardEnvironment
    ↓
AbstractEnvironment
8.2 配置 命令行参数 到创建的环境类
1
2
3
4
5
6
7
8
9
10
11
protected void configureEnvironment(ConfigurableEnvironment environment, String[] args) {
    // 8.2.1 环境类中创建ApplicationConversionService(),属性绑定类型转换器
    if (this.addConversionService) {
        environment.setConversionService(new ApplicationConversionService());
    }
    // 8.2.2 将命令行参数包装成 SimpleCommandLinePropertySource 加入 PropertySources
    // 配置源初始化
    configurePropertySources(environment, args);
    // 8.2.3 配置 profiles
    configureProfiles(environment, args);
}
8.2.2 配置源初始化
Springboot中的配置源及其对应的PropertySource
| 配置来源 | PropertySource |
|---|---|
| application.yml | OriginTrackedMapPropertySource |
| JVM参数 | PropertiesPropertySource |
| 环境变量 | SystemEnvironmentPropertySource |
| 命令行 | SimpleCommandLinePropertySource |
1
2
3
4
5
6
7
8
9
10
11
12
13
14
15
16
17
18
19
20
21
22
23
24
25
26
27
28
protected void configurePropertySources(ConfigurableEnvironment environment, String[] args) {
    // 从 环境类 中获取 MutablePropertySources
    MutablePropertySources sources = environment.getPropertySources();
    if (!CollectionUtils.isEmpty(this.defaultProperties)) {
        DefaultPropertiesPropertySource.addOrMerge(this.defaultProperties, sources);
    }
    // 若 需要配置命令行参数 并且 命令行参数不为0
    if (this.addCommandLineProperties && args.length > 0) {
        // 获取 命令行参数 在MutablePropertySources的 key="commandLineArgs"
        String name = CommandLinePropertySource.COMMAND_LINE_PROPERTY_SOURCE_NAME;
        // 获取 MutablePropertySources 中 key = "commandLineArgs" 的 value
        PropertySource<?> source = sources.get(name);
        // 若已经存在过命令行参数的 PropertySource,创建CompositePropertySource融合
        if (source != null) {
            CompositePropertySource composite = new CompositePropertySource(name);
            composite
                .addPropertySource(new SimpleCommandLinePropertySource("springApplicationCommandLineArgs", args));
            composite.addPropertySource(source);
            sources.replace(name, composite);
        }
        else {
            // 若不存在命令行参数的 PropertySource,添加到MutablePropertySources的头部(命令行参数优先级最高)
            sources.addFirst(new SimpleCommandLinePropertySource(args));
        }
    }
    // 添加:应用元信息 (优先级低)
    environment.getPropertySources().addLast(new ApplicationInfoPropertySource(this.mainApplicationClass));
}
8.2.3 配置 profiles
1
protected void configureProfiles(ConfigurableEnvironment environment, String[] args) {}
方法是空的,留给子类扩展。
1
2
3
spring:
  profiles:
    active: dev
用于控制加载application-dev.yml还是application-prod.yml
8.3 松散绑定(Relaxed Binding)
ConfigurationPropertySources.attach(environment) 的真正作用:在 Environment 中注册一个特殊的 PropertySource,将传统 PropertySource 体系适配为 Spring Boot Binder 可识别的 ConfigurationPropertySource 体系,从而支持 @ConfigurationProperties 的高级配置绑定能力。
总结: PropertySource 是 Spring 生态使用的,ConfigurationPropertySource 是 Springboot 生态使用的。ConfigurationPropertySource是一种特殊的 PropertySource,提供了绑定能力。attach()创建一个新的PropertySource (ConfigurationPropertySourcesPropertySource中包含[ “configurationProperties”, SpringConfigurationPropertySources(sources)]键值对) 指向 原来的 MutablePropertySources,并将自身添加到 MutablePropertySources 中。
1
2
3
4
5
6
7
8
9
10
11
12
13
14
15
16
17
18
19
20
21
22
23
24
25
26
27
28
29
public static void attach(Environment environment) {
    // 保证 环境类 是 ConfigurableEnvironment.class
    Assert.isInstanceOf(ConfigurableEnvironment.class, environment);
    // 获取 环境类 中的 MutablePropertySources
    MutablePropertySources sources = ((ConfigurableEnvironment) environment).getPropertySources();
    // 获取 MutablePropertySources 已经存在的 ConfigurationPropertySources
    PropertySource<?> attached = getAttached(sources);
    // 判断 attached 是否需要更新
    if (!isUsingSources(attached, sources)) {
        // 若需要更新,创建新的 [ "configurationProperties", SpringConfigurationPropertySources(sources)]键值对
        attached = new ConfigurationPropertySourcesPropertySource(ATTACHED_PROPERTY_SOURCE_NAME,
                new SpringConfigurationPropertySources(sources));
    }
    // 移除原来的configurationProperties
    sources.remove(ATTACHED_PROPERTY_SOURCE_NAME);
    // 将最新的 attached 放到队列头部
    sources.addFirst(attached);
}

// 判断当前已经挂载到 Environment 里的 ConfigurationPropertySourcesPropertySource是否仍然引用的是“当前这份” MutablePropertySources。
@Contract("null, _ -> false")
private static boolean isUsingSources(@Nullable PropertySource<?> attached, MutablePropertySources sources) {
    return attached instanceof ConfigurationPropertySourcesPropertySource
            && ((SpringConfigurationPropertySources) attached.getSource()).isUsingSources(sources);
}

static @Nullable PropertySource<?> getAttached(@Nullable MutablePropertySources sources) {
    return (sources != null) ? sources.get(ATTACHED_PROPERTY_SOURCE_NAME) : null;
}
8.4 发布 ApplicationEnvironmentPreparedEvent 事件
SpringApplicationRunListener发布Event,由ApplicationListener监听并执行具体操作。
如 SpringApplicationRunListeners 有方法:starting() environmentPrepared() contextPrepared() contextLoaded() started() ready() failed()
会执行 SpringApplicationRunListener 中对应的方法,默认的 SpringApplicationRunListener 实现类是EventPublishingRunListener。
1
2
3
4
5
6
7
SpringApplicationRunListeners.environmentPrepared()
    ↓
EventPublishingRunListener.environmentPrepared() //发布是Event=ApplicationEnvironmentPreparedEvent
    ↓
EventPublishingRunListener.multicastInitialEvent()
    ↓
SimpleApplicationEventMulticaster.multicastEvent()
1
2
3
4
5
// SpringApplicationRunListeners.java
void environmentPrepared(ConfigurableBootstrapContext bootstrapContext, ConfigurableEnvironment environment) {
    doWithListeners("spring.boot.application.environment-prepared",
            (listener) -> listener.environmentPrepared(bootstrapContext, environment));
}
1
2
3
4
5
6
7
8
9
10
11
12
13
// EventPublishingRunListener.java
@Override
public void environmentPrepared(ConfigurableBootstrapContext bootstrapContext,
        ConfigurableEnvironment environment) {
    multicastInitialEvent(
            new ApplicationEnvironmentPreparedEvent(bootstrapContext, this.application, this.args, environment));
}

private void multicastInitialEvent(ApplicationEvent event) {
    refreshApplicationListeners();
    // this.initialMulticaster = SimpleApplicationEventMulticaster
    this.initialMulticaster.multicastEvent(event);
}
最终的Event(ApplicationEnvironmentPreparedEvent)是发布在SimpleApplicationEventMulticaster.multicastEvent()
1
2
3
4
5
6
7
8
9
10
11
12
13
14
15
16
17
18
19
20
21
22
23
// SimpleApplicationEventMulticaster.java
@Override
public void multicastEvent(ApplicationEvent event, @Nullable ResolvableType eventType) {
    ResolvableType type = (eventType != null ? eventType : ResolvableType.forInstance(event));
    // 获取线程池
    Executor executor = getTaskExecutor();
    // 遍历所有ApplicationListener, 找出支持 ApplicationEnvironmentPreparedEvent的
    for (ApplicationListener<?> listener : getApplicationListeners(event, type)) {
        // 判断是否支持异步
        if (executor != null && listener.supportsAsyncExecution()) {
            try {
                executor.execute(() -> invokeListener(listener, event));
            }
            catch (RejectedExecutionException ex) {
                // Probably on shutdown -> invoke listener locally instead
                invokeListener(listener, event);
            }
        }
        else {
            invokeListener(listener, event);
        }
    }
}
最终调用invokeListener(listener, event);执行了listener.onApplicationEvent(event);
1
2
3
4
5
6
7
8
9
10
11
12
13
14
15
16
17
18
19
20
21
22
23
24
25
26
27
// EnvironmentPostProcessorApplicationListener.java
@Override
public void onApplicationEvent(ApplicationEvent event) {
    if (event instanceof ApplicationEnvironmentPreparedEvent environmentPreparedEvent) {
        // event = ApplicationEnvironmentPreparedEvent 执行
        onApplicationEnvironmentPreparedEvent(environmentPreparedEvent);
    }
    if (event instanceof ApplicationPreparedEvent) {
        onApplicationPreparedEvent();
    }
    if (event instanceof ApplicationFailedEvent) {
        onApplicationFailedEvent();
    }
}

private void onApplicationEnvironmentPreparedEvent(ApplicationEnvironmentPreparedEvent event) {
    ConfigurableEnvironment environment = event.getEnvironment();
    SpringApplication application = event.getSpringApplication();
    // 从 META-INF/spring.factories 中 获取 EnvironmentPostProcessor.class
    List<EnvironmentPostProcessor> postProcessors = getEnvironmentPostProcessors(application.getResourceLoader(),
            event.getBootstrapContext());
    addAotGeneratedEnvironmentPostProcessorIfNecessary(postProcessors, application);
    for (EnvironmentPostProcessor postProcessor : postProcessors) {
        // 执行 EnvironmentPostProcessor 的 postProcessEnvironment,具体逻辑
        postProcessor.postProcessEnvironment(environment, application);
    }
}
1
2
3
4
5
6
7
# Environment Post Processors
org.springframework.boot.EnvironmentPostProcessor=\
org.springframework.boot.cloud.CloudFoundryVcapEnvironmentPostProcessor,\
org.springframework.boot.context.config.ConfigDataEnvironmentPostProcessor,\
org.springframework.boot.support.RandomValuePropertySourceEnvironmentPostProcessor,\
org.springframework.boot.support.SpringApplicationJsonEnvironmentPostProcessor,\
org.springframework.boot.support.SystemEnvironmentPropertySourceEnvironmentPostProcessor
其中ConfigDataEnvironmentPostProcessor会加载配置,包括:
- application.yml
- application-dev.yml
- bootstrap 配置
- import 配置
- profile 激活
1
2
3
4
5
6
7
8
// ConfigDataEnvironmentPostProcessor.java
void postProcessEnvironment(ConfigurableEnvironment environment, @Nullable ResourceLoader resourceLoader,
        Collection<String> additionalProfiles) {
    this.logger.trace("Post-processing environment to add config data");
    resourceLoader = (resourceLoader != null) ? resourceLoader : new DefaultResourceLoader();
    // 配置文件加载的核心逻辑 在 processAndApply()中
    getConfigDataEnvironment(environment, resourceLoader, additionalProfiles).processAndApply();
}
配置文件的加载 在 ConfigDataEnvironment.processAndApply() 中执行。
1
2
3
4
5
6
7
8
9
10
11
12
13
14
15
16
17
18
19
20
21
// ConfigDataEnvironment.java
void processAndApply() {
    // 创建 importer
    ConfigDataImporter importer = new ConfigDataImporter(this.logFactory, this.notFoundAction, this.resolvers,
            this.loaders);
    registerBootstrapBinder(this.contributors, null, DENY_INACTIVE_BINDING);
    // 创建初始 contributors 把已有 PropertySource 包装起来
    ConfigDataEnvironmentContributors contributors = processInitial(this.contributors, importer);
    // 创建 profile 激活上下文
    ConfigDataActivationContext activationContext = createActivationContext(
            contributors.getBinder(null, BinderOption.FAIL_ON_BIND_TO_INACTIVE_SOURCE));
    // 第一次加载 application.yml
    contributors = processWithoutProfiles(contributors, importer, activationContext);
    // 解析 active/include profile
    activationContext = withProfiles(contributors, activationContext);
    // 第二次加载 application-dev.yml
    contributors = processWithProfiles(contributors, importer, activationContext);
    // 将配置加入 Environment
    applyToEnvironment(contributors, activationContext, importer.getLoadedLocations(),
            importer.getOptionalLocations());
}
8.8 确保最后的environment类型
1
2
3
4
5
6
// 默认this.isCustomEnvironment=false,会进入
// 当执行SpringApplication.setEnvironment()会执行this.isCustomEnvironment=true,不会进入
if (!this.isCustomEnvironment) {
    EnvironmentConverter environmentConverter = new EnvironmentConverter(getClassLoader());
    environment = environmentConverter.convertEnvironmentIfNecessary(environment, deduceEnvironmentClass());
}
当通过setEnvironment()自定义 Environment 会将 this.isCustomEnvironment 设置为 true。不会进入到environment的转化。
1
2
3
4
public void setEnvironment(@Nullable ConfigurableEnvironment environment) {
    this.isCustomEnvironment = true;
    this.environment = environment;
}
这好像是历史遗留问题,默认启动路径下不会出现 Environment 不一致的情况,即使进入转化也没有实际作用,直接返回原environment。
9.打印 Banner
Banner 打印发生在:
Environment已经准备完成之后ApplicationContext.refresh()之前
1
2
3
4
5
6
7
8
9
10
11
12
13
14
15
16
private @Nullable Banner printBanner(ConfigurableEnvironment environment) {
    // 根据environment判断是否需要打印 Banner
    if (this.properties.getBannerMode(environment) == Banner.Mode.OFF) {
        return null;
    }
    // resourceLoader用于加载 banner.txt 等资源文件
    ResourceLoader resourceLoader = (this.resourceLoader != null) ? this.resourceLoader
            : new DefaultResourceLoader(null);
    // 具体的打印类
    SpringApplicationBannerPrinter bannerPrinter = new SpringApplicationBannerPrinter(resourceLoader, this.banner);
    // 判断打印到 控制台 还是 日志
    if (this.properties.getBannerMode(environment) == Mode.LOG) {
        return bannerPrinter.print(environment, this.mainApplicationClass, logger);
    }
    return bannerPrinter.print(environment, this.mainApplicationClass, System.out);
}
10.根据应用类型创建ApplicationContext
1
2
3
4
5
6
protected ConfigurableApplicationContext createApplicationContext() {
    ConfigurableApplicationContext context = this.applicationContextFactory
        .create(this.properties.getWebApplicationType());
    Assert.state(context != null, "ApplicationContextFactory created null context");
    return context;
}
其中this.applicationContextFactory=ApplicationContextFactory.DEFAULT 为 DefaultApplicationContextFactory类。
1
2
3
4
5
6
7
8
9
10
11
12
13
14
15
16
17
18
19
20
21
22
23
24
// DefaultApplicationContextFactory.java
public ConfigurableApplicationContext create(@Nullable WebApplicationType webApplicationType) {
    try {
        return getFromSpringFactories(webApplicationType, ApplicationContextFactory::create,
                this::createDefaultApplicationContext);
    }
    catch (Exception ex) {
        throw new IllegalStateException("Unable create a default ApplicationContext instance, "
                + "you may need a custom ApplicationContextFactory", ex);
    }
}

private <T> @Nullable T getFromSpringFactories(@Nullable WebApplicationType webApplicationType,
        BiFunction<ApplicationContextFactory, @Nullable WebApplicationType, @Nullable T> action,
        @Nullable Supplier<T> defaultResult) {
    for (ApplicationContextFactory candidate : SpringFactoriesLoader.loadFactories(ApplicationContextFactory.class,
            getClass().getClassLoader())) {
        T result = action.apply(candidate, webApplicationType);
        if (result != null) {
            return result;
        }
    }
    return (defaultResult != null) ? defaultResult.get() : null;
}
getFromSpringFactories()从META-INF/spring.factories中获取ApplicationContextFactory.class的实现类,具体的ApplicationContextFactory实现类被写在了spring-boot-web-server-4.0.6.jar包内的META-INF/spring.factories中
1
2
3
4
# Application Context Factories
org.springframework.boot.ApplicationContextFactory=\
org.springframework.boot.web.server.reactive.context.ReactiveWebServerApplicationContextFactory,\
org.springframework.boot.web.server.servlet.context.ServletWebServerApplicationContextFactory
当使用Servlet时,使用ServletWebServerApplicationContextFactory创建AnnotationConfigServletWebServerApplicationContext(如果使用了AOT,创建ServletWebServerApplicationContext)
1
2
3
4
5
6
7
8
9
10
11
12
// ServletWebServerApplicationContextFactory.java
@Override
public @Nullable ConfigurableApplicationContext create(@Nullable WebApplicationType webApplicationType) {
    return (webApplicationType != WebApplicationType.SERVLET) ? null : createContext();
}

private ConfigurableApplicationContext createContext() {
    if (!AotDetector.useGeneratedArtifacts()) {
        return new AnnotationConfigServletWebServerApplicationContext();
    }
    return new ServletWebServerApplicationContext();
}
如果给没有引入web,则createDefaultApplicationContext()兜底。
1
2
3
4
5
6
7
8
9
// DefaultApplicationContextFactory.java
private ConfigurableApplicationContext createDefaultApplicationContext() {
    if (!AotDetector.useGeneratedArtifacts()) {
        // 普通 JVM 模式
        return new AnnotationConfigApplicationContext();
    }
    // AOT / Native 模式 BeanDefinition 已提前生成
    return new GenericApplicationContext();
}
12. 填充/配置容器,上下文准备阶段
对刚创建的ConfigurableApplicationContext进行一系列初始化和配置操作
1
2
3
4
5
6
7
8
9
10
11
12
13
14
15
16
17
18
19
20
21
22
23
24
25
26
27
28
29
30
31
32
33
34
35
36
37
38
39
40
41
42
43
44
45
46
47
48
49
50
51
52
53
54
55
56
57
58
59
60
61
62
63
private void prepareContext(DefaultBootstrapContext bootstrapContext, ConfigurableApplicationContext context,
        ConfigurableEnvironment environment, SpringApplicationRunListeners listeners,
        ApplicationArguments applicationArguments, @Nullable Banner printedBanner) {
    // 12.1 环境(environment)绑定到上下文(context)中
    context.setEnvironment(environment);
    // 12.2 对 ApplicationContext 做通用后置处理
    postProcessApplicationContext(context);
    // 12.3 AOT(Ahead-of-Time 编译)支持。若是 AOT 运行模式,自动添加 AOT 生成的初始化器。
    addAotGeneratedInitializerIfNecessary(this.initializers);
    // 12.4 遍历所有 ApplicationContextInitializer 并调用其 initialize() 方法
    applyInitializers(context);
    // 12.5 广播 ApplicationContextInitializedEvent 事件,通知所有监听器"上下文已初始化完毕,但 sources 还未加载(扩展点,用户可监听此事件在 Bean 加载前做操作)
    listeners.contextPrepared(context);
    // 12.6 关闭 BootstrapContext(引导上下文),并将其中注册的对象迁移/通知给正式的 ApplicationContext(扩展点,用户可监听此事件并对BootstrapContext做出处理)
    bootstrapContext.close(context);
    // 12.7 打印启动日志
    if (this.properties.isLogStartupInfo()) {
        // 打印 "Starting XxxApplication using Java xx"
        logStartupInfo(context);
        // 打印激活的 Profile
        logStartupProfileInfo(context);
    }
    // Add boot specific singleton beans
    // 12.8 注册启动关键单例 Bean
    ConfigurableListableBeanFactory beanFactory = context.getBeanFactory();
    // 12.9 注册命令行参数 Bean(applicationArguments)
    beanFactory.registerSingleton("springApplicationArguments", applicationArguments);
    // 12.10 注册 Banner Bean(如果有 printedBanner)
    if (printedBanner != null) {
        beanFactory.registerSingleton("springBootBanner", printedBanner);
    }
    // 12.11 BeanFactory 特性配置
    if (beanFactory instanceof AbstractAutowireCapableBeanFactory autowireCapableBeanFactory) {
    // 是否允许循环依赖(默认 false)
        autowireCapableBeanFactory.setAllowCircularReferences(this.properties.isAllowCircularReferences());
        if (beanFactory instanceof DefaultListableBeanFactory listableBeanFactory) {
    // 是否允许 BeanDefinition 覆盖(默认 false)
    listableBeanFactory.setAllowBeanDefinitionOverriding(this.properties.isAllowBeanDefinitionOverriding());
        }
    }
    // 12.12 添加 BeanFactoryPostProcessor
    if (this.properties.isLazyInitialization()) {
        // 懒加载支持
        context.addBeanFactoryPostProcessor(new LazyInitializationBeanFactoryPostProcessor());
    }
    // 用于在没有其他非守护线程时保持 JVM 存活(某些嵌入式场景需要)
    if (this.properties.isKeepAlive()) {
        context.addApplicationListener(new KeepAlive());
    }
    // 12.13 PropertySource 排序处理器 优先级: 命令行参数 > 环境变量 > application.yml > 默认值
    context.addBeanFactoryPostProcessor(new PropertySourceOrderingBeanFactoryPostProcessor(context));
    // 加载 Bean Sources
    if (!AotDetector.useGeneratedArtifacts()) {
        // Load the sources
        // 12.14 收集 主启动类(@SpringBootApplication 标注的类) 和 通过 SpringApplication.setSources() 手动添加的源
        Set<Object> sources = getAllSources();
        Assert.state(!ObjectUtils.isEmpty(sources), "No sources defined");
        // 12.15 load() 内部使用 BeanDefinitionLoader支持多种 source 类型
        load(context, sources.toArray(new Object[0]));
    }
    // 广播 ApplicationPreparedEvent 事件 通知上下文已加载
    listeners.contextLoaded(context);
}
12.2 对 ApplicationContext 做通用后置处理
1
2
3
4
5
6
7
8
9
10
11
12
13
14
15
16
17
18
19
20
protected void postProcessApplicationContext(ConfigurableApplicationContext context) {
    // 注册 beanNameGenerator(如果用户自定义了命名策略)
    if (this.beanNameGenerator != null) {
        context.getBeanFactory()
            .registerSingleton(AnnotationConfigUtils.CONFIGURATION_BEAN_NAME_GENERATOR, this.beanNameGenerator);
    }
    // 设置 resourceLoader / classLoader
    if (this.resourceLoader != null) {
        if (context instanceof GenericApplicationContext genericApplicationContext) {
            genericApplicationContext.setResourceLoader(this.resourceLoader);
        }
        if (context instanceof DefaultResourceLoader defaultResourceLoader) {
            defaultResourceLoader.setClassLoader(this.resourceLoader.getClassLoader());
        }
    }
    //  注册 ConversionService(类型转换服务)
    if (this.addConversionService) {
        context.getBeanFactory().setConversionService(context.getEnvironment().getConversionService());
    }
}
12.4 遍历所有 ApplicationContextInitializer
Springboot 默认的ApplicationContextInitializer(META-INF/spring.factories中):
1
2
3
4
5
# Application Context Initializers
org.springframework.context.ApplicationContextInitializer=\
org.springframework.boot.context.ConfigurationWarningsApplicationContextInitializer,\
org.springframework.boot.context.ContextIdApplicationContextInitializer,\
org.springframework.boot.io.ProtocolResolverApplicationContextInitializer
具体的作用:
| 初始化器 | 主要功能 | 目的 |
|---|---|---|
ConfigurationWarningsApplicationContextInitializer | 扫描并报告潜在的不良配置 | 提升代码质量与配置安全性 |
ContextIdApplicationContextInitializer | 为 ApplicationContext 设置一个结构化的唯一 ID | 便于日志、监控和上下文管理 |
ProtocolResolverApplicationContextInitializer | 注册自定义的资源协议解析器 | 扩展 Spring 的资源加载能力 |
这是ApplicationContextInitializer是在创建 SpringApplication实例时,构造函数中获取的,并存储在this.initializers中
1
2
// 5. 从 META-INF/spring.factories 读取 key 为 ApplicationContextInitializer 的类名称
setInitializers((Collection) getSpringFactoriesInstances(ApplicationContextInitializer.class));
在applyInitializers(context);中遍历所有的ApplicationContextInitializer并调用其initialize(context)方法。
1
2
3
4
5
6
7
8
9
10
protected void applyInitializers(ConfigurableApplicationContext context) {
    for (ApplicationContextInitializer initializer : getInitializers()) {
        Class<?> requiredType = GenericTypeResolver.resolveTypeArgument(initializer.getClass(),
                ApplicationContextInitializer.class);
        Assert.state(requiredType != null,
                () -> "No generic type found for initializr of type " + initializer.getClass());
        Assert.state(requiredType.isInstance(context), "Unable to call initializer");
        initializer.initialize(context);
    }
}
13. (核心)刷新上下文
1
2
3
4
5
6
7
private void refreshContext(ConfigurableApplicationContext context) {
    if (this.properties.isRegisterShutdownHook()) {
        // 向 JVM 注册一个“关闭钩子(Shutdown Hook)”,以确保 Spring 应用上下文能够在 JVM 关闭时实现“优雅停机”。
        shutdownHook.registerApplicationContext(context);
    }
    refresh(context);
}
其中refresh(context)执行的是applicationContext.refresh()
1
2
3
protected void refresh(ConfigurableApplicationContext applicationContext) {
    applicationContext.refresh();
}
Web Servlet的applicationContext的类型是ServletWebServerApplicationContext
1
2
3
4
5
6
7
8
9
10
11
12
13
14
15
16
17
18
19
20
21
// ServletWebServerApplicationContext.java
@Override
public final void refresh() throws BeansException, IllegalStateException {
    try {
        // 调用 AbstractApplicationContext.refresh()
        super.refresh();
    }
    catch (RuntimeException ex) {
        WebServer webServer = this.webServer;
        if (webServer != null) {
            try {
                webServer.stop();
                webServer.destroy();
            }
            catch (RuntimeException stopOrDestroyEx) {
                ex.addSuppressed(stopOrDestroyEx);
            }
        }
        throw ex;
    }
}
AbstractApplicationContext.refresh()核心代码:
1
2
3
4
5
6
7
8
9
10
11
12
13
14
15
16
17
18
19
20
21
22
23
24
25
26
27
28
29
30
31
32
33
34
35
36
37
38
39
40
41
42
43
44
45
46
47
48
49
50
51
52
53
54
55
56
57
58
59
60
61
62
63
64
65
66
67
68
69
70
71
72
73
74
75
76
77
78
79
80
81
82
83
84
85
86
87
88
89
90
91
92
93
94
95
96
97
98
99
100
// AbstractApplicationContext.java
@Override
public void refresh() throws BeansException, IllegalStateException {
    // 13.1 ReentrantLock,防止并发刷新/关闭,保证线程安全
    this.startupShutdownLock.lock();
    try {
        // 13.2 shutdown 时校验,防止错误线程关闭 context
        this.startupShutdownThread = Thread.currentThread();
		// 13.3 启动性能监控,供Spring Boot Actuator使用
        StartupStep contextRefresh = this.applicationStartup.start("spring.context.refresh");

        // Prepare this context for refreshing.
        // 13.4 Context 级别初始化
        prepareRefresh();

        // Tell the subclass to refresh the internal bean factory.
        // 13.5 获取 BeanFactory,返回是默认的DefaultListableBeanFactory()
        ConfigurableListableBeanFactory beanFactory = obtainFreshBeanFactory();

        // Prepare the bean factory for use in this context.
        // 13.6 配置标准 BeanFactory, 向 BeanFactory 注册 Spring 内部必需的组件
        prepareBeanFactory(beanFactory);

        try {
            // Allows post-processing of the bean factory in context subclasses.
            // 13.7 在 Bean 实例化之前,给子类一个机会对 BeanFactory 进行最后的定制和增强
            postProcessBeanFactory(beanFactory);
			// 13.8 记录beanPostProcess处理过程
            StartupStep beanPostProcess = this.applicationStartup.start("spring.context.beans.post-process");
            // Invoke factory processors registered as beans in the context.
            // 13.9 执行 BeanFactory 后处理器
            invokeBeanFactoryPostProcessors(beanFactory);
            // Register bean processors that intercept bean creation.
            // 13.10 注册 Bean 后处理器
            registerBeanPostProcessors(beanFactory);
            // 13.8 beanPostProcess结束
            beanPostProcess.end();

            // Initialize message source for this context.
            // 13.11 初始化国际化资源
            initMessageSource();

            // Initialize event multicaster for this context.
            // 13.12 初始化事件广播器
            initApplicationEventMulticaster();

            // Initialize other special beans in specific context subclasses.
            // 13.13 子类实现的刷新逻辑
            onRefresh();

            // Check for listener beans and register them.
            // 13.14 注册事件监听器
            registerListeners();

            // Instantiate all remaining (non-lazy-init) singletons.
            // 13.15 初始化所有非懒加载的单例 Bean
            // 耗时最长、最核心的步骤
            finishBeanFactoryInitialization(beanFactory);

            // Last step: publish corresponding event.
            // 13.16 完成刷新,让整个应用真正开始对外提供服务
            finishRefresh();
        }

        catch (RuntimeException | Error ex) {
            if (logger.isWarnEnabled()) {
                logger.warn("Exception encountered during context initialization - " +
                        "cancelling refresh attempt: " + ex);
            }

            // Stop already started Lifecycle beans to avoid dangling resources.
            if (this.lifecycleProcessor != null && this.lifecycleProcessor.isRunning()) {
                try {
                    this.lifecycleProcessor.stop();
                }
                catch (Throwable ex2) {
                    logger.warn("Exception thrown from LifecycleProcessor on cancelled refresh", ex2);
                }
            }

            // Destroy already created singletons to avoid dangling resources.
            destroyBeans();

            // Reset 'active' flag.
            cancelRefresh(ex);

            // Propagate exception to caller.
            throw ex;
        }

        finally {
            contextRefresh.end();
        }
    }
    finally {
        this.startupShutdownThread = null;
        // 解锁
        this.startupShutdownLock.unlock();
    }
}
13.4 Context 级别初始化
1
2
3
4
5
6
7
8
9
10
11
12
13
14
15
16
17
18
19
20
21
22
23
24
25
26
27
28
29
30
31
32
33
34
35
36
37
38
39
40
41
42
43
44
45
protected void prepareRefresh() {
    // Switch to active.
    // 13.4.1 记录容器启动时间
    this.startupDate = System.currentTimeMillis();
    // 13.4.2 容器不在 关闭 状态
    this.closed.set(false);
    // 13.4.3 容器进入 正在运行 状态
    this.active.set(true);
	// 13.4.4 日志打印
    if (logger.isDebugEnabled()) {
        if (logger.isTraceEnabled()) {
            logger.trace("Refreshing " + this);
        }
        else {
            logger.debug("Refreshing " + getDisplayName());
        }
    }

    // Initialize any placeholder property sources in the context environment.
    // 13.4.5 拓展接口,留给子类实现
    initPropertySources();

    // Validate that all properties marked as required are resolvable:
    // see ConfigurablePropertyResolver#setRequiredProperties
    // 13.4.6 校验必要配置(Spring Boot 不常用, 是 Spring Framework 底层机制)
    getEnvironment().validateRequiredProperties();

    // Store pre-refresh ApplicationListeners...
    // 13.4.7 保存 earlyApplicationListeners,创建applicationListeners快照
    // 避免 refresh 过程中动态修改后污染原始状态
    if (this.earlyApplicationListeners == null) {
        this.earlyApplicationListeners = new LinkedHashSet<>(this.applicationListeners);
    }
    else {
        // Reset local application listeners to pre-refresh state.
        // 如果earlyApplicationListeners已经赋值,则重置applicationListeners保证干净一致
        this.applicationListeners.clear();
        this.applicationListeners.addAll(this.earlyApplicationListeners);
    }

    // Allow for the collection of early ApplicationEvents,
    // to be published once the multicaster is available...
    // 13.4.8  为 ApplicationEventMulticaster 就绪前发布的事件提供一个安全的临时存储
    this. = new LinkedHashSet<>();
}
13.4.5 initPropertySources() 拓展接口
某些 PropertySource 必须等到 ApplicationContext 创建时才能拿到,在 SpringApplication 启动初期并不存在,只能等 WebApplicationContext 创建后再注入。
在AbstractApplicationContext的子类,ServletWebServerApplicationContext的父类GenericWebApplicationContext中实现了initPropertySources()
1
2
3
4
5
6
7
8
// GenericWebApplicationContext.java
@Override
protected void initPropertySources() {
    ConfigurableEnvironment env = getEnvironment();
    if (env instanceof ConfigurableWebEnvironment configurableWebEnv) {
        configurableWebEnv.initPropertySources(this.servletContext, null);
    }
}
13.6 配置标准 BeanFactory
1
2
3
4
5
6
7
8
9
10
11
12
13
14
15
16
17
18
19
20
21
22
23
24
25
26
27
28
29
30
31
32
33
34
35
36
37
38
39
40
41
42
43
44
45
46
47
48
49
50
51
52
53
54
55
56
57
58
59
protected void prepareBeanFactory(ConfigurableListableBeanFactory beanFactory) {
    // Tell the internal bean factory to use the context's class loader etc.
    // 13.6.1 获得 ClassLoader 能力
    beanFactory.setBeanClassLoader(getClassLoader());
    // 13.6.2 获得 Spring EL 表达式能力
    beanFactory.setBeanExpressionResolver(new StandardBeanExpressionResolver(beanFactory.getBeanClassLoader()));
    // 13.6.3 获取 类型转换(编辑属性) 能力 (字符串 → 特殊类型)
    beanFactory.addPropertyEditorRegistrar(new ResourceEditorRegistrar(this, getEnvironment()));

    // Configure the bean factory with context callbacks.
    // 13.6.4 添加 ApplicationContextAwareProcessor
    beanFactory.addBeanPostProcessor(new ApplicationContextAwareProcessor(this));
    // 忽略对特定接口的实现类 中的注入
    beanFactory.ignoreDependencyInterface(EnvironmentAware.class);
    beanFactory.ignoreDependencyInterface(EmbeddedValueResolverAware.class);
    beanFactory.ignoreDependencyInterface(ResourceLoaderAware.class);
    beanFactory.ignoreDependencyInterface(ApplicationEventPublisherAware.class);
    beanFactory.ignoreDependencyInterface(MessageSourceAware.class);
    beanFactory.ignoreDependencyInterface(ApplicationContextAware.class);
    beanFactory.ignoreDependencyInterface(ApplicationStartupAware.class);

    // BeanFactory interface not registered as resolvable type in a plain factory.
    // MessageSource registered (and found for autowiring) as a bean.
    // 13.6.5 注入ResolvableDependency 即使容器里没有 BeanDefinition,也能注入某些特殊对象
    // Spring 内置对象自动注入
    beanFactory.registerResolvableDependency(BeanFactory.class, beanFactory);
    beanFactory.registerResolvableDependency(ResourceLoader.class, this);
    beanFactory.registerResolvableDependency(ApplicationEventPublisher.class, this);
    beanFactory.registerResolvableDependency(ApplicationContext.class, this);

    // Register early post-processor for detecting inner beans as ApplicationListeners.
    // 13.6.6 自动识别 ApplicationListener类 并 自动注册为事件监听器
    beanFactory.addBeanPostProcessor(new ApplicationListenerDetector(this));

    // Detect a LoadTimeWeaver and prepare for weaving, if found.
    if (!NativeDetector.inNativeImage() && beanFactory.containsBean(LOAD_TIME_WEAVER_BEAN_NAME)) {
        // 13.6.7 类加载时动态修改字节码
        beanFactory.addBeanPostProcessor(new LoadTimeWeaverAwareProcessor(beanFactory));
        // Set a temporary ClassLoader for type matching.
        // 13.6.8 类型匹配时避免提前加载类
        beanFactory.setTempClassLoader(new ContextTypeMatchClassLoader(beanFactory.getBeanClassLoader()));
    }

    // Register default environment beans.
    // 13.6.9 注册环境相关 Bean
    if (!beanFactory.containsLocalBean(ENVIRONMENT_BEAN_NAME)) {
        beanFactory.registerSingleton(ENVIRONMENT_BEAN_NAME, getEnvironment());
    }
    if (!beanFactory.containsLocalBean(SYSTEM_PROPERTIES_BEAN_NAME)) {
        beanFactory.registerSingleton(SYSTEM_PROPERTIES_BEAN_NAME, getEnvironment().getSystemProperties());
    }
    if (!beanFactory.containsLocalBean(SYSTEM_ENVIRONMENT_BEAN_NAME)) {
        beanFactory.registerSingleton(SYSTEM_ENVIRONMENT_BEAN_NAME, getEnvironment().getSystemEnvironment());
    }
    // 13.6.10 启动过程性能监控
    if (!beanFactory.containsLocalBean(APPLICATION_STARTUP_BEAN_NAME)) {
        beanFactory.registerSingleton(APPLICATION_STARTUP_BEAN_NAME, getApplicationStartup());
    }
}
全部加载后,ConfigurableListableBeanFactory具备了以下功能:
| 能力 | 来源 |
|---|---|
| Aware 回调 | ApplicationContextAwareProcessor |
| EL 表达式 | StandardBeanExpressionResolver |
| 特殊依赖注入 | registerResolvableDependency |
| 类型转换 | ResourceEditorRegistrar |
| ApplicationListener | ApplicationListenerDetector |
| 环境 Bean | registerSingleton |
| LTW/AOP | LoadTimeWeaverAwareProcessor |
13.6.4 添加 ApplicationContextAwareProcessor
ApplicationContextAwareProcessor 是 Spring 框架中的一个 Bean 后置处理器(BeanPostProcessor),其主要作用是在 Bean 初始化过程中,自动为实现了特定 *Aware 接口的 Bean 注入相应的上下文或资源对象(如 ApplicationContext、Environment 等)。
当配置了beanFactory.ignoreDependencyInterface(EnvironmentAware.class);后,ApplicationContextAwareProcessor会自动忽略EnvironmentAware接口的Bean,不对其注入。
13.6.5 添加 ResolvableDependency
注册了一组可解析的依赖映射(Resolvable Dependency Map)。在 beanFactory 内部维护的一个 Map<Class<?>, Object> 中存入数据。它的作用是告诉 Spring 的依赖注入器:
- 如果有 Bean 需要注入如
BeanFactory.class这个类型,不要再去容器里找它的实现类了,直接把第二个参数(比如当前的beanFactory或this)注入进去。
主要用于 Spring 内置对象自动注入。
13.7 postProcessBeanFactory(beanFactory)
不同类型的 ApplicationContext 可以在 Bean 实例化之前,对 BeanFactory 做最后的定制。
常用的ServletWebServerApplicationContext中
1
2
3
4
5
6
7
8
@Override
protected void postProcessBeanFactory(ConfigurableListableBeanFactory beanFactory) {
    // 如果 Bean 实现 ServletContextAware,自动注入ServletContext
    beanFactory.addBeanPostProcessor(new WebApplicationContextServletContextAwareProcessor(this));
    // 忽略 ServletContextAware 接口
    beanFactory.ignoreDependencyInterface(ServletContextAware.class);
    registerWebApplicationScopes();
}
13.9 执行 BeanFactory 后处理器
本阶段的主要作用:在 Bean 创建之前,执行所有 BeanFactory 级别扩展,完成整个 IOC BeanDefinition 体系的最终构建。
本阶段操作的是 BeanDefinition,而不是 Bean。功能有:
- 增删 BeanDefinition
- 修改 BeanDefinition
- 动态注册 Bean
- 修改作用域
- 修改依赖关系
- 修改 lazy
- 修改 primary
- 修改 autowireCandidate
调用的是PostProcessorRegistrationDelegate的invokeBeanFactoryPostProcessors()方法
1
2
3
4
5
6
7
8
9
10
11
12
13
14
protected void invokeBeanFactoryPostProcessors(ConfigurableListableBeanFactory beanFactory) {
    // (核心) 执行 BeanFactory 后处理器
    PostProcessorRegistrationDelegate.invokeBeanFactoryPostProcessors(beanFactory, getBeanFactoryPostProcessors());

    // Detect a LoadTimeWeaver and prepare for weaving, if found in the meantime
    // (for example, through a @Bean method registered by ConfigurationClassPostProcessor)
    // 类加载期织入(LTW)如 AspectJ,JPA 增强,字节码织入
    // (一般 SpringBoot 普通项目很少用)
    if (!NativeDetector.inNativeImage() && beanFactory.getTempClassLoader() == null &&
            beanFactory.containsBean(LOAD_TIME_WEAVER_BEAN_NAME)) {
        beanFactory.addBeanPostProcessor(new LoadTimeWeaverAwareProcessor(beanFactory));
        beanFactory.setTempClassLoader(new ContextTypeMatchClassLoader(beanFactory.getBeanClassLoader()));
    }
}
其中 getBeanFactoryPostProcessors() 是从ApplicationContext的成员this.beanFactoryPostProcessors获取已经加载的BeanFactoryPostProcessors。
1
2
3
public List<BeanFactoryPostProcessor> getBeanFactoryPostProcessors() {
    return this.beanFactoryPostProcessors;
}
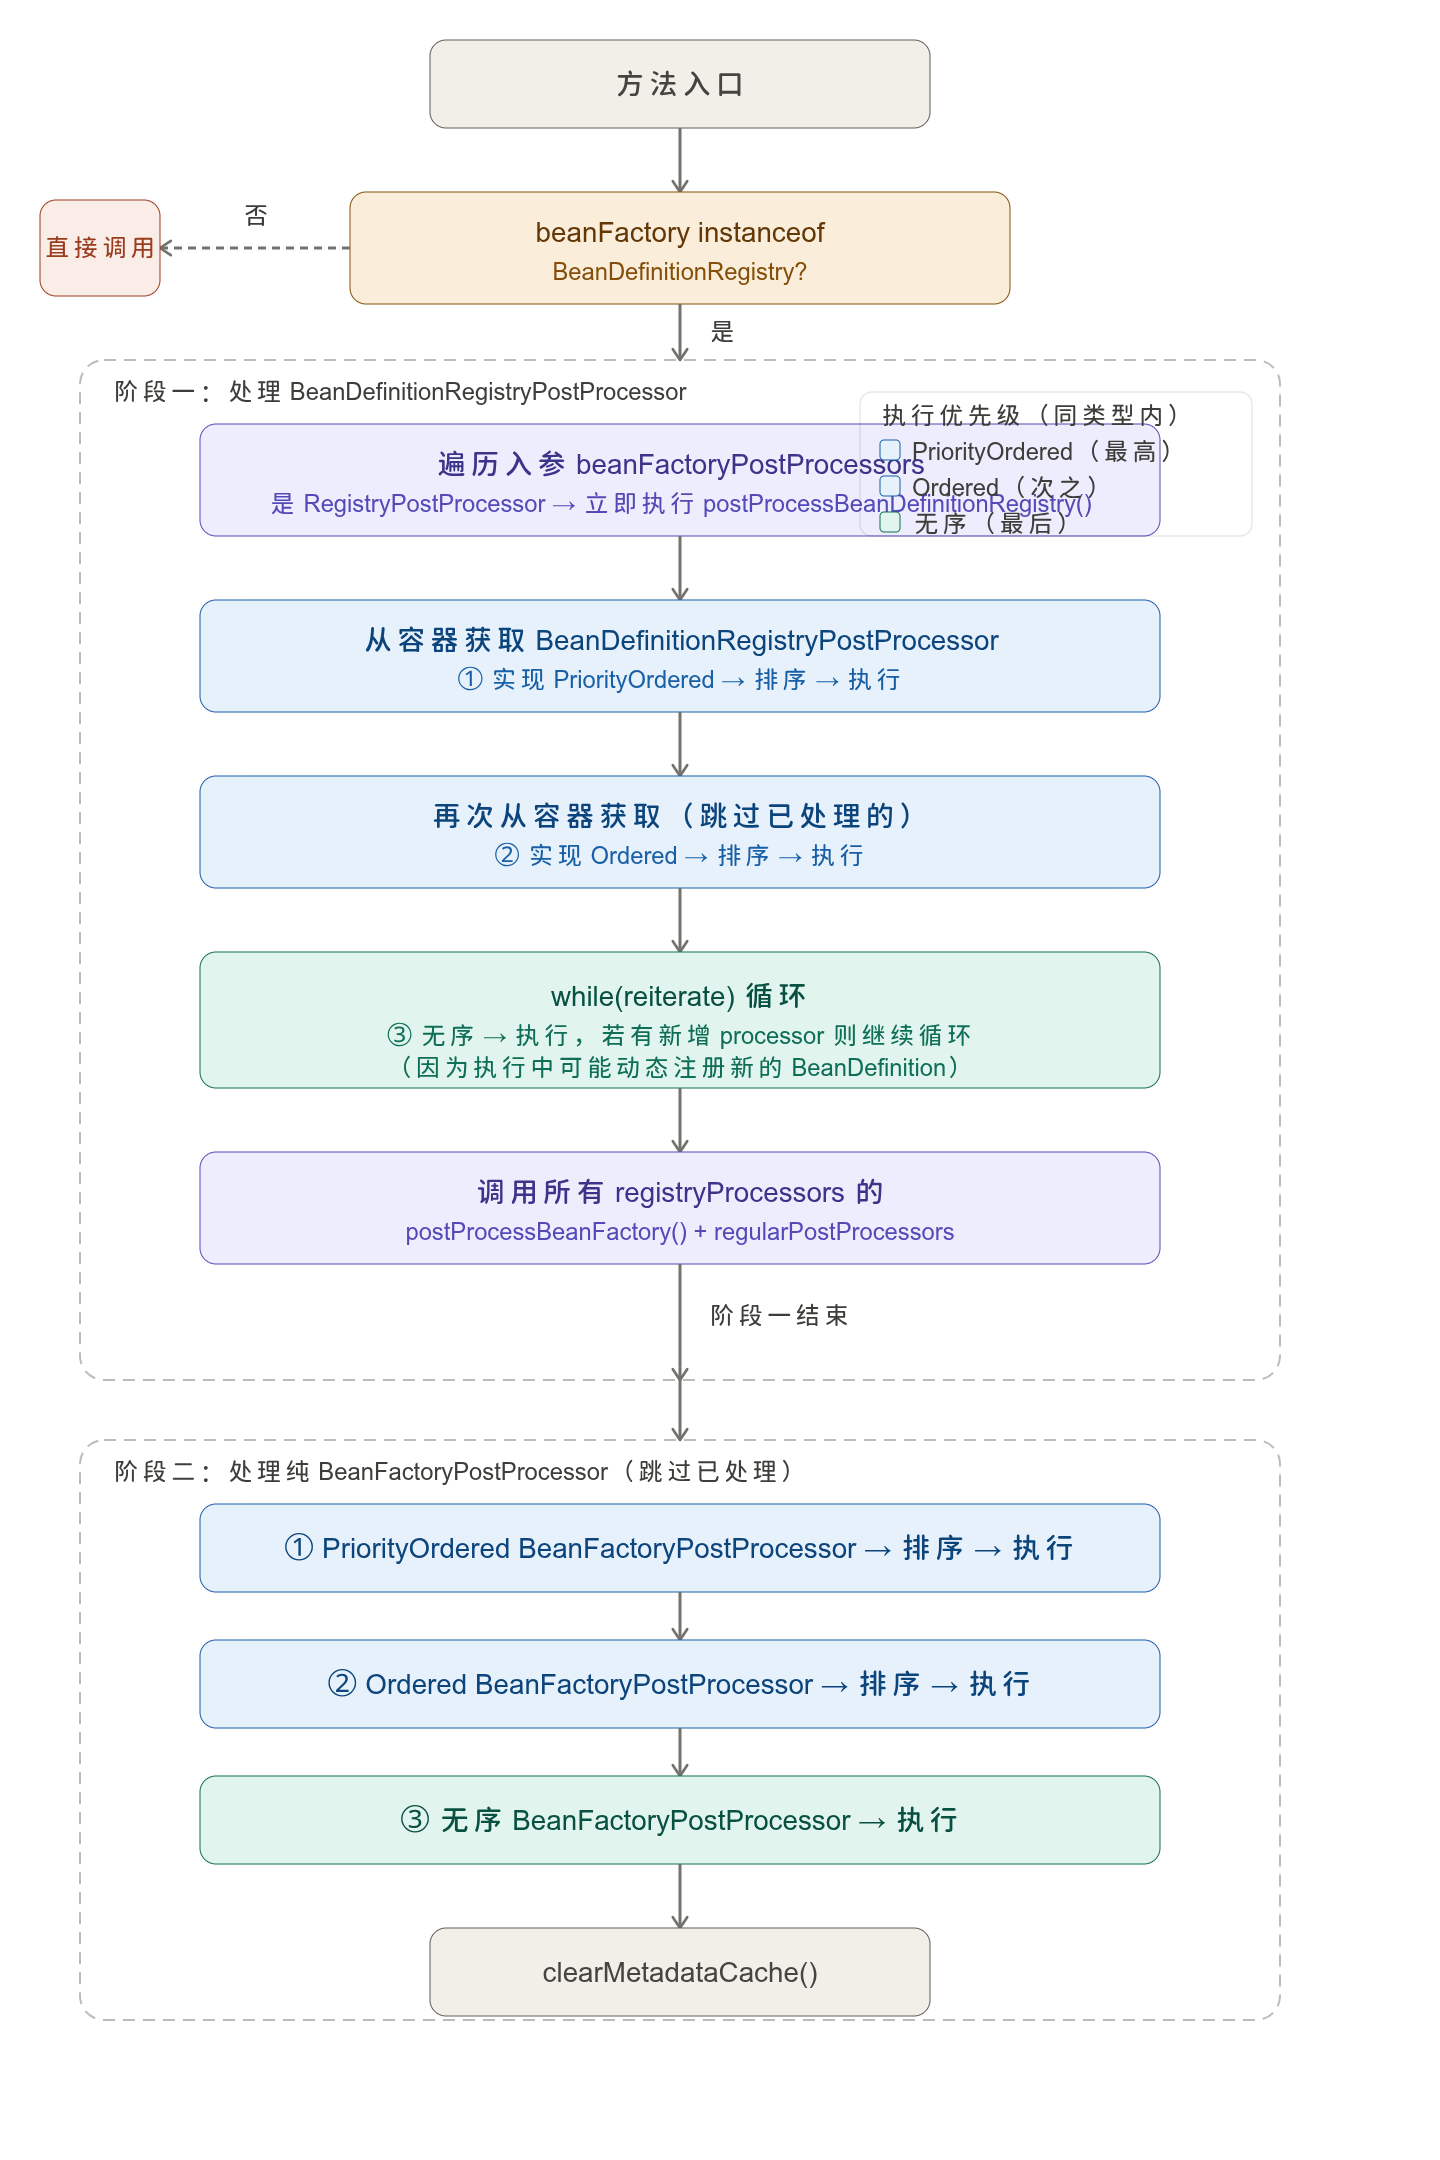
PostProcessorRegistrationDelegate.invokeBeanFactoryPostProcessors() 是配置BeanFactory的核心代码:
注:此代码片段写的很乱,只需要理解流程。这个方法按照严格的优先级与阶段规则,执行所有 BeanFactoryPostProcessor 和 BeanDefinitionRegistryPostProcessor。
1
2
3
4
5
6
7
8
9
10
11
12
13
14
15
16
17
18
19
20
21
22
23
24
25
26
27
28
29
30
31
32
33
34
35
36
37
38
39
40
41
42
43
44
45
46
47
48
49
50
51
52
53
54
55
56
57
58
59
60
61
62
63
64
65
66
67
68
69
70
71
72
73
74
75
76
77
78
79
80
81
82
83
84
85
86
87
88
89
90
91
92
93
94
95
96
97
98
99
100
101
102
103
104
105
106
107
108
109
110
111
112
113
114
115
116
117
118
119
120
121
122
123
124
125
126
127
128
129
130
131
132
133
134
135
136
137
138
139
140
141
142
143
144
145
146
147
148
149
150
151
152
153
154
155
156
157
158
159
160
161
162
163
164
165
166
167
168
169
170
171
172
173
174
175
176
177
178
179
180
181
182
183
184
185
// PostProcessorRegistrationDelegate.java
public static void invokeBeanFactoryPostProcessors(
        ConfigurableListableBeanFactory beanFactory, List<BeanFactoryPostProcessor> beanFactoryPostProcessors) {

    // Invoke BeanDefinitionRegistryPostProcessors first, if any.
    // 1. 调用 BeanDefinitionRegistryPostProcessors
    Set<String> processedBeans = new HashSet<>();
	// 2. beanFactory 必须实现 BeanDefinitionRegistry 接口
    if (beanFactory instanceof BeanDefinitionRegistry registry) {
        // 3. 存储 BeanFactoryPostProcessor
        List<BeanFactoryPostProcessor> regularPostProcessors = new ArrayList<>();
        // 4. 存储 BeanDefinitionRegistryPostProcessor
        List<BeanDefinitionRegistryPostProcessor> registryProcessors = new ArrayList<>();
		// 5. 遍历所有的手动传入 beanFactoryPostProcessors 并分类
        for (BeanFactoryPostProcessor postProcessor : beanFactoryPostProcessors) {
            if (postProcessor instanceof BeanDefinitionRegistryPostProcessor registryProcessor) {
                // 5.1 如果是 BeanDefinitionRegistryPostProcessor,将 BeanFactory 加入到 BeanDefinitionRegistryPostProcessor中
                registryProcessor.postProcessBeanDefinitionRegistry(registry);
                // 5.2 记录 BeanDefinitionRegistryPostProcessor 到 registryProcessors
                registryProcessors.add(registryProcessor);
            }
            else {
                // 5.3 如果是 BeanFactoryPostProcessor 记录到 regularPostProcessors
                regularPostProcessors.add(postProcessor);
            }
        }

        // Separate between BeanDefinitionRegistryPostProcessors that implement
        // PriorityOrdered, Ordered, and the rest.
        // 6. 根据优先级进一步分离 BeanDefinitionRegistryPostProcessors
        // PriorityOrdered > Ordered > the rest
        List<BeanDefinitionRegistryPostProcessor> currentRegistryProcessors = new ArrayList<>();

        // First, invoke the BeanDefinitionRegistryPostProcessors that implement PriorityOrdered.
        // 7. 获取beanFactory中已经加入的BeanDefinitionRegistryPostProcessor
        String[] postProcessorNames =
                beanFactory.getBeanNamesForType(BeanDefinitionRegistryPostProcessor.class, true, false);
        for (String ppName : postProcessorNames) {
            // 8. 先获取实现 PriorityOrdered 的 BeanDefinitionRegistryPostProcessor
            if (beanFactory.isTypeMatch(ppName, PriorityOrdered.class)) {
                // 添加到当前处理器(currentRegistryProcessors)
                currentRegistryProcessors.add(beanFactory.getBean(ppName, BeanDefinitionRegistryPostProcessor.class));
                // 记录名字
                processedBeans.add(ppName);
            }
        }
        // 9. 调用内部方法对 currentRegistryProcessors 列表按 PriorityOrdered.getOrder() 值升序排序(值越小,优先级越高)
        sortPostProcessors(currentRegistryProcessors, beanFactory);
        // 10. 合并到总的registryProcessors
        registryProcessors.addAll(currentRegistryProcessors);
        // 11. 立即执行 当前处理器(currentRegistryProcessors) 的 postProcessBeanDefinitionRegistry(registry) 方法
        // ConfigurationClassPostProcessor 是在此处被执行的
        invokeBeanDefinitionRegistryPostProcessors(currentRegistryProcessors, registry, beanFactory.getApplicationStartup());
        // 清空 当前处理器变量 currentRegistryProcessors
        currentRegistryProcessors.clear();

        // Next, invoke the BeanDefinitionRegistryPostProcessors that implement Ordered.
        // 12. 以上述同样的方法,执行实现了Ordered.class的BeanDefinitionRegistryPostProcessor类
        // 获取beanFactory中已经加入的BeanDefinitionRegistryPostProcessor
        postProcessorNames = beanFactory.getBeanNamesForType(BeanDefinitionRegistryPostProcessor.class, true, false);
        for (String ppName : postProcessorNames) {
            // 获取实现 Ordered 的 BeanDefinitionRegistryPostProcessor
            if (!processedBeans.contains(ppName) && beanFactory.isTypeMatch(ppName, Ordered.class)) {
                // 添加到当前处理器(currentRegistryProcessors)
                currentRegistryProcessors.add(beanFactory.getBean(ppName, BeanDefinitionRegistryPostProcessor.class));
                // 记录名字
                processedBeans.add(ppName);
            }
        }
         // 调用内部方法对 currentRegistryProcessors 列表按 Ordered.getOrder() 值升序排序(值越小,优先级越高)
        sortPostProcessors(currentRegistryProcessors, beanFactory);
        // 合并到总的registryProcessors
        registryProcessors.addAll(currentRegistryProcessors);
        // 立即执行 当前处理器(currentRegistryProcessors) 的 postProcessBeanDefinitionRegistry(registry) 方法
        invokeBeanDefinitionRegistryPostProcessors(currentRegistryProcessors, registry, beanFactory.getApplicationStartup());
        // 清空 当前处理器变量 currentRegistryProcessors
        currentRegistryProcessors.clear();

        // Finally, invoke all other BeanDefinitionRegistryPostProcessors until no further ones appear.
        // 13. 最后调用所有其他的 BeanDefinitionRegistryPostProcessors
        boolean reiterate = true;
        while (reiterate) {
            reiterate = false;
            // 再次获取beanFactory中已经加入的BeanDefinitionRegistryPostProcessor
            postProcessorNames = beanFactory.getBeanNamesForType(BeanDefinitionRegistryPostProcessor.class, true, false);
            for (String ppName : postProcessorNames) {
                // 14. 排除上面两步已经执行过的BeanDefinitionRegistryPostProcessor
                if (!processedBeans.contains(ppName)) {
                    // // 添加到当前处理器(currentRegistryProcessors)
                    currentRegistryProcessors.add(beanFactory.getBean(ppName, BeanDefinitionRegistryPostProcessor.class));
                    // 记录名字
                    processedBeans.add(ppName);
                    // 只要有新 BeanDefinitionRegistryPostProcessor 就要从 beanFactory 再次获取
                    reiterate = true;
                }
            }
            // 排序普通 BeanDefinitionRegistryPostProcessor (按 Bean 名称的字典序)
            sortPostProcessors(currentRegistryProcessors, beanFactory);
            // 合并到总的registryProcessors
            registryProcessors.addAll(currentRegistryProcessors);
             // 立即执行 当前处理器(currentRegistryProcessors) 的 postProcessBeanDefinitionRegistry(registry) 方法
            invokeBeanDefinitionRegistryPostProcessors(currentRegistryProcessors, registry, beanFactory.getApplicationStartup());
            // 清空 当前处理器变量 currentRegistryProcessors
            currentRegistryProcessors.clear();
        }

        // Now, invoke the postProcessBeanFactory callback of all processors handled so far.
        // 14. 上面执行了 BeanDefinitionRegistryPostProcessor 的 postProcessor.postProcessBeanDefinitionRegistry(registry);
        // 此处需执行 BeanDefinitionRegistryPostProcessor 的 postProcessor.postProcessBeanFactory(beanFactory);
        invokeBeanFactoryPostProcessors(registryProcessors, beanFactory);
        // 15. 执行 BeanFactoryPostProcessor 的 postProcessor.postProcessBeanFactory(beanFactory);
        invokeBeanFactoryPostProcessors(regularPostProcessors, beanFactory);
    }

    else {
        // Invoke factory processors registered with the context instance.
        // 16. 如果 beanFactory 没有实现 BeanDefinitionRegistry 就只执行 命令行添加的BeanFactoryPostProcessor 的 postProcessor.postProcessBeanFactory(beanFactory);
        invokeBeanFactoryPostProcessors(beanFactoryPostProcessors, beanFactory);
    }

    // Do not initialize FactoryBeans here: We need to leave all regular beans
    // uninitialized to let the bean factory post-processors apply to them!
    // 处理 BeanFactoryPostProcessor
    // 17. 获取 beanFactory 中的 BeanFactoryPostProcessor
    String[] postProcessorNames =
            beanFactory.getBeanNamesForType(BeanFactoryPostProcessor.class, true, false);

    // Separate between BeanFactoryPostProcessors that implement PriorityOrdered,
    // Ordered, and the rest.
    // 18. 用于存储 实现PriorityOrdered接口 的BeanFactoryPostProcessor
    List<BeanFactoryPostProcessor> priorityOrderedPostProcessors = new ArrayList<>();
    // 19. 用于存储 实现Ordered接口 的BeanFactoryPostProcessor
    List<String> orderedPostProcessorNames = new ArrayList<>();
    // 20. 用于存储 其他 的BeanFactoryPostProcessor
    List<String> nonOrderedPostProcessorNames = new ArrayList<>();
    for (String ppName : postProcessorNames) {
        // 21. 排除已经在BeanDefinitionRegistryPostProcessor中处理过的
        if (processedBeans.contains(ppName)) {
            // skip - already processed in first phase above
        }
        // 22. 寻找实现了PriorityOrdered接口的BeanFactoryPostProcessor
        else if (beanFactory.isTypeMatch(ppName, PriorityOrdered.class)) {
            priorityOrderedPostProcessors.add(beanFactory.getBean(ppName, BeanFactoryPostProcessor.class));
        }
        // 23. 寻找实现了Ordered接口的BeanFactoryPostProcessor
        else if (beanFactory.isTypeMatch(ppName, Ordered.class)) {
            orderedPostProcessorNames.add(ppName);
        }
        // 24. 寻找其他的BeanFactoryPostProcessor
        else {
            nonOrderedPostProcessorNames.add(ppName);
        }
    }

    // First, invoke the BeanFactoryPostProcessors that implement PriorityOrdered.
    // 25 排序 实现了PriorityOrdered接口的BeanFactoryPostProcessor
    sortPostProcessors(priorityOrderedPostProcessors, beanFactory);
    // 26 执行 实现了PriorityOrdered接口的BeanFactoryPostProcessor
    invokeBeanFactoryPostProcessors(priorityOrderedPostProcessors, beanFactory);

    // Next, invoke the BeanFactoryPostProcessors that implement Ordered.
    // BeanFactoryPostProcessors的转化(String -> Class)
    List<BeanFactoryPostProcessor> orderedPostProcessors = new ArrayList<>(orderedPostProcessorNames.size());
    for (String postProcessorName : orderedPostProcessorNames) {
        orderedPostProcessors.add(beanFactory.getBean(postProcessorName, BeanFactoryPostProcessor.class));
    }
    // 27 排序 实现了Ordered接口的BeanFactoryPostProcessor
    sortPostProcessors(orderedPostProcessors, beanFactory);
    // 28 执行 实现了Ordered接口的BeanFactoryPostProcessor
    invokeBeanFactoryPostProcessors(orderedPostProcessors, beanFactory);

    // Finally, invoke all other BeanFactoryPostProcessors.
    // BeanFactoryPostProcessors的转化(String -> Class)
    List<BeanFactoryPostProcessor> nonOrderedPostProcessors = new ArrayList<>(nonOrderedPostProcessorNames.size());
    for (String postProcessorName : nonOrderedPostProcessorNames) {
        nonOrderedPostProcessors.add(beanFactory.getBean(postProcessorName, BeanFactoryPostProcessor.class));
    }
    // 29 执行 实现了Ordered接口的BeanFactoryPostProcessor(不需要排序)
    invokeBeanFactoryPostProcessors(nonOrderedPostProcessors, beanFactory);

    // Clear cached merged bean definitions since the post-processors might have
    // modified the original metadata, for example, replacing placeholders in values...
    beanFactory.clearMetadataCache();
}
BeanFactoryPostProcessor 和 BeanDefinitionRegistryPostProcessor 用于修改 ConfigurableListableBeanFactory,前者是修改 BeanDefinition,后者可添加新的BeanDefinition。 BeanFactoryPostProcessor 修改 BeanDefinition 元数据:
1
2
3
public interface BeanFactoryPostProcessor {
    void postProcessBeanFactory(ConfigurableListableBeanFactory beanFactory);
}
BeanDefinitionRegistryPostProcessor 向容器中注册新的 BeanDefinition,其核心实现为ConfigurationClassPostProcessor:
1
2
3
4
5
6
public interface BeanDefinitionRegistryPostProcessor
        extends BeanFactoryPostProcessor {

    void postProcessBeanDefinitionRegistry(
            BeanDefinitionRegistry registry);
}
BeanFactoryPostProcessor (包括BeanDefinitionRegistryPostProcessor)可以通过手动注入和作为普通 BeanDefinition 注册。
- 手动注入:
AbstractApplicationContext.addBeanFactoryPostProcessor()将自定义的BeanFactoryPostProcessor类添加到this.beanFactoryPostProcessors中。并在执行PostProcessorRegistrationDelegate.invokeBeanFactoryPostProcessors()时当作参数传入。 - 普通 BeanDefinition 注册:编写
@Component,@Bean等类被自动发现导入。
BeanFactory的功能:
- BeanDefinition 注册与管理(来自
BeanDefinitionRegistry)
registerBeanDefinition(String beanName, BeanDefinition beanDefinition)removeBeanDefinition(String beanName)getBeanDefinition(String beanName)
- 按类型或名称批量获取 Bean(来自
ListableBeanFactory)
getBeansOfType(Class<T> type)getBeanNamesForType(Class<?> type)containsBeanDefinition(String beanName)
- 完整的 Bean 生命周期管理
- 支持构造器注入、属性注入、Aware 接口回调、初始化方法、
BeanPostProcessor处理等。 - 继承自
AbstractAutowireCapableBeanFactory,具备自动装配能力(byName/byType)。
- 单例缓存与作用域管理
- 单例池(
singletonObjects) - 支持自定义作用域(通过
Scope接口)
- 依赖解析与循环依赖处理
- 三级缓存机制(singletonObjects / earlySingletonObjects / singletonFactories)
- 记录依赖关系,支持有序销毁
- 可作为独立容器使用
- 虽然通常被
ApplicationContext封装,但也可直接实例化使用
13.9.7 获取beanFactory中已经加入的BeanDefinitionRegistryPostProcessor
1
beanFactory.getBeanNamesForType(BeanDefinitionRegistryPostProcessor.class, true, false);
用于获取 beanFactory 中已经加入的BeanDefinitionRegistryPostProcessor。在创建DefaultListableBeanFactory时,会主动加入一些BeanFactoryPostProcessor,在创建ApplicationContext(AnnotationConfigServletWebServerApplicationContext)时,其构造函数
1
2
3
4
5
// AnnotationConfigServletWebServerApplicationContext.java
public AnnotationConfigServletWebServerApplicationContext() {
    this.reader = new AnnotatedBeanDefinitionReader(this);
    this.scanner = new ClassPathBeanDefinitionScanner(this);
}
以及其父类的构造函数
1
2
3
4
// GenericApplicationContext.java
public GenericApplicationContext() {
    this.beanFactory = new DefaultListableBeanFactory();
}
创建了默认的beanFactory(DefaultListableBeanFactory)之后创建了AnnotatedBeanDefinitionReader()和ClassPathBeanDefinitionScanner)。
AnnotatedBeanDefinitionReader()中的 AnnotationConfigUtils.registerAnnotationConfigProcessors(this.registry); 会加入必要的 BeanDefinition。
1
2
3
4
5
6
7
8
9
// AnnotatedBeanDefinitionReader.java
public AnnotatedBeanDefinitionReader(BeanDefinitionRegistry registry, Environment environment) {
    Assert.notNull(registry, "BeanDefinitionRegistry must not be null");
    Assert.notNull(environment, "Environment must not be null");
    this.registry = registry;
    this.conditionEvaluator = new ConditionEvaluator(registry, environment, null);
    // 向 BeanFactory 中提前添加某些必要的 BeanDefinition
    AnnotationConfigUtils.registerAnnotationConfigProcessors(this.registry);
}
1
2
3
4
5
6
7
8
9
10
11
12
13
14
15
16
17
18
19
20
21
22
23
24
25
26
27
28
29
30
31
32
33
34
35
36
37
38
39
40
41
42
43
44
45
46
47
48
49
50
51
52
53
54
55
56
57
58
59
60
61
62
63
64
65
66
// AnnotationConfigUtils.java
public static Set<BeanDefinitionHolder> registerAnnotationConfigProcessors(
        BeanDefinitionRegistry registry, @Nullable Object source) {

    DefaultListableBeanFactory beanFactory = unwrapDefaultListableBeanFactory(registry);
    if (beanFactory != null) {
        if (!(beanFactory.getDependencyComparator() instanceof AnnotationAwareOrderComparator)) {
            beanFactory.setDependencyComparator(AnnotationAwareOrderComparator.INSTANCE);
        }
        if (!(beanFactory.getAutowireCandidateResolver() instanceof ContextAnnotationAutowireCandidateResolver)) {
            beanFactory.setAutowireCandidateResolver(new ContextAnnotationAutowireCandidateResolver());
        }
    }

    Set<BeanDefinitionHolder> beanDefs = CollectionUtils.newLinkedHashSet(6);

    if (!registry.containsBeanDefinition(CONFIGURATION_ANNOTATION_PROCESSOR_BEAN_NAME)) {
        // 注册 ConfigurationClassPostProcessor 的 BeanDefinition
        RootBeanDefinition def = new RootBeanDefinition(ConfigurationClassPostProcessor.class);
        def.setSource(source);
        beanDefs.add(registerPostProcessor(registry, def, CONFIGURATION_ANNOTATION_PROCESSOR_BEAN_NAME));
    }

    if (!registry.containsBeanDefinition(AUTOWIRED_ANNOTATION_PROCESSOR_BEAN_NAME)) {
        // 注册 AutowiredAnnotationBeanPostProcessor 的 BeanDefinition
        RootBeanDefinition def = new RootBeanDefinition(AutowiredAnnotationBeanPostProcessor.class);
        def.setSource(source);
        beanDefs.add(registerPostProcessor(registry, def, AUTOWIRED_ANNOTATION_PROCESSOR_BEAN_NAME));
    }

    // Check for Jakarta Annotations support, and if present add the CommonAnnotationBeanPostProcessor.
    if (JAKARTA_ANNOTATIONS_PRESENT && !registry.containsBeanDefinition(COMMON_ANNOTATION_PROCESSOR_BEAN_NAME)) {
        RootBeanDefinition def = new RootBeanDefinition(CommonAnnotationBeanPostProcessor.class);
        def.setSource(source);
        beanDefs.add(registerPostProcessor(registry, def, COMMON_ANNOTATION_PROCESSOR_BEAN_NAME));
    }

    // Check for JPA support, and if present add the PersistenceAnnotationBeanPostProcessor.
    if (JPA_PRESENT && !registry.containsBeanDefinition(PERSISTENCE_ANNOTATION_PROCESSOR_BEAN_NAME)) {
        RootBeanDefinition def = new RootBeanDefinition();
        try {
            def.setBeanClass(ClassUtils.forName(PERSISTENCE_ANNOTATION_PROCESSOR_CLASS_NAME,
                    AnnotationConfigUtils.class.getClassLoader()));
        }
        catch (ClassNotFoundException ex) {
            throw new IllegalStateException(
                    "Cannot load optional framework class: " + PERSISTENCE_ANNOTATION_PROCESSOR_CLASS_NAME, ex);
        }
        def.setSource(source);
        beanDefs.add(registerPostProcessor(registry, def, PERSISTENCE_ANNOTATION_PROCESSOR_BEAN_NAME));
    }

    if (!registry.containsBeanDefinition(EVENT_LISTENER_PROCESSOR_BEAN_NAME)) {
        RootBeanDefinition def = new RootBeanDefinition(EventListenerMethodProcessor.class);
        def.setSource(source);
        beanDefs.add(registerPostProcessor(registry, def, EVENT_LISTENER_PROCESSOR_BEAN_NAME));
    }

    if (!registry.containsBeanDefinition(EVENT_LISTENER_FACTORY_BEAN_NAME)) {
        RootBeanDefinition def = new RootBeanDefinition(DefaultEventListenerFactory.class);
        def.setSource(source);
        beanDefs.add(registerPostProcessor(registry, def, EVENT_LISTENER_FACTORY_BEAN_NAME));
    }

    return beanDefs;
}
其中最为重要的是ConfigurationClassPostProcessor 作为一个 BeanDefinitionRegistryPostProcessor(BeanFactoryPostProcessor 的子接口),拥有非常高的优先级,会在 Spring 容器初始化的早期阶段被执行 。它的核心职责是扫描、解析、并注册所有由注解(如 @Configuration, @Component, @Import, @Bean 等)定义的 Bean。
13.9.9 对 currentRegistryProcessors 列表排序
1
2
3
4
5
6
7
8
9
10
11
12
13
14
15
16
// PostProcessorRegistrationDelegate.java
private static void sortPostProcessors(List<?> postProcessors, ConfigurableListableBeanFactory beanFactory) {
    // Nothing to sort?
    if (postProcessors.size() <= 1) {
        return;
    }
    Comparator<Object> comparatorToUse = null;
    if (beanFactory instanceof DefaultListableBeanFactory dlbf) {
        // 会拿到 AnnotationAwareOrderComparator.INSTANCE
        comparatorToUse = dlbf.getDependencyComparator();
    }
    if (comparatorToUse == null) {
        comparatorToUse = OrderComparator.INSTANCE;
    }
    postProcessors.sort(comparatorToUse);
}
AnnotationAwareOrderComparator.INSTANCE排序优先级
| 条件 | 排序依据 |
|---|---|
1.实现 PriorityOrdered | getOrder() (小 → 高优先级) |
2.实现 Ordered | getOrder() |
3.有 @Order(value) 或 @Priority(value) | 注解的 value |
| 4.都没有 | 视为 order = Integer.MAX_VALUE |
| 5.order 值相同 | 按 Bean 名称的字典序(String natural order) |
13.9.11 执行 当前处理器 的 postProcessBeanDefinitionRegistry(registry) 方法
最重要的 BeanFactoryPostProcessor 即 ConfigurationClassPostProcessor 在此处被执行。ConfigurationClassPostProcessor是BeanDefinitionRegistryPostProcessor且实现了PriorityOrdered.class。postProcessBeanDefinitionRegistry(registry)会执行 postProcessBeanDefinitionRegistry(registry)
1
2
3
4
5
6
7
8
9
10
11
12
13
14
15
16
// ConfigurationClassPostProcessor.java
@Override
public void postProcessBeanDefinitionRegistry(BeanDefinitionRegistry registry) {
    int registryId = System.identityHashCode(registry);
    if (this.registriesPostProcessed.contains(registryId)) {
        throw new IllegalStateException(
                "postProcessBeanDefinitionRegistry already called on this post-processor against " + registry);
    }
    if (this.factoriesPostProcessed.contains(registryId)) {
        throw new IllegalStateException(
                "postProcessBeanFactory already called on this post-processor against " + registry);
    }
    this.registriesPostProcessed.add(registryId);
	// 处理本项目中的 @Configuration,@Component,@Service,@Import等,并将它们转换为 BeanDefinition 注册到 Spring 容器中
    processConfigBeanDefinitions(registry);
}
processConfigBeanDefinitions(registry); 该方法中包含了对 @Configuraiton,@Import,@Component等注解的处理。处理流程
1
2
3
4
5
6
7
8
9
10
11
12
13
14
15
16
17
18
19
20
21
22
23
24
25
26
27
28
29
30
31
32
33
34
35
36
37
38
39
40
41
42
43
44
45
46
47
48
49
50
51
52
53
54
55
56
57
58
59
60
61
62
63
64
65
66
67
68
69
70
71
72
73
74
75
76
77
78
79
80
81
82
83
84
85
86
87
88
89
90
91
92
93
94
95
96
97
98
99
100
101
102
103
104
105
106
107
108
109
110
111
112
113
114
115
116
117
118
119
120
121
122
123
124
// ConfigurationClassPostProcessor.java
public void processConfigBeanDefinitions(BeanDefinitionRegistry registry) {
    List<BeanDefinitionHolder> configCandidates = new ArrayList<>();
    // 1. 获取提前加入 beanFactory 的 BeanDefintion的名字(包含 项目启动类)
    String[] candidateNames = registry.getBeanDefinitionNames();
	// 2. 将BeanDefintion的名字 转化为实例类
    for (String beanName : candidateNames) {
        BeanDefinition beanDef = registry.getBeanDefinition(beanName);
        // 3. 检查BeanDefintion是否已经被处理过
        if (beanDef.getAttribute(ConfigurationClassUtils.CONFIGURATION_CLASS_ATTRIBUTE) != null) {
            if (logger.isDebugEnabled()) {
                logger.debug("Bean definition has already been processed as a configuration class: " + beanDef);
            }
        }
        // 4. 检查BeanDefintion是否包含@Configuraiton
        else if (ConfigurationClassUtils.checkConfigurationClassCandidate(beanDef, this.metadataReaderFactory)) {
            configCandidates.add(new BeanDefinitionHolder(beanDef, beanName));
        }
    }

    // Return immediately if no @Configuration classes were found
    // 5. 没有发现 @Configuration 直接返回
    if (configCandidates.isEmpty()) {
        return;
    }

    // Sort by previously determined @Order value, if applicable
    // 6. 对 所有 Configuration 的类排序
    configCandidates.sort((bd1, bd2) -> {
        int i1 = ConfigurationClassUtils.getOrder(bd1.getBeanDefinition());
        int i2 = ConfigurationClassUtils.getOrder(bd2.getBeanDefinition());
        return Integer.compare(i1, i2);
    });

    // Detect any custom bean name generation strategy supplied through the enclosing application context
    SingletonBeanRegistry singletonRegistry = null;
    if (registry instanceof SingletonBeanRegistry sbr) {
        singletonRegistry = sbr;
        BeanNameGenerator configurationGenerator = (BeanNameGenerator) singletonRegistry.getSingleton(
                AnnotationConfigUtils.CONFIGURATION_BEAN_NAME_GENERATOR);
        if (configurationGenerator != null) {
            if (this.localBeanNameGeneratorSet) {
                if (configurationGenerator instanceof ConfigurationBeanNameGenerator &
                        configurationGenerator != this.importBeanNameGenerator) {
                    throw new IllegalStateException("Context-level ConfigurationBeanNameGenerator [" +
                            configurationGenerator + "] must not be overridden with processor-level generator [" +
                            this.importBeanNameGenerator + "]");
                }
            }
            else {
                this.componentScanBeanNameGenerator = configurationGenerator;
                this.importBeanNameGenerator = configurationGenerator;
            }
        }
    }

    if (this.environment == null) {
        this.environment = new StandardEnvironment();
    }

    // Parse each @Configuration class
    ConfigurationClassParser parser = new ConfigurationClassParser(
            this.metadataReaderFactory, this.problemReporter, this.environment,
            this.resourceLoader, this.componentScanBeanNameGenerator, registry);

    Set<BeanDefinitionHolder> candidates = new LinkedHashSet<>(configCandidates);
    Set<ConfigurationClass> alreadyParsed = CollectionUtils.newHashSet(configCandidates.size());
    do {
        StartupStep processConfig = this.applicationStartup.start("spring.context.config-classes.parse");
        parser.parse(candidates);
        parser.validate();

        Set<ConfigurationClass> configClasses = new LinkedHashSet<>(parser.getConfigurationClasses());
        configClasses.removeAll(alreadyParsed);

        // Read the model and create bean definitions based on its content
        if (this.reader == null) {
            this.reader = new ConfigurationClassBeanDefinitionReader(
                    registry, this.sourceExtractor, this.resourceLoader, this.environment,
                    this.importBeanNameGenerator, parser.getImportRegistry());
        }
        this.reader.loadBeanDefinitions(configClasses);
        for (ConfigurationClass configClass : configClasses) {
            this.beanRegistrars.addAll(configClass.getBeanRegistrars());
        }
        alreadyParsed.addAll(configClasses);
        processConfig.tag("classCount", () -> String.valueOf(configClasses.size())).end();

        candidates.clear();
        if (registry.getBeanDefinitionCount() > candidateNames.length) {
            String[] newCandidateNames = registry.getBeanDefinitionNames();
            Set<String> oldCandidateNames = Set.of(candidateNames);
            Set<String> alreadyParsedClasses = CollectionUtils.newHashSet(alreadyParsed.size());
            for (ConfigurationClass configurationClass : alreadyParsed) {
                alreadyParsedClasses.add(configurationClass.getMetadata().getClassName());
            }
            for (String candidateName : newCandidateNames) {
                if (!oldCandidateNames.contains(candidateName)) {
                    BeanDefinition bd = registry.getBeanDefinition(candidateName);
                    if (ConfigurationClassUtils.checkConfigurationClassCandidate(bd, this.metadataReaderFactory) &&
                            !alreadyParsedClasses.contains(bd.getBeanClassName())) {
                        candidates.add(new BeanDefinitionHolder(bd, candidateName));
                    }
                }
            }
            candidateNames = newCandidateNames;
        }
    }
    while (!candidates.isEmpty());

    // Register the ImportRegistry as a bean in order to support ImportAware @Configuration classes
    if (singletonRegistry != null && !singletonRegistry.containsSingleton(IMPORT_REGISTRY_BEAN_NAME)) {
        singletonRegistry.registerSingleton(IMPORT_REGISTRY_BEAN_NAME, parser.getImportRegistry());
    }

    // Store the PropertySourceDescriptors to contribute them Ahead-of-time if necessary
    this.propertySourceDescriptors = parser.getPropertySourceDescriptors();

    if (this.metadataReaderFactory instanceof CachingMetadataReaderFactory cachingMetadataReaderFactory) {
        // Clear cache in externally provided MetadataReaderFactory; this is a no-op
        // for a shared cache since it'll be cleared by the ApplicationContext.
        cachingMetadataReaderFactory.clearCache();
    }
}
整体的处理流程:
1
2
3
4
5
6
7
8
9
10
11
12
13
14
15
16
17
18
19
20
21
22
23
24
25
26
27
28
29
30
31
32
33
34
35
36
37
38
39
40
41
42
43
44
45
46
47
48
49
50
51
52
53
54
55
56
57
58
59
60
[Spring 准备环境]
       │
       ▼
1. 容器启动,先将「项目启动类」手动注册为初始的 BeanDefinition
       │
       ▼
2. 触发 ConfigurationClassPostProcessor 的 processConfigBeanDefinitions()
       │
       ▼
3. 通过 registry.getBeanDefinitionNames() 抓取到「项目启动类」作为初始候选者
       │
       ▼
4. 进入 do-while 循环,ConfigurationClassParser 开始解析「项目启动类」
       │
       ├───> A. 解析 @ComponentScan:扫描本项目,发现 @Service@Configuration 等
       │        └─> 立即注册为新的 BeanDefinition 塞进 registry
       │
       └───> B. 解析 @SpringBootApplication 内部嵌套的 @Import(AutoConfigurationImportSelector.class)
                └─> 触发 Selector 去读取所有 JAR 包中的 `AutoConfiguration.imports` 文本
                └─> 把里面成百上千个第三方 @Configuration 类的名字返回给 Parser
       │
       ▼
5. 循环末尾检查:registry.getBeanDefinitionCount() 变大了!
       │
       ▼
6. 发现刚才「扫描出来的本项目 Bean」和「Import 进来的自动配置类」都是新面孔
       │
       ▼
7. 开启下一轮 do-while 循环,Parser 继续解析这些新出来的 @Configuration 类...(递归解析内部的 @Bean)


[Spring 准备环境]
       │
       ▼
1. 容器启动,先将「项目启动类」手动注册为初始的 BeanDefinition
       │
       ▼
2. 触发 ConfigurationClassPostProcessor 的 processConfigBeanDefinitions()
       │
       ▼
3. 通过 registry.getBeanDefinitionNames() 抓取到「项目启动类」作为初始候选者
       │
       ▼
4. 进入 do-while 循环,ConfigurationClassParser 开始解析「项目启动类」
       │
       ├───> A. 解析 @ComponentScan:扫描本项目,发现 @Service @Configuration 等
       │        └─> 立即注册为新的 BeanDefinition 塞进 registry
       │
       └───> B. 解析 @SpringBootApplication 内部嵌套的 @Import(AutoConfigurationImportSelector.class)
                └─> 触发 Selector 去读取所有 JAR 包中的 AutoConfiguration.imports 文本
                └─> 把里面成百上千个第三方 @Configuration 类的名字返回给 Parser
       │
       ▼
5. 循环末尾检查:registry.getBeanDefinitionCount() 变大了!
       │
       ▼
6. 发现刚才「扫描出来的本项目 Bean」和「Import 进来的自动配置类」都是新面孔
       │
       ▼
7. 开启下一轮 do-while 循环,Parser 继续解析这些新出来的 @Configuration 类... (递归解析内部的 @Bean)
最关键的是 启动类 的 @SpringBootApplication注解,其中包含了@EnableAutoConfiguration,其中又包含了@Import(AutoConfigurationImportSelector.class)。AutoConfigurationImportSelector.class
是加载配置自动配置类的关键。当扫描到该@Import时,会执行processImports()方法,调用其中类的selectImports()方法。
1
2
3
4
5
6
7
8
9
10
11
12
13
14
15
16
17
18
19
20
21
22
23
24
25
26
27
28
29
30
31
// AutoConfigurationImportSelector.java
@Override
public String[] selectImports(AnnotationMetadata annotationMetadata) {
    if (!isEnabled(annotationMetadata)) {
        return NO_IMPORTS;
    }
    AutoConfigurationEntry autoConfigurationEntry = getAutoConfigurationEntry(annotationMetadata);
    return StringUtils.toStringArray(autoConfigurationEntry.getConfigurations());
}

// 具体的读取
protected AutoConfigurationEntry getAutoConfigurationEntry(AnnotationMetadata annotationMetadata) {
    if (!isEnabled(annotationMetadata)) {
        return EMPTY_ENTRY;
    }
    AnnotationAttributes attributes = getAttributes(annotationMetadata);
    // 关键第一步:这里进去拿到了所有的候选配置列表(读取 .imports 文件)
    List<String> configurations = getCandidateConfigurations(annotationMetadata, attributes);
    // // 第二步:利用 Set 集合特性去除重复的配置类
    configurations = removeDuplicates(configurations);
    // 第三步:获取用户在 application.properties 中配置的 spring.autoconfigure.exclude 需要排除的类
    Set<String> exclusions = getExclusions(annotationMetadata, attributes);
    checkExcludedClasses(configurations, exclusions);
    configurations.removeAll(exclusions);
    // 第四步:【核心过滤】根据 @ConditionalOnClass 等条件注解进行筛选,不满足条件的全部踢掉!
    configurations = getConfigurationClassFilter().filter(configurations);
    // 第五步:触发自动装配导入的事件(广播给监听器)
    fireAutoConfigurationImportEvents(configurations, exclusions);
    // 最终把筛选干净的配置类列表,封装成 AutoConfigurationEntry 对象返回
    return new AutoConfigurationEntry(configurations, exclusions);
}
13.10 注册 Bean 后处理器
1
2
3
4
// AbstractApplicationContext.java
protected void registerBeanPostProcessors(ConfigurableListableBeanFactory beanFactory) {
    PostProcessorRegistrationDelegate.registerBeanPostProcessors(beanFactory, this);
}
调用的依然是PostProcessorRegistrationDelegate类的方法,本次为registerBeanPostProcessors()方法。
作用:从 BeanFactory 中找出所有实现了 BeanPostProcessor 接口的 Bean,并把它们注册到 BeanFactory 的内部列表中。
目的:在所有常规 Bean 实例化之前,先把这些“拦截器”准备好。BeanPostProcessor主要用于后面对Bean的增强,比如 AOP 动态代理、@Autowired 依赖注入都是靠这些后处理器在后面步骤执行的。
1
2
3
4
5
6
7
8
9
10
11
12
13
14
15
16
17
18
19
20
21
22
23
24
25
26
27
28
29
30
31
32
33
34
35
36
37
38
39
40
41
42
43
44
45
46
47
48
49
50
51
52
53
54
55
56
57
58
59
60
61
62
63
64
65
66
67
68
69
70
71
72
73
74
75
76
77
78
79
80
81
82
83
84
// PostProcessorRegistrationDelegate.java
public static void registerBeanPostProcessors(
        ConfigurableListableBeanFactory beanFactory, AbstractApplicationContext applicationContext) {
	// 1. 获取 beanFactory 中所有实现了 BeanPostProcessor 接口的 Bean 的名称(扫描 BeanDefinition)
    String[] postProcessorNames = beanFactory.getBeanNamesForType(BeanPostProcessor.class, true, false);

    // Register BeanPostProcessorChecker that logs a warn message when
    // a bean is created during BeanPostProcessor instantiation, i.e. when
    // a bean is not eligible for getting processed by all BeanPostProcessors.
    // 2. 注册一个 BeanPostProcessorChecker,用于打印警告日志
    int beanProcessorTargetCount = beanFactory.getBeanPostProcessorCount() + 1 + postProcessorNames.length;
    beanFactory.addBeanPostProcessor(
            new BeanPostProcessorChecker(beanFactory, postProcessorNames, beanProcessorTargetCount));

    // Separate between BeanPostProcessors that implement PriorityOrdered,
    // Ordered, and the rest.
    List<BeanPostProcessor> priorityOrderedPostProcessors = new ArrayList<>();
    List<BeanPostProcessor> internalPostProcessors = new ArrayList<>();
    List<String> orderedPostProcessorNames = new ArrayList<>();
    List<String> nonOrderedPostProcessorNames = new ArrayList<>();
    for (String ppName : postProcessorNames) {
        // 第一梯队:实现了 PriorityOrdered 接口
        if (beanFactory.isTypeMatch(ppName, PriorityOrdered.class)) {
            BeanPostProcessor pp = beanFactory.getBean(ppName, BeanPostProcessor.class);
            priorityOrderedPostProcessors.add(pp);
            if (pp instanceof MergedBeanDefinitionPostProcessor) {
                internalPostProcessors.add(pp);
            }
        }
        // 第二梯队:实现了 Ordered 接口(暂不实例化,只存名字)
        else if (beanFactory.isTypeMatch(ppName, Ordered.class)) {
            orderedPostProcessorNames.add(ppName);
        }
        else {
            // 第三梯队:没有实现任何排序接口的普通处理器(暂不实例化,只存名字)
            nonOrderedPostProcessorNames.add(ppName);
        }
    }

    // First, register the BeanPostProcessors that implement PriorityOrdered.
    // 对 实现了PriorityOrdered的 BeanPostProcessors 进行排序
    sortPostProcessors(priorityOrderedPostProcessors, beanFactory);
    // 批量注册 实现了PriorityOrdered的 BeanPostProcessors 到 BeanFactory 中
    registerBeanPostProcessors(beanFactory, priorityOrderedPostProcessors);

    // Next, register the BeanPostProcessors that implement Ordered.
    List<BeanPostProcessor> orderedPostProcessors = new ArrayList<>(orderedPostProcessorNames.size());
    for (String ppName : orderedPostProcessorNames) {
        // 强制实例化实现了Ordered的处理器
        BeanPostProcessor pp = beanFactory.getBean(ppName, BeanPostProcessor.class);
        orderedPostProcessors.add(pp);
        if (pp instanceof MergedBeanDefinitionPostProcessor) {
            internalPostProcessors.add(pp);
        }
    }
    // 对 实现了Ordered的 BeanPostProcessors 进行排序
    sortPostProcessors(orderedPostProcessors, beanFactory);
    // 批量注册 实现了Ordered的 BeanPostProcessors 到 BeanFactory 中
    registerBeanPostProcessors(beanFactory, orderedPostProcessors);

    // Now, register all regular BeanPostProcessors.
    List<BeanPostProcessor> nonOrderedPostProcessors = new ArrayList<>(nonOrderedPostProcessorNames.size());
    for (String ppName : nonOrderedPostProcessorNames) {
        // 强制实例化 其他的处理器
        BeanPostProcessor pp = beanFactory.getBean(ppName, BeanPostProcessor.class);
        nonOrderedPostProcessors.add(pp);
        if (pp instanceof MergedBeanDefinitionPostProcessor) {
            internalPostProcessors.add(pp);
        }
    }
    // 常规处理器不需要排序,直接注册到 BeanFactory 中
    registerBeanPostProcessors(beanFactory, nonOrderedPostProcessors);

    // Finally, re-register all internal BeanPostProcessors.
    // 最后,重新排序并注册所有的 MergedBeanDefinitionPostProcessor
    // MergedBeanDefinitionPostProcessor 负责合并 Bean 定义(解析内部注解等)需放置在执行链的最末端
    sortPostProcessors(internalPostProcessors, beanFactory);
    registerBeanPostProcessors(beanFactory, internalPostProcessors);

    // Re-register post-processor for detecting inner beans as ApplicationListeners,
    // moving it to the end of the processor chain (for picking up proxies etc).
    // 作为保底的BeanPostProcessor : ApplicationListenerDetector 的作用是检测创建好的 Bean 是否实现了 ApplicationListener 接口,如果是,则将其加入到事件监听器列表中。
    beanFactory.addBeanPostProcessor(new ApplicationListenerDetector(applicationContext));
}
13.11 初始化国际化资源
核心:给 ApplicationContext 的 this.messageSource 赋值
1
2
3
4
5
6
7
8
9
10
11
12
13
14
15
16
17
18
19
20
21
22
23
24
25
26
27
28
29
30
protected void initMessageSource() {
    ConfigurableListableBeanFactory beanFactory = getBeanFactory();
    // 1. 检查是否存在自定义的 MessageSource(默认情况下是会进入的,MessageSourceAutoConfiguration会在此之前就将MessageSource的BeanDefinition加入beanFactory)
    if (beanFactory.containsLocalBean(MESSAGE_SOURCE_BEAN_NAME)) {
        // 2. 从BeanFactory中获取 messageSource,如果没有就实例化
        this.messageSource = beanFactory.getBean(MESSAGE_SOURCE_BEAN_NAME, MessageSource.class);
        // Make MessageSource aware of parent MessageSource.
        // 3. 双亲委派机制
        if (this.parent != null && this.messageSource instanceof HierarchicalMessageSource hms &&
                hms.getParentMessageSource() == null) {
            // Only set parent context as parent MessageSource if no parent MessageSource
            // registered already.
            hms.setParentMessageSource(getInternalParentMessageSource());
        }
        if (logger.isTraceEnabled()) {
            logger.trace("Using MessageSource [" + this.messageSource + "]");
        }
    }
    else {
        // Use empty MessageSource to be able to accept getMessage calls.
        // 4. 保底 beanFactory中包含MessageSource
        DelegatingMessageSource dms = new DelegatingMessageSource();
        dms.setParentMessageSource(getInternalParentMessageSource());
        this.messageSource = dms;
        beanFactory.registerSingleton(MESSAGE_SOURCE_BEAN_NAME, this.messageSource);
        if (logger.isTraceEnabled()) {
            logger.trace("No '" + MESSAGE_SOURCE_BEAN_NAME + "' bean, using [" + this.messageSource + "]");
        }
    }
}
项目中国际化的使用:
步骤 1:编写国际化配置文件
在 src/main/resources 目录下创建以下文件:
messages.properties (默认)
1
user.welcome=Welcome, {0}!
messages_zh_CN.properties (中文)
user.welcome=欢迎您,{0}!
提示:
{0}是占位符,对应代码中传入的参数数组(Object[] args)。
**步骤 2:在代码中调用 MessageSource **
Spring Boot 启动后,MessageSource 已经被自动注入容器。你可以直接在 Controller 或 Service 中使用它:
@RestController
public class UserController {

    // 直接注入自动配置好的 MessageSource
    @Autowired
    private MessageSource messageSource;

    @GetMapping("/welcome")
    public String welcome(@RequestParam String name, Locale locale) {
        // Spring MVC 会自动将请求头中的 Accept-Language 解析为当前请求的 Locale 对象

        // 动态获取国际化文本
        String welcomeMessage = messageSource.getMessage(
            "user.welcome",         // 1. Key
            new Object[]{name},     // 2. 填充占位符的参数
            locale                  // 3. 语言环境对象
        );

        return welcomeMessage;
    }
}
3. 测试效果
- 请求一(英文): 发送请求:
GET /welcome?name=John,并在 Header 中设置Accept-Language: en-US。 返回结果:Welcome, John! - 请求二(中文): 发送请求:
GET /welcome?name=张三,并在 Header 中设置Accept-Language: zh-CN。 返回结果:欢迎您,张三!
13.12 初始化事件广播器
作用:初始化 Spring 容器的“事件广播器”。它是 Spring 观察者模式(Observer Pattern)的核心枢纽,负责在后续流程中把各种系统事件(ApplicationEvent)通知给对应的监听器(ApplicationListener)。
核心:给 ApplicationContext 的 this.applicationEventMulticaster 赋值。
1
2
3
4
5
6
7
8
9
10
11
12
13
14
15
16
17
18
19
20
21
22
23
24
protected void initApplicationEventMulticaster() {
    ConfigurableListableBeanFactory beanFactory = getBeanFactory();
    // 1. 检查容器中是否已经有一个名为 "applicationEventMulticaster" 的 Bean
    if (beanFactory.containsLocalBean(APPLICATION_EVENT_MULTICASTER_BEAN_NAME)) {
        // 2. 如果有,直接拿出来
        this.applicationEventMulticaster =
                beanFactory.getBean(APPLICATION_EVENT_MULTICASTER_BEAN_NAME, ApplicationEventMulticaster.class);
        // 打印日志
        if (logger.isTraceEnabled()) {
            logger.trace("Using ApplicationEventMulticaster [" + this.applicationEventMulticaster + "]");
        }
    }
    else {
        // 3. 如果没有自定义的,就默认创建一个 SimpleApplicationEventMulticaster
        this.applicationEventMulticaster = new SimpleApplicationEventMulticaster(beanFactory);
        // 4. 并将该类注册到 beanFactory
        beanFactory.registerSingleton(APPLICATION_EVENT_MULTICASTER_BEAN_NAME, this.applicationEventMulticaster);
        // 打印日志
        if (logger.isTraceEnabled()) {
            logger.trace("No '" + APPLICATION_EVENT_MULTICASTER_BEAN_NAME + "' bean, using " +
                    "[" + this.applicationEventMulticaster.getClass().getSimpleName() + "]");
        }
    }
}
13.13 子类实现的刷新逻辑(启动Web)
以 Servlet Web 容器为例
1
2
3
4
// AbstractApplicationContext.java
protected void onRefresh() throws BeansException {
    // For subclasses: do nothing by default.
}
子类实现:(AnnotationConfigServletWebServerApplicationContext 是 ServletWebServerApplicationContext的子类)
1
2
3
4
5
6
7
8
9
10
11
12
13
14
15
16
17
18
19
20
21
22
23
24
25
26
27
28
29
30
31
32
33
34
35
36
37
38
39
40
41
42
43
44
45
46
47
48
49
50
// ServletWebServerApplicationContext.java
@Override
protected void onRefresh() {
    super.onRefresh();
    try {
        createWebServer();
    }
    catch (Throwable ex) {
        throw new ApplicationContextException("Unable to start web server", ex);
    }
}

private void createWebServer() {
    WebServer webServer = this.webServer;
    ServletContext servletContext = getServletContext();
    // 1. 检查当前上下文中是否已经存在 WebServer 实例和 ServletContext 实例
    if (webServer == null && servletContext == null) {
        // 2. 启动性能追踪
        StartupStep createWebServer = getApplicationStartup().start("spring.boot.webserver.create");
        // 3. 获取 Web 服务器工厂
        // TomcatServletWebServerFactory 或 JettyServletWebServerFactory 或UndertowServletWebServerFactory
        ServletWebServerFactory factory = getWebServerFactory();
        // 4. 记录使用的是哪种 Web 服务器工厂,便于调试或监控
        createWebServer.tag("factory", factory.getClass().toString());
        // 5. 创建 WebServer 实例
        webServer = factory.getWebServer(getSelfInitializer());
        // 6. 给 this.webServer 赋值
        this.webServer = webServer;
        // 7. 结束性能追踪步骤
        createWebServer.end();
        // 8. 注册优雅关闭生命周期 Bean
        getBeanFactory().registerSingleton("webServerGracefulShutdown",
                new WebServerGracefulShutdownLifecycle(webServer));
        // 9. 注册启动/停止生命周期管理 Bean
        getBeanFactory().registerSingleton("webServerStartStop", new WebServerStartStopLifecycle(this, webServer));
    }
    // 10. 已有 ServletContext(传统 WAR 部署场景)
    else if (servletContext != null) {
        try {
            // 11. 将 Spring 的组件(如DispatcherServlet)注册到已存在的 ServletContext 中
            getSelfInitializer().onStartup(servletContext);
        }
        catch (ServletException ex) {
            throw new ApplicationContextException("Cannot initialize servlet context", ex);
        }
    }
    // 12. 初始化属性源 将 Web 相关的属性(如 server.port)注入到 Spring 的 Environment 中
    // 如 将 ServletContext 的初始化参数作为 PropertySource 加入环境
    initPropertySources();
}
13.13.5 创建 WebServer 实例
TomcatServletWebServerFactory 的 getWebServer() 会创建Tomcat并初启动。(最终开启端口监听在后面)
1
2
3
4
5
6
7
8
9
10
11
12
13
14
15
// TomcatServletWebServerFactory.java
@Override
public WebServer getWebServer(ServletContextInitializer... initializers) {
    // 1. 创建内置的Tomcat实例
    Tomcat tomcat = createTomcat();
    // 2. 传入拦截/初始化器
    // 把 getSelfInitializer() 传进去。这个初始化器负责在 Tomcat 启动时,把 Spring 的 DispatcherServlet 等组件注册到 Tomcat 的 Servlet 上下文中。
    prepareContext(tomcat.getHost(), initializers);
    // 3. 创建 TomcatWebServer(其中会初启动Tomcat)
    return getTomcatWebServer(tomcat);
}

protected TomcatWebServer getTomcatWebServer(Tomcat tomcat) {
    return new TomcatWebServer(tomcat, getPort() >= 0, getShutdown());
}
1
2
3
4
5
6
7
8
9
10
11
12
13
14
15
16
17
18
19
20
21
22
23
24
25
26
27
28
29
30
31
32
33
34
35
36
37
38
39
40
41
42
43
44
45
46
47
48
49
50
51
52
53
54
55
// TomcatWebServer.java
public TomcatWebServer(Tomcat tomcat, boolean autoStart, Shutdown shutdown) {
    Assert.notNull(tomcat, "'tomcat' must not be null");
    this.tomcat = tomcat;
    this.autoStart = autoStart;
    this.gracefulShutdown = (shutdown == Shutdown.GRACEFUL) ? new GracefulShutdown(tomcat) : null;
    // 初始化 TomcatWebServer
    initialize();
}

private void initialize() throws WebServerException {
    logger.info("Tomcat initialized with " + getPortsDescription(false));
    synchronized (this.monitor) {
        try {
            addInstanceIdToEngineName();

            Context context = findContext();
            context.addLifecycleListener((event) -> {
                if (context.equals(event.getSource()) && Lifecycle.START_EVENT.equals(event.getType())) {
                    // Remove service connectors so that protocol binding doesn't
                    // happen when the service is started.
                    // 关键点:在 Context 启动时,把 Service 的连接器给移除/断开
                    removeServiceConnectors();
                }
            });

            disableBindOnInit();

            // Start the server to trigger initialization listeners
            // 启动Tomcat (上面把 Service 的连接器给移除后,此处启动不会进行底层的网络端口绑定)
            // 此时它根本无法接收任何外部的 HTTP 请求
            this.tomcat.start();

            // We can re-throw failure exception directly in the main thread
            rethrowDeferredStartupExceptions();

            try {
                ContextBindings.bindClassLoader(context, context.getNamingToken(), getClass().getClassLoader());
            }
            catch (NamingException ex) {
                // Naming is not enabled. Continue
            }

            // Unlike Jetty, all Tomcat threads are daemon threads. We create a
            // blocking non-daemon to stop immediate shutdown
            startNonDaemonAwaitThread();
        }
        catch (Exception ex) {
            stopSilently();
            destroySilently();
            throw new WebServerException("Unable to start embedded Tomcat", ex);
        }
    }
}
13.14 注册事件监听器
作用:注册所有的应用事件监听器(ApplicationListener)并发布早期事件(early application events)。
从容器中搜寻所有实现了 ApplicationListener 接口的 Bean,把它们注册到 13.12 创建的事件广播器中。并把前面早期产生、攒着的事件(Early Application Events)一次性广播出去。
1
2
3
4
5
6
7
8
9
10
11
12
13
14
15
16
17
18
19
20
21
22
23
24
25
26
27
28
29
30
// AbstractApplicationContext.java
protected void registerListeners() {
    // Register statically specified listeners first.
    // 1. 注册静态指定的监听器
    // 这些监听器是在上下文初始化之前通过编程方式添加的 (将这些监听器直接注册到事件广播器)
    for (ApplicationListener<?> listener : getApplicationListeners()) {
        getApplicationEventMulticaster().addApplicationListener(listener);
    }

    // Do not initialize FactoryBeans here: We need to leave all regular beans
    // uninitialized to let post-processors apply to them!
    // 2. 注册容器中定义的监听器 Bean
    // 将这些监听器 Bean 的名称注册到事件广播器中。实际的 Bean 实例会在事件发生时才被懒加载
    String[] listenerBeanNames = getBeanNamesForType(ApplicationListener.class, true, false);
    for (String listenerBeanName : listenerBeanNames) {
        getApplicationEventMulticaster().addApplicationListenerBean(listenerBeanName);
    }

    // Publish early application events now that we finally have a multicaster...
    // 3. 发布早期事件
    // 在 ApplicationEventMulticaster 初始化完成前,如果已经有事件被发布会被暂存在 earlyApplicationEvents 集合中
    // 此时多播器已经准备就绪,于是将这些“积压”的早期事件 一次性发布出去
    Set<ApplicationEvent> earlyEventsToProcess = this.earlyApplicationEvents;
    this.earlyApplicationEvents = null;
    if (!CollectionUtils.isEmpty(earlyEventsToProcess)) {
        for (ApplicationEvent earlyEvent : earlyEventsToProcess) {
            getApplicationEventMulticaster().multicastEvent(earlyEvent);
        }
    }
}
13.15 初始化所有非懒加载的单例 Bean
作用:遍历 BeanFactory 中所有的 BeanDefinition,初始化所有非懒加载的单例 Bean。
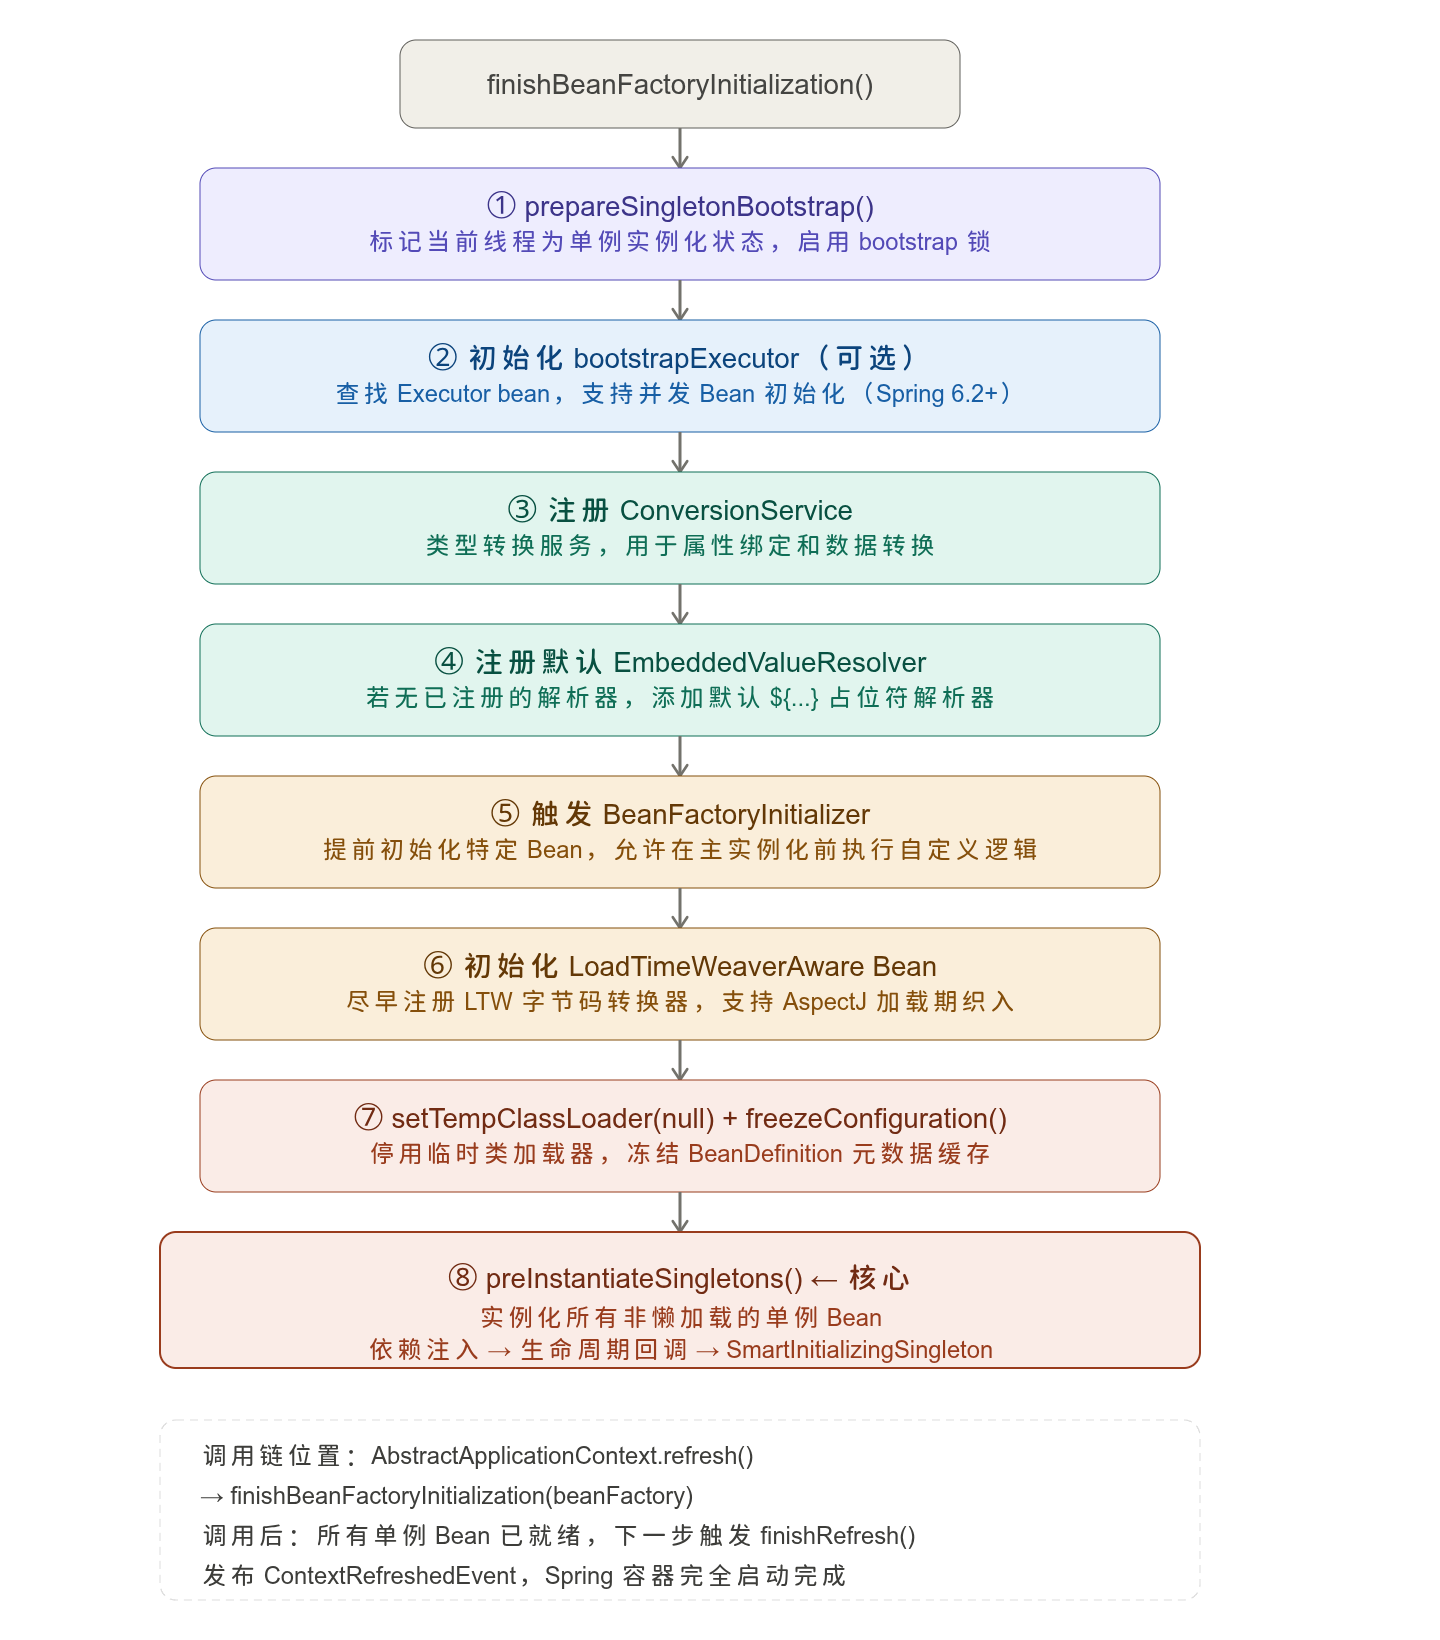
1
2
3
4
5
6
7
8
9
10
11
12
13
14
15
16
17
18
19
20
21
22
23
24
25
26
27
28
29
30
31
32
33
34
35
36
37
38
39
40
41
42
43
44
45
46
47
48
49
50
51
52
53
54
55
56
57
58
59
60
61
62
63
64
65
66
67
68
69
70
71
72
// AbstractApplicationContext.java
protected void finishBeanFactoryInitialization(ConfigurableListableBeanFactory beanFactory) {
    // Mark current thread for singleton instantiation with applied bootstrap locking.
    // 1. 将当前线程标记为"正在执行单例 bootstrap"状态,并激活 bootstrap 锁机制
    // 避免多个线程同时构建同一个单例而造成循环依赖或竞争条件
    beanFactory.prepareSingletonBootstrap();

    // Initialize bootstrap executor for this context.
    // 2. 初始化 bootstrapExecutor,BeanFactory 添加名为 BOOTSTRAP_EXECUTOR_BEAN_NAME 的 Executor
    // 后续 preInstantiateSingletons 可以用它并发实例化彼此无依赖关系的单例 Bean,大幅缩短启动时间
    if (beanFactory.containsBean(BOOTSTRAP_EXECUTOR_BEAN_NAME) &&
            beanFactory.isTypeMatch(BOOTSTRAP_EXECUTOR_BEAN_NAME, Executor.class)) {
        beanFactory.setBootstrapExecutor(
                beanFactory.getBean(BOOTSTRAP_EXECUTOR_BEAN_NAME, Executor.class));
    }

    // Initialize conversion service for this context.
    // 3. 注册 ConversionService
    // ConversionService 是 Spring 的统一类型转换体系,用于将 String 转换为 Integer、List、自定义类型等。
    // 在 @Value @ConfigurationProperties、数据绑定中大量使用
    if (beanFactory.containsBean(CONVERSION_SERVICE_BEAN_NAME) &&
            beanFactory.isTypeMatch(CONVERSION_SERVICE_BEAN_NAME, ConversionService.class)) {
        beanFactory.setConversionService(
                beanFactory.getBean(CONVERSION_SERVICE_BEAN_NAME, ConversionService.class));
    }

    // Register a default embedded value resolver if no BeanFactoryPostProcessor
    // (such as a PropertySourcesPlaceholderConfigurer bean) registered any before:
    // at this point, primarily for resolution in annotation attribute values.
    // 4. 注册默认 EmbeddedValueResolver
    // EmbeddedValueResolver 负责解析 ${spring.datasource.url} 这类占位符
    if (!beanFactory.hasEmbeddedValueResolver()) {
        beanFactory.addEmbeddedValueResolver(strVal -> getEnvironment().resolvePlaceholders(strVal));
    }

    // Call BeanFactoryInitializer beans early to allow for initializing specific other beans early.
    // 5. 触发 BeanFactoryInitializer
    // 在Bean批量实例化之前对 BeanFactory 做最后的定制。它比 BeanFactoryPostProcessor 更晚执行,可以访问到 BeanFactory 完整配置后的状态。
    String[] initializerNames = beanFactory.getBeanNamesForType(BeanFactoryInitializer.class, false, false);
    for (String initializerName : initializerNames) {
        beanFactory.getBean(initializerName, BeanFactoryInitializer.class).initialize(beanFactory);
    }

    // Initialize LoadTimeWeaverAware beans early to allow for registering their transformers early.
    // 6. 初始化 LoadTimeWeaverAware Bean
    // 在类被 ClassLoader 加载时动态修改字节码。提前实例化 LoadTimeWeaverAware 的 Bean,确保字节码转换器在其他 Bean 类被加载之前就已注册到 ClassLoader
    String[] weaverAwareNames = beanFactory.getBeanNamesForType(LoadTimeWeaverAware.class, false, false);
    for (String weaverAwareName : weaverAwareNames) {
        try {
            beanFactory.getBean(weaverAwareName, LoadTimeWeaverAware.class);
        }
        catch (BeanNotOfRequiredTypeException ex) {
            if (logger.isDebugEnabled()) {
                logger.debug("Failed to initialize LoadTimeWeaverAware bean '" + weaverAwareName +
                        "' due to unexpected type mismatch: " + ex.getMessage());
            }
        }
    }

    // Stop using the temporary ClassLoader for type matching.
    // 7. 冻结配置 移除类型匹配阶段使用的临时 ClassLoader,切换回正式的应用类加载器
    beanFactory.setTempClassLoader(null);

    // Allow for caching all bean definition metadata, not expecting further changes.
    // 8. 将所有 BeanDefinition 缓存起来,并标记为不再接受修改
    // 保证后续的 Bean 名称查找可以直接命中缓存,显著提升性能
    beanFactory.freezeConfiguration();

    // Instantiate all remaining (non-lazy-init) singletons.
    // 9. 实例化所有 非lazy 的 BeanDefinition
    beanFactory.preInstantiateSingletons();
}
13.15.9 实例化所有 非lazy 的 BeanDefinition
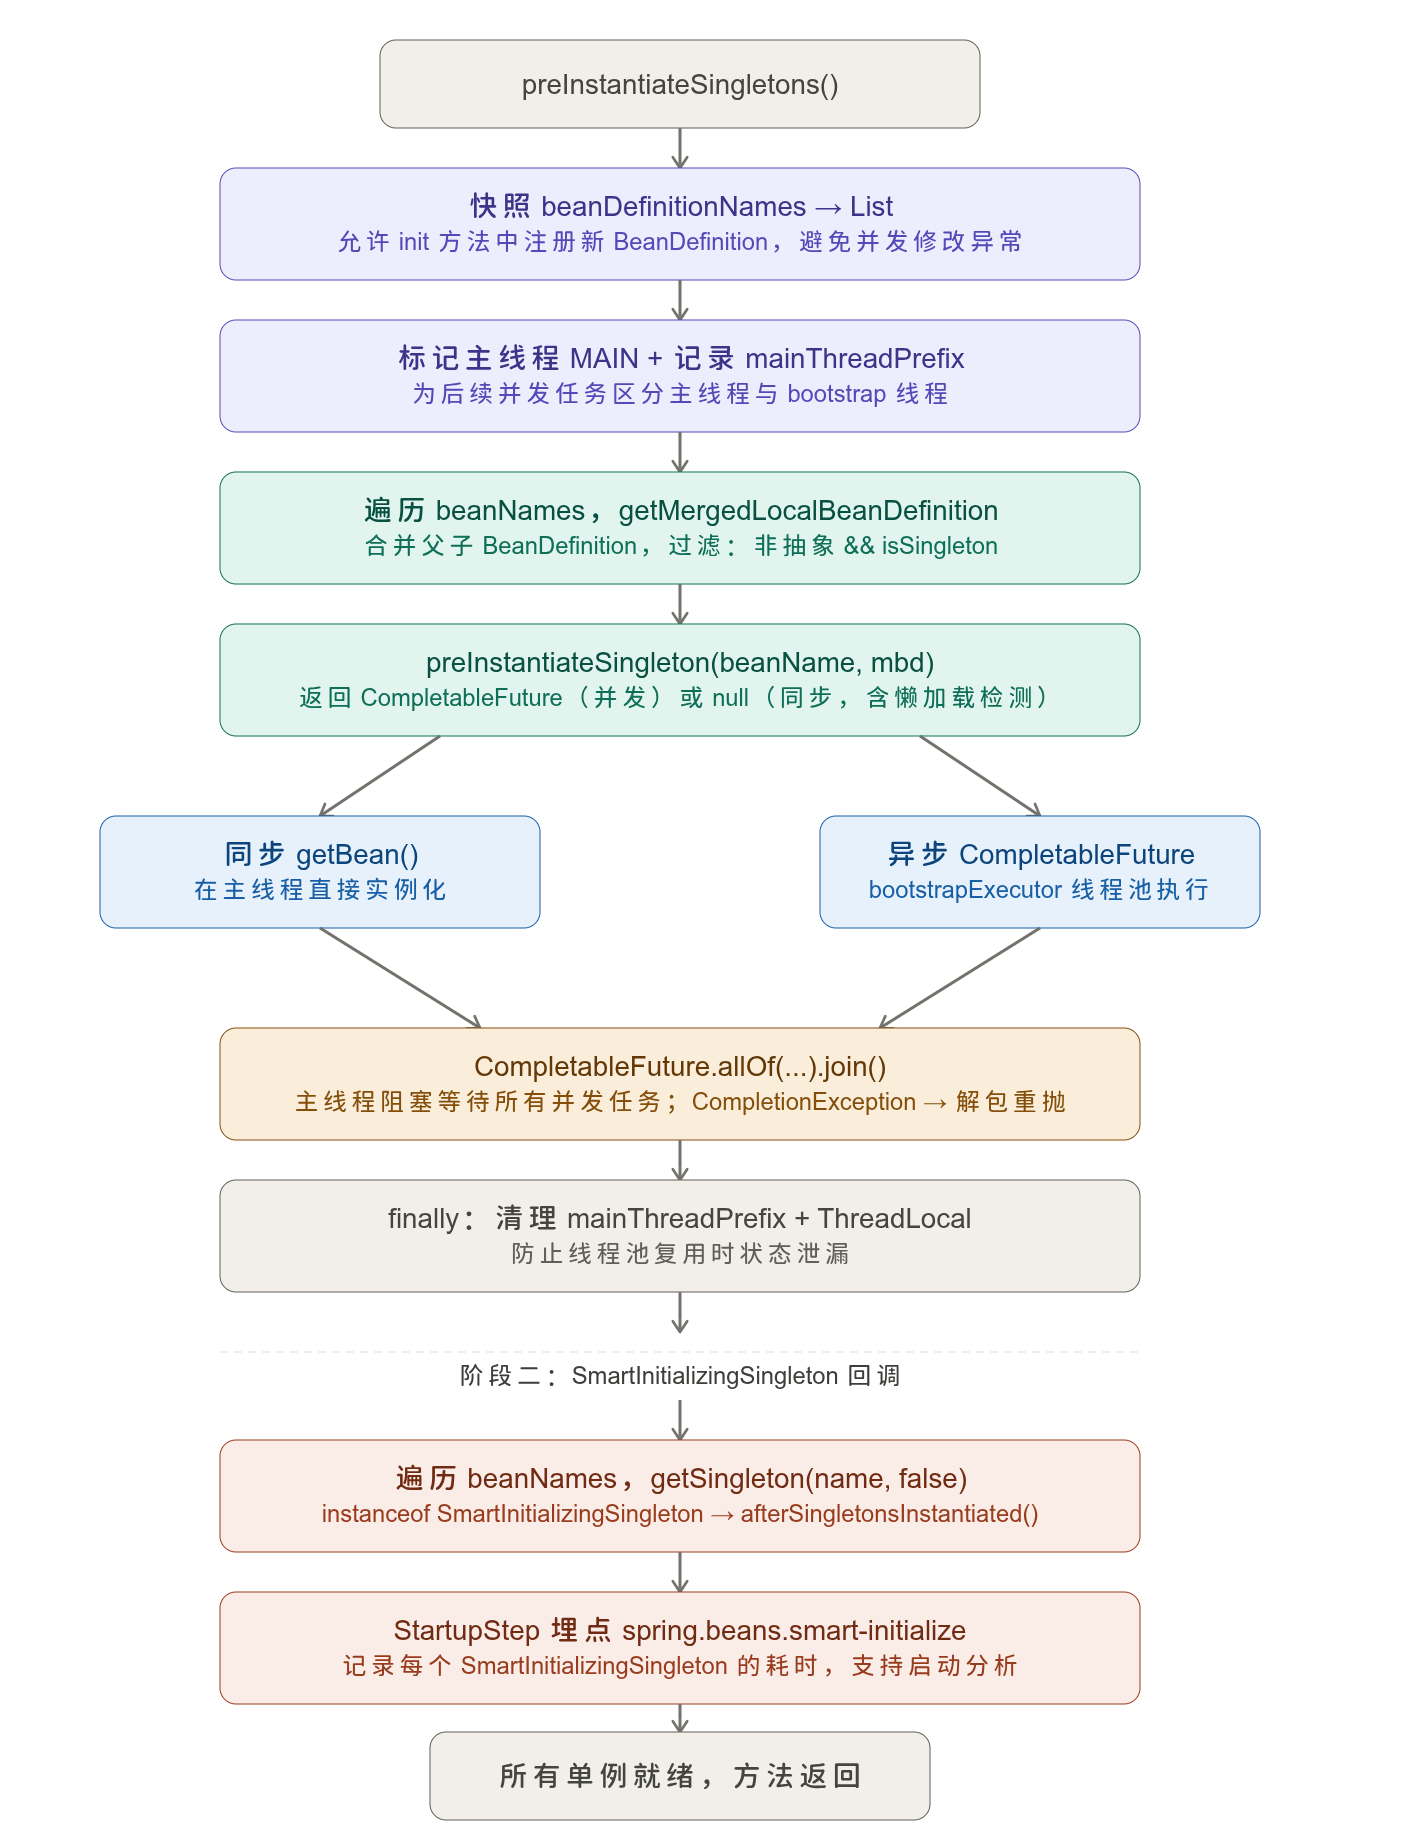
1
2
3
4
5
6
7
8
9
10
11
12
13
14
15
16
17
遍历所有 BeanDefinition
  ├── 是 FactoryBean?
  │     └── 先实例化 FactoryBean 本身
  │           └── 若 isEagerInit=true,再调用 getObject() 获取产品 Bean
  └── 普通 Bean?
        └── getBean(beanName)
              ├── 三级缓存检查(解决循环依赖)
              ├── 实例化(构造器/工厂方法)
              ├── 属性注入(@Autowired / @Value)
              ├── Aware 接口回调
              ├── BeanPostProcessor.postProcessBeforeInitialization
              ├── 初始化方法(@PostConstruct / afterPropertiesSet / init-method)
              └── BeanPostProcessor.postProcessAfterInitialization

所有单例实例化完成后:
  └── 遍历实现 SmartInitializingSingleton 的 Bean
        └── 调用 afterSingletonsInstantiated()
1
2
3
4
5
6
7
8
9
10
11
12
13
14
15
16
17
18
19
20
21
22
23
24
25
26
27
28
29
30
31
32
33
34
35
36
37
38
39
40
41
42
43
44
45
46
47
48
49
50
51
52
53
54
55
56
57
58
59
60
61
62
// DefaultListableBeanFactory.java
@Override
public void preInstantiateSingletons() throws BeansException {
    if (logger.isTraceEnabled()) {
        logger.trace("Pre-instantiating singletons in " + this);
    }

    // Iterate over a copy to allow for init methods which in turn register new bean definitions.
    // While this may not be part of the regular factory bootstrap, it does otherwise work fine.
    // 1. 获取所有 Bean 名称
    List<String> beanNames = new ArrayList<>(this.beanDefinitionNames);

    // Trigger initialization of all non-lazy singleton beans...
    // 记录主线程名称前缀,后续用来给 bootstrap 线程池中的线程命名
    this.preInstantiationThread.set(PreInstantiation.MAIN);
    if (this.mainThreadPrefix == null) {
        this.mainThreadPrefix = getThreadNamePrefix();
    }
    try {
        List<CompletableFuture<?>> futures = new ArrayList<>();
        // 2. 遍历所有 Bean,筛选出非抽象、单例的 Bean
        for (String beanName : beanNames) {
            // 3. 将父子合并为一个完整的 RootBeanDefinition,结果会被缓存在 mergedBeanDefinitions 中,避免重复合并
            RootBeanDefinition mbd = getMergedLocalBeanDefinition(beanName);
            if (!mbd.isAbstract() && mbd.isSingleton()) {
                // 4. 异步或同步实例化 Bean
                // 支持并行初始化非依赖的单例 Bean,以提升启动性能。(只有无依赖的 Bean 才能并行初始化。)
                CompletableFuture<?> future = preInstantiateSingleton(beanName, mbd);
                if (future != null) {
                    futures.add(future);
                }
            }
        }
        if (!futures.isEmpty()) {
            try {
                // 5. 等待所有异步任务完成
                CompletableFuture.allOf(futures.toArray(new CompletableFuture<?>[0])).join();
            }
            catch (CompletionException ex) {
                ReflectionUtils.rethrowRuntimeException(ex.getCause());
            }
        }
    }
    finally {
        // 清理 ThreadLocal
        this.mainThreadPrefix = null;
        this.preInstantiationThread.remove();
    }

    // Trigger post-initialization callback for all applicable beans...
    // 6. SmartInitializingSingleton 回调
    for (String beanName : beanNames) {
        Object singletonInstance = getSingleton(beanName, false);
        if (singletonInstance instanceof SmartInitializingSingleton smartSingleton) {
            // StartupStep 性能埋点
            StartupStep smartInitialize = getApplicationStartup().start("spring.beans.smart-initialize")
                    .tag("beanName", beanName);
            smartSingleton.afterSingletonsInstantiated();
            smartInitialize.end();
        }
    }
}
Bean的实例化过程是在getBean()中执行的:
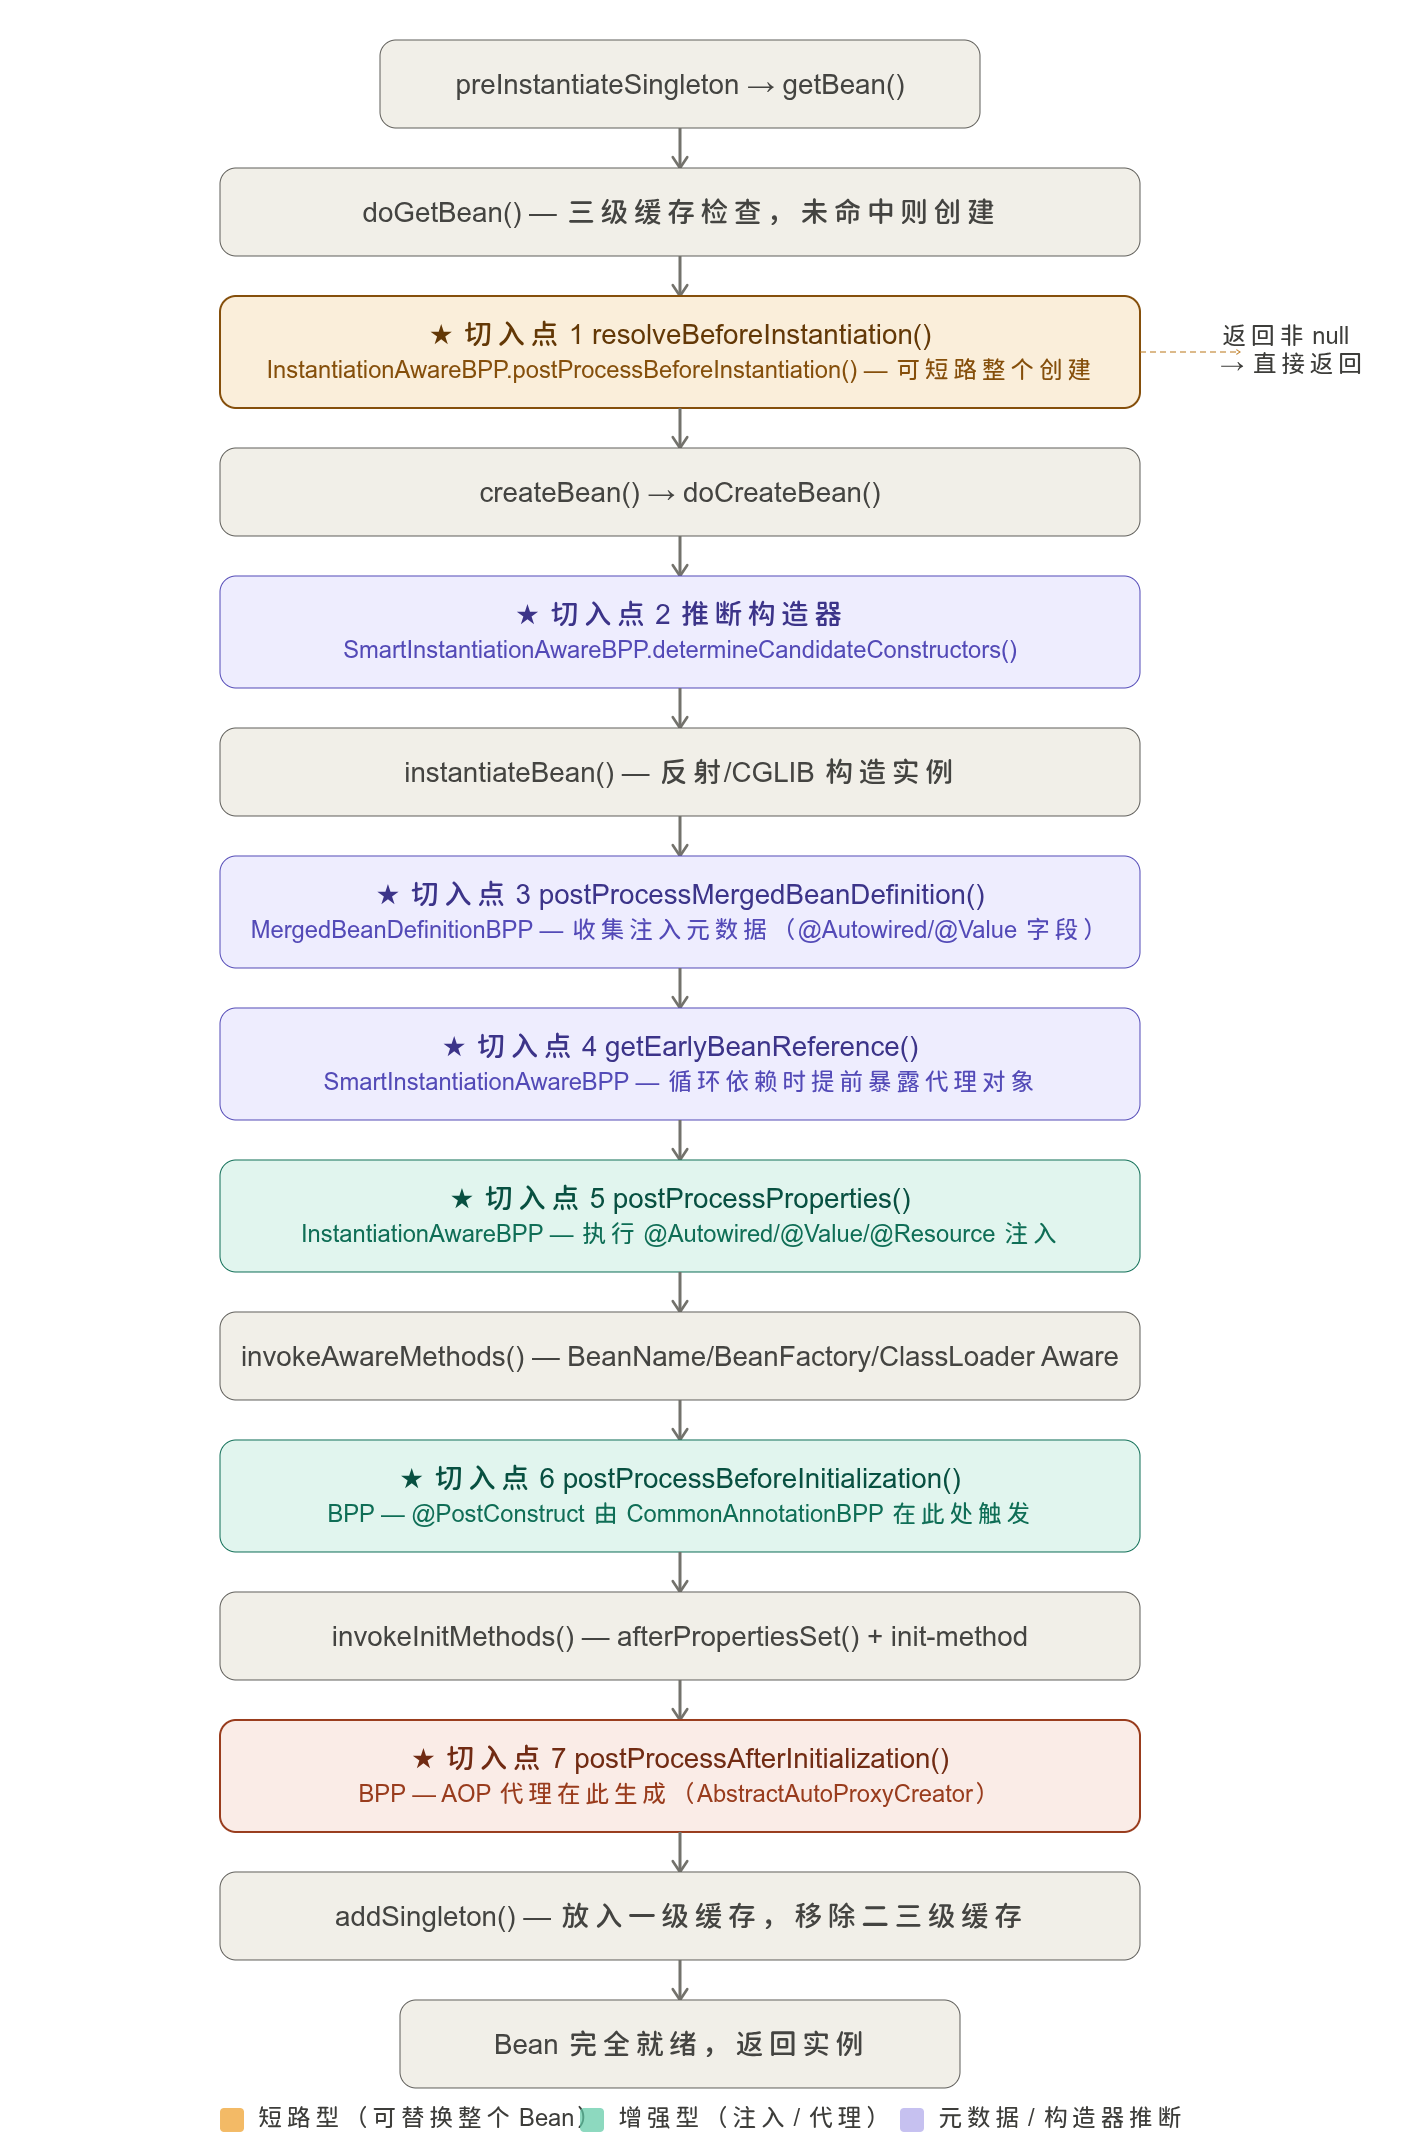
13.16 完成刷新,让整个应用真正开始对外提供服务
1
2
3
4
5
6
7
8
9
10
11
12
13
14
15
16
17
18
19
20
21
22
23
24
25
26
27
28
protected void finishRefresh() {
    // Reset common introspection caches in Spring's core infrastructure.
    // 1. 重置 Spring 核心框架中的一些公共反射元数据缓存
    // 清理在容器启动和 Bean 定义解析过程中产生的临时缓存,释放内存,避免旧的元数据影响后续的运行
    resetCommonCaches();

    // Clear context-level resource caches (such as ASM metadata from scanning).
    // 2. 清除当前应用上下文级别的资源缓存
    // 此时所有的 BeanDefinition(Bean的定义信息)都已经加载并处理完毕,及时清理可以减轻内存占用
    clearResourceCaches();

    // Initialize lifecycle processor for this context.
    // 3. 为当前的应用上下文初始化生命周期处理器
    // 处理器专门用来管理实现了 Lifecycle 接口的 Bean 的启动和停止。
    initLifecycleProcessor();

    // Propagate refresh to lifecycle processor first.
    // 4. 将容器刷新的信号传播给生命周期处理器,正式启动生命周期管理
    // 会触发所有实现了 Lifecycle 接口的 Bean 的 start() 方法
    // (最终完整启动 Tomcat,监听端口)
    getLifecycleProcessor().onRefresh();

    // Publish the final event.
    // 5. 发布最终的容器刷新完成事件
    // 该事件的发出,明确告知所有监听器 Spring容器已经彻底准备就绪,所有的单例 Bean 都已经创建并初始化完毕
    // 可编写监听器来监听这个事件,从而执行一些系统级的初始化工作(如缓存预热、定时任务启动、服务状态上报等)。
    publishEvent(new ContextRefreshedEvent(this));
}
18. 执行自定义的 Runner 代码
作用:找出容器中所有实现了 CommandLineRunner 或 ApplicationRunner 接口的 Bean,并按照指定的顺序执行它们
1
2
3
4
5
6
7
8
9
10
11
12
13
14
15
16
private void callRunners(ConfigurableApplicationContext context, ApplicationArguments args) {
    // 1. 获取所有 Runner 类型的 Bean 名称
    ConfigurableListableBeanFactory beanFactory = context.getBeanFactory();
    String[] beanNames = beanFactory.getBeanNamesForType(Runner.class);
    // 2. 构建 Bean 实例与名称的映射表
    Map<Runner, String> instancesToBeanNames = new IdentityHashMap<>();
    for (String beanName : beanNames) {
        instancesToBeanNames.put(beanFactory.getBean(beanName, Runner.class), beanName);
    }
    // Spring Boot 支持通过 @Order 注解或实现 Ordered 接口来控制 Runner 的执行顺序
    // 3. 创建带有排序规则的比较器
    Comparator<Object> comparator = getOrderComparator(beanFactory)
        .withSourceProvider(new FactoryAwareOrderSourceProvider(beanFactory, instancesToBeanNames));
    // 4. 排序并触发执行
    instancesToBeanNames.keySet().stream().sorted(comparator).forEach((runner) -> callRunner(runner, args));
}
Springboot 线程模型
一个 Spring Boot 应用 是 一个 JVM 进程,进程内包含多组线程:
1
2
3
4
5
6
7
8
9
10
操作系统 (OS)
└── 📦 Spring Boot 进程 (只有一个 PID, 共享一份 JVM 内存堆)
     ├── 🧵 线程 1: 主线程 (Main Thread) ── 负责启动和调度
     ├── 🧵 线程 2: Tomcat 接收线程 ── 负责死守 8080 端口,看谁来了
     ├── 🧵 线程 3: http-nio-8080-exec-1 ── 正在处理张三的查询请求
     ├── 🧵 线程 4: http-nio-8080-exec-2 ── 正在处理李四的下单请求
     ├── 🧵 线程 5: @Scheduled ── 定时任务(TaskScheduler)
     ├── 🧵 线程 6: @Async ── 异步任务(TaskExecutor)
     └── 🧵 线程 7: GC 垃圾回收线程 ── 负责在后台打扫卫生