GitHub Pages + Jekyll + Chirpy Jekyll Theme 搭建博客
GitHub Pages + Jekyll + Chirpy Jekyll Theme 搭建博客。
GitHub Pages默认支持Jekyll,但Chirpy主题不是Jekyll默认支持的,需要通过Chirpy模板创建仓库。
创建Github仓库
克隆Chirpy模板
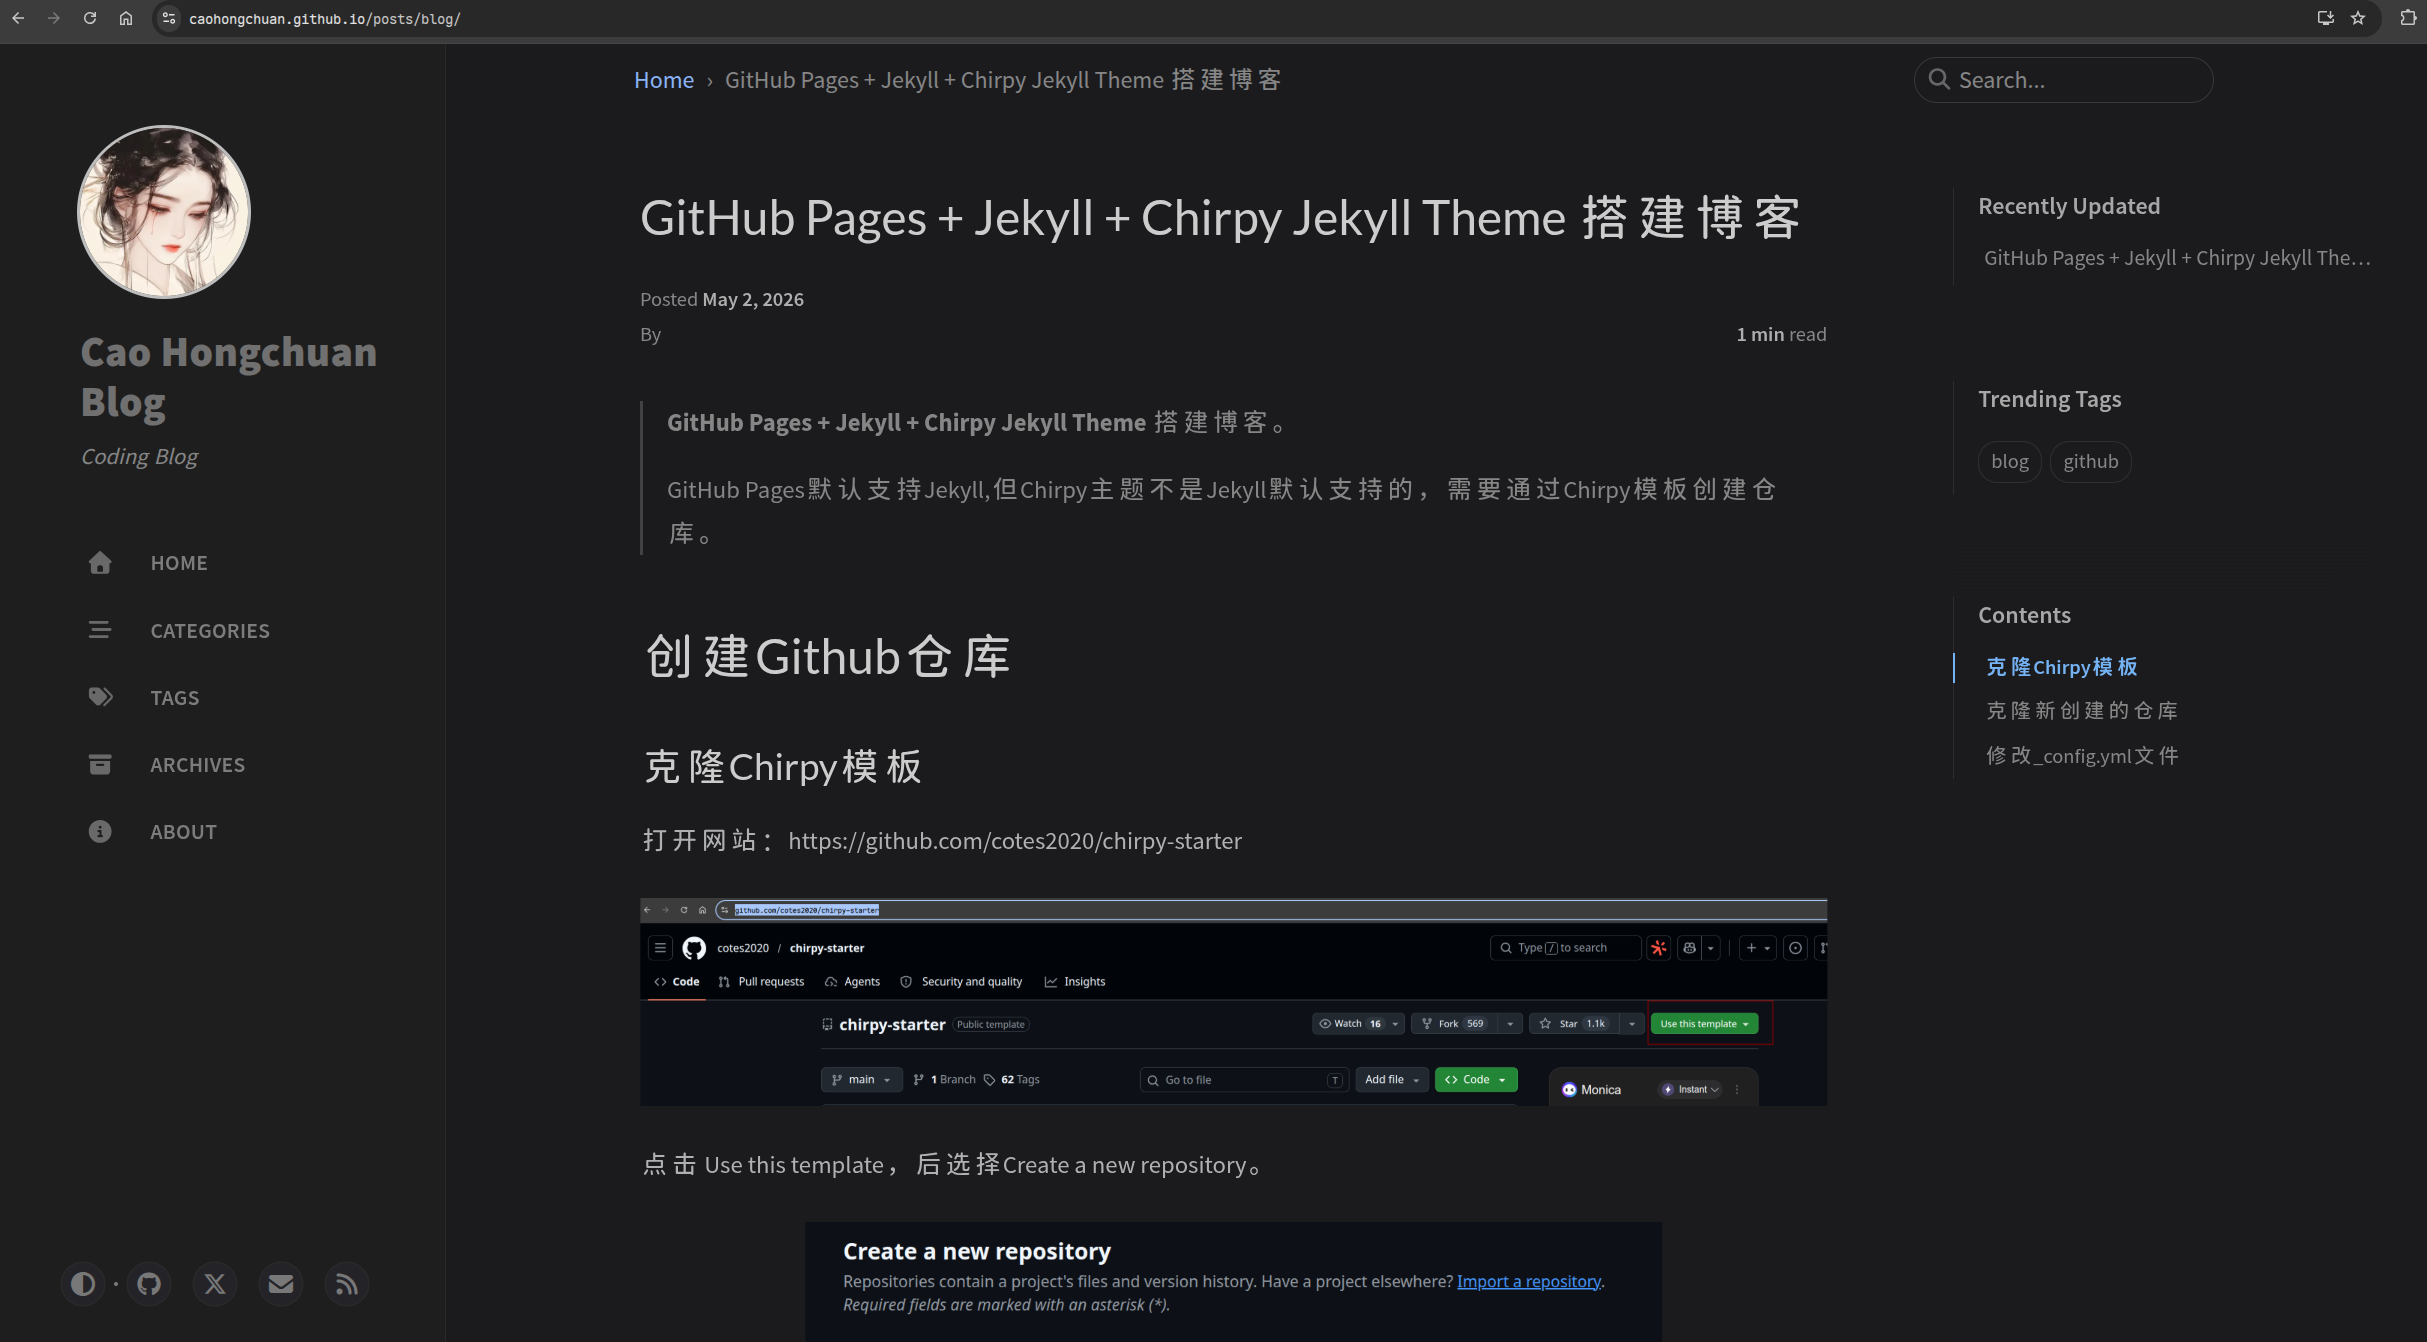
打开网站:https://github.com/cotes2020/chirpy-starter

点击 Use this template,后选择Create a new repository。
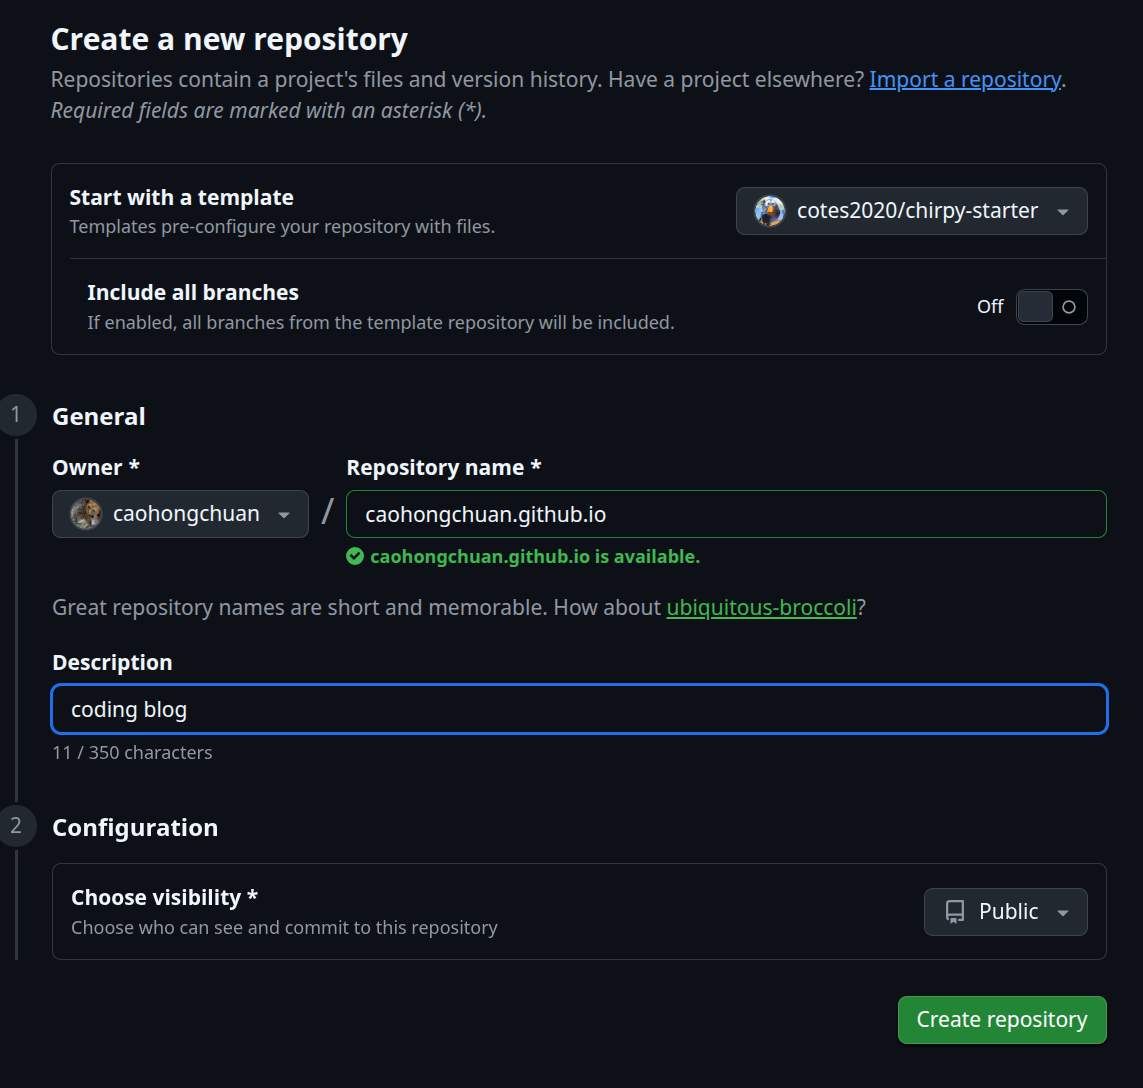
仓库名=你的用户名.github.io
克隆Github仓库到本地
克隆新创建的仓库
1
git clone git@github.com:caohongchuan/caohongchuan.github.io.git
修改基础配置
修改_config.yml文件
打开_config.yml,修改以下内容
1
2
3
4
5
6
7
8
9
10
11
12
13
14
15
16
17
18
19
20
21
22
# Change to your timezone › https://zones.arilyn.cc
timezone: Asia/Shanghai

# jekyll-seo-tag settings › https://github.com/jekyll/jekyll-seo-tag/blob/master/docs/usage.md
# ↓ --------------------------

title: Cao Hongchuan Blog # the main title

tagline: Coding Blog # it will display as the subtitle

description: >- # used by seo meta and the atom feed
  Blog with Github Page, Using jekyll and chirpy theme.

# Fill in the protocol & hostname for your site.
# E.g. 'https://username.github.io', note that it does not end with a '/'.
url: "https://caohongchuan.github.io"

github:
  username: caohongchuan # change to your GitHub usernam

# the avatar on sidebar, support local or CORS resources
avatar: https://www.gravatar.com/avatar/ed2b24fd797e5bf76f22156d333c5ba7?s=200&d=identicon
写一篇文章
文章放在_posts/目录下,文件的命令规则是YYYY-MM-DD-title.md
如创建_posts/tutorial/2026-05-02-blog.md,文件开头包含yml配置信息:
1
2
3
4
5
6
7
8
9
10
11
---
title: GitHub Pages + Jekyll + Chirpy Jekyll Theme 搭建博客
date: 2026-05-02 00:00:00 +0800
categories: [tutorial]
tags: [blog, github]
author: caohongchuan
pin: false
math: false
toc: true
comments: true
---
所有的文章都可以使用该模板。
推送本地仓库到Github
1
2
3
git add .
git commit -m "init blog"
git push
推送后,打开Github创建的caohongchuan.github.io仓库的Settings:https://github.com/caohongchuan/caohongchuan.github.io/settings/pages,选中code and automation中的Pages。

默认只要名字是caohongchuan.github.io会自动开启Pages,确保Build and deployment中Source是GitHub Action。之后通过Visit site可访问博客。
注:选择GitHub Action后,Github会自动扫描项目中的.github/workflows/pages-deploy.yml构建流程来构建项目。该yml配置文件是https://github.com/cotes2020/chirpy-starter模板自带的。(只有纯Jekyll项目+Jekyll默认支持的主题才能使用Build from Branch,使用Github内置的Jekyll直接构建)
开启评论功能
Giscus(基于 GitHub Discussions)
开启Discussions
开启caohongchuan/caohongchuan.github.io仓库的Discussions功能:
Settings -> General -> Features -> Discussions,勾选
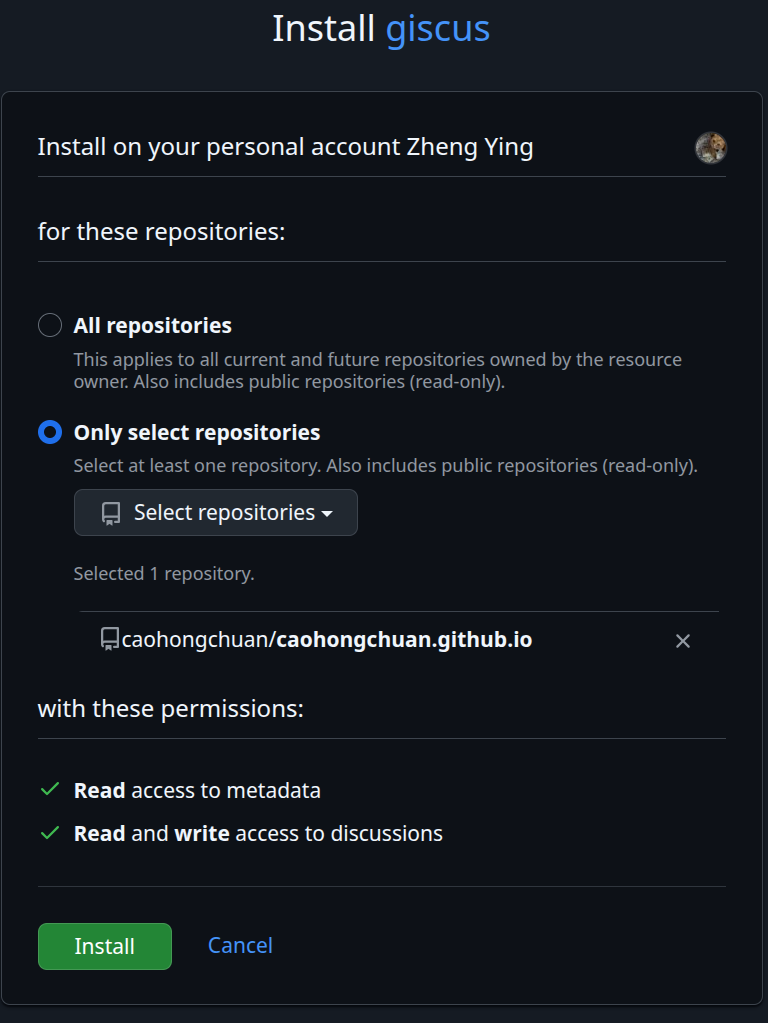
Github安装giscus App
打开https://github.com/apps/giscus点击Install,安装到对应的仓库即可
获取Giscus参数
打开Giscus官网:https://giscus.app/
Repository 填写从https://github.com/cotes2020/chirpy-starter克隆后创建的caohongchuan.github.io
Page -> Discussions Mapping 选择 Discussion title contains page
pathnameDiscussion Category 选择 Announcements
然后会自动生成:
1
2
3
4
5
6
7
8
9
10
11
12
13
14
15
<script src="https://giscus.app/client.js"
        data-repo="caohongchuan/caohongchuan.github.io"
        data-repo-id="xxx"
        data-category="Announcements"
        data-category-id="xx"
        data-mapping="pathname"
        data-strict="0"
        data-reactions-enabled="1"
        data-emit-metadata="0"
        data-input-position="bottom"
        data-theme="preferred_color_scheme"
        data-lang="en"
        crossorigin="anonymous"
        async>
</script>
然后将其对应到_config.yml中
1
2
3
4
5
6
7
8
9
10
11
12
13
14
15
16
17
18
19
20
21
comments:
  # Global switch for the post-comment system. Keeping it empty means disabled.
  provider: giscus # [disqus | utterances | giscus]
  # The provider options are as follows:
  disqus:
    shortname: # fill with the Disqus shortname. › https://help.disqus.com/en/articles/1717111-what-s-a-shortname
  # utterances settings › https://utteranc.es/
  utterances:
    repo: # <gh-username>/<repo>
    issue_term: # < url | pathname | title | ...>
  # Giscus options › https://giscus.app
  giscus:
    repo: caohongchuan/caohongchuan.github.io # <gh-username>/<repo>
    repo_id: xxx
    category: Announcements
    category_id: xx
    mapping: # optional, default to 'pathname'
    strict: # optional, default to '0'
    input_position: # optional, default to 'bottom'
    lang: # optional, default to the value of `site.lang`
    reactions_enabled: # optional, default to the value of `1`
配置网站自定义字体
LxgwWenkai字体
对于使用中文的网站,LxgwWenkai字体是一个不错的选择。
官方地址:https://github.com/lxgw/LxgwWenkai
CDN Github地址:https://github.com/CMBill/lxgw-wenkai-web
CDN地址:https://cdn.jsdelivr.net/npm/@callmebill/lxgw-wenkai-web@latest/style.css
在https://github.com/cotes2020/chirpy-starter的工程中,创建assets/css/jekyll-theme-chirpy.scss:
1
2
3
4
5
6
7
8
9
10
11
12
13
14
15
16
17
18
19
20
21
22
---
---

/* prettier-ignore */
@use 'main
{%- if jekyll.environment == 'production' -%}
  .bundle
{%- endif -%}
';

/* append your custom style below */

@import url('https://cdn.jsdelivr.net/npm/@callmebill/lxgw-wenkai-web@latest/style.css');

body, p, span, div, li, a, td, th, tr, blockquote, code, pre {
  font-family: 'LXGW WenKai', 'Source Sans Pro', 'Microsoft Yahei', sans-serif !important;
}

h1, h2, h3, h4, h5, h6, .heading, .post-title {
  font-family: 'LXGW WenKai', Lato, 'Microsoft Yahei', sans-serif !important;
}
重启jekyll工程字体生效,推送到Github仓库远程生效。
搭建Github raw图床
搭建 GitHub Raw 图床 + PicGo 自动上传
创建Github仓库
创建一个新的Github仓库,如caohongchuan/blogimg,在其中创建一个文件夹nextimg用来存放图片。
仓库必须是Public。(只有public的仓库上传的图片才会提供外链接,如https://raw.githubusercontent.com/xxx)
配置Personal access token
为了PicGo客户端能方便的使用Github提供的API且不用每次登陆,配置Github的Personal access token并添加到PicGo客户端。最新推荐创建Fine-grained personal access tokens更加安全。
头像 -> Settings -> Developer Settings -> Personal access tokens -> Fine-grained tokens

配置 Token name 和 Expiration
配置 Repository access,选择 Only select repositories 到 caohongchuan/blogimg 仓库
配置 Permissions(关键):只需要开启 Contents → Read and Write
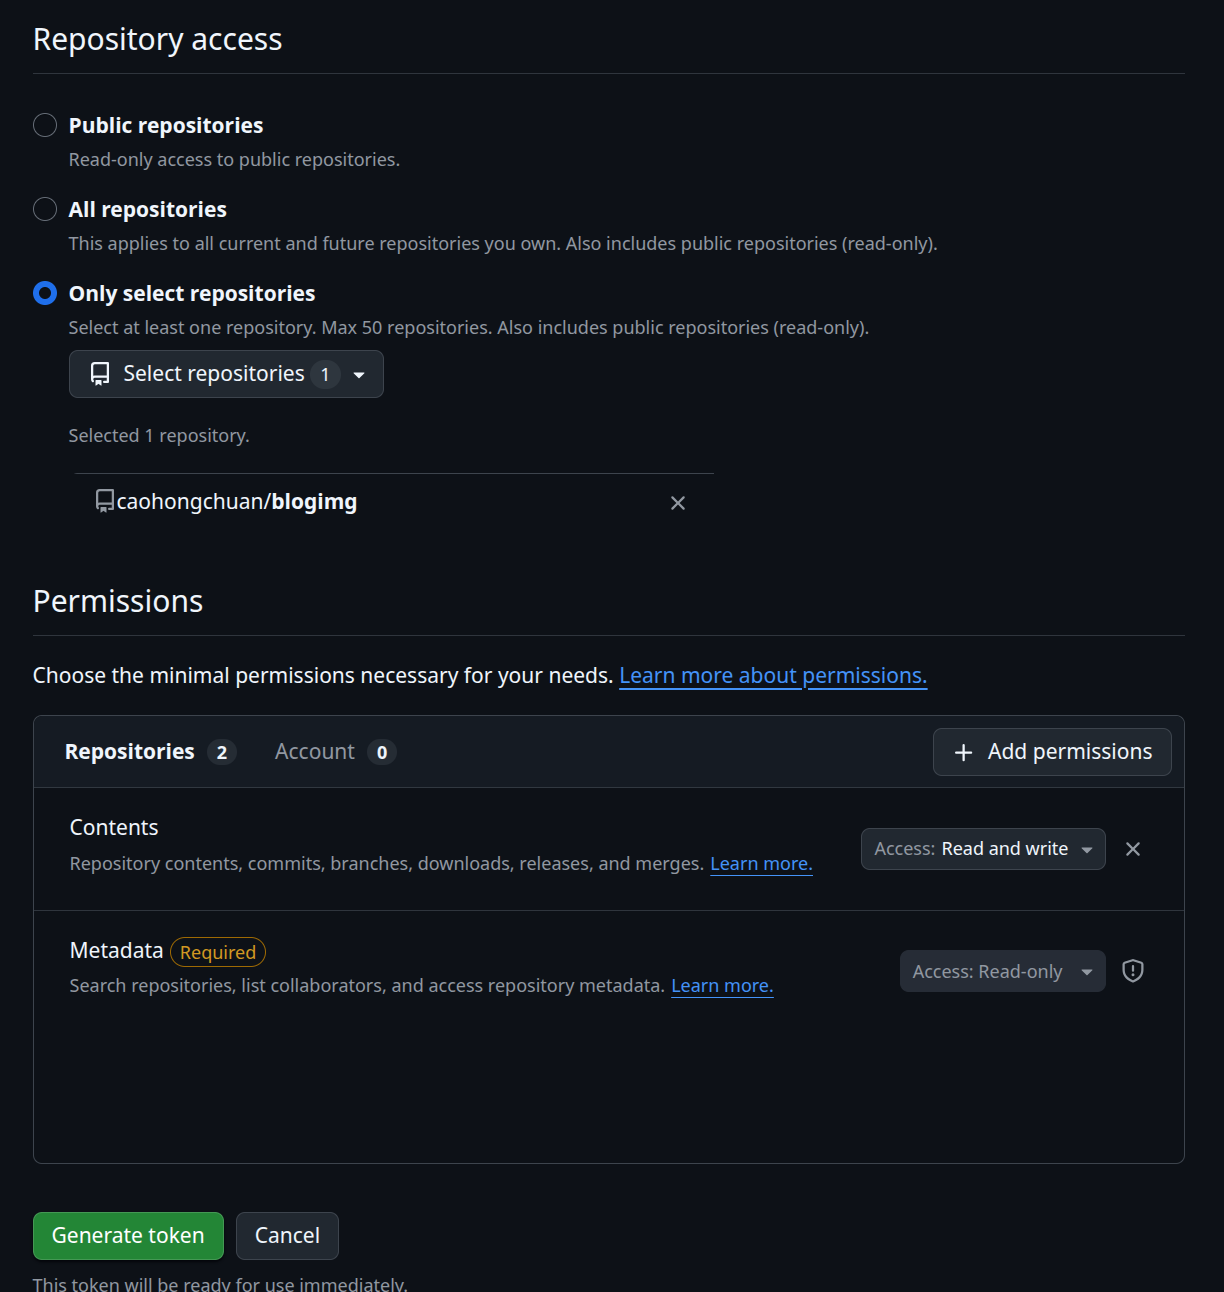
至此可以生成token,点击Generate token。
配置到PicGo客户端
本文以Typora内置的Image功能,配置PicGO。
打开Typora的 File -> Preferences -> Image
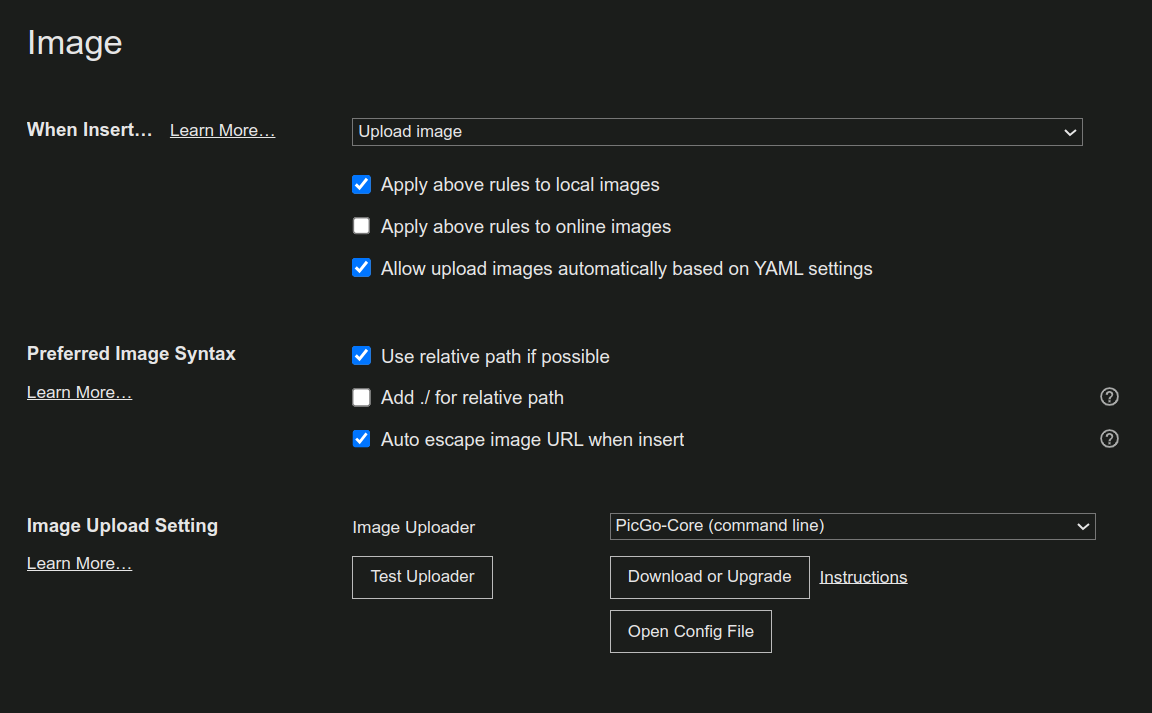
Image Uploader 选择 PicGo-Core,点击 Open Config File
1
2
3
4
5
6
7
8
9
10
11
12
13
14
15
16
17
18
19
20
21
22
23
24
25
26
27
28
29
30
31
{
  "picBed": {
    "current": "github",
    "uploader": "github",
    "smms": {
      "token": ""
    },
    "github": {
      "repo": "caohongchuan/blogimg",
      "branch": "main",
      "token": "github_pat_xxxx",
      "path": "nextimg/",
      "customUrl": ""
    }
  },
  "settings": {
    "shortKey": {
      "picgo:upload": {
        "enable": true,
        "key": "CommandOrControl+Shift+P",
        "name": "upload",
        "label": "QUICK_UPLOAD"
      }
    },
    "showUpdateTip": true,
    "privacyEnsure": true,
    "autoRename": true
  },
  "needReload": false,
  "picgoPlugins": {}
}
Github:配置仓库(repo),分支(branch),路径(path),以及上面配置好的Token。