Https
HTTPS原理
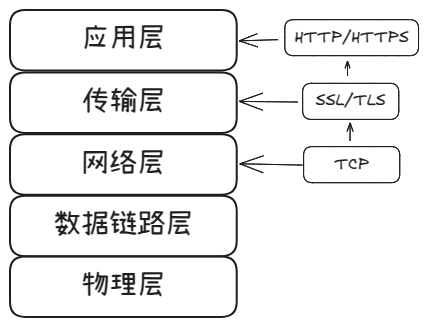
HTTPS分为两个阶段:握手阶段,传输阶段。
TCP握手 + TLS\SSL握手
网络协议分为五层,首先完成网络层TCP的三次握手,再完成传输层的TLS\SSL的握手,最后到达应用层的HTTPS
证书生成
生成密钥
openssl生成RSA密钥:
1 | openssl genrsa -out prkey.key 2048 |
或生成RSA加密密钥(使用des3对密钥加密)(可选):
1 | openssl genrsa -des3 -out prkey.key 2048 |
从私钥中导出公钥(可选)
1 | openssl rsa -pubout -in prkey.key -out pukey.pem |
创建证书签名请求(CSR)
1 | openssl req -new -key prkey.key -out cer_request.csr -subj "/C=CN/ST=Beijing/L=Beijing/O=MyCompany/OU=IT/CN=example.com/emailAddress=admin@example.com" |
自签名证书
.crt可以换成.pem
1 | openssl x509 -req -days 365 -in cer_request.csr -signkey prkey.key -out certificate.crt |
CA签署证书(可选)
.crt可以换成.pem
需要先生成 认证中心的 私钥 和 证书,然后对CSR请求生成证书。
1 | openssl x509 -req -days 365 -in cer_request.csr -CA ca_cert.crt -CAkey ca_prkey.key -CAcreateserial -out certificate.crt |
查看
1 | openssl x509 -in certificate.crt -noout -text |
实例
以CA签署证书为例
自签名证书有两种类型:
自签名证书:自签名证书的
Issuer和Subject是相同的。私有 CA 签名证书:其中CA的证书是自签名证书,server证书是由CA签发的。
生成服务器端私钥(server.key)
1
genrsa -out server.key 2048
生成服务端签名证书请求(server.csr)
1
openssl req -new -config serverssl.cnf -key server.key -out server.csr
1
2
3
4
5
6
7
8
9
10
11
12
13
14
15
16
17
18
19
20
21
22
23# serverssl.cnf
[req]
default_bits = 2048
prompt = no
default_md = sha256
x509_extensions = v3_req
distinguished_name = dn
[dn]
C = CN
ST = SD
L = JINAN
O = yingzheng
OU = yingzhengunit
emailAddress = yingzhengttt@gmail.com
CN = yingzhengttt.com
[v3_req]
subjectAltName = @alt_names
[alt_names]
DNS.1 = yingzhengttt.com
DNS.2 = www.yingzhengttt.com其中CN必须与服务器的域名一致。否则浏览器会警告不安全。
生成CA私钥(ca.key)
1
openssl genrsa -out ca.key 2048
生成CA自签名证书(ca.crt)
1
openssl req -new -x509 -days 365 -key ca.key -out ca.crt -subj "/C=CN/ST=SD/L=JINAN/O=yingzheng/OU=yingzhengunit/CN=ROOTcert/emailAddress=ying使用CA证书(ca.crt)对服务端证书请求(server.csr)签名,获取服务端签名(server.crt)zhengttt@gmail.com"
使用CA证书(ca.crt)对服务端证书请求(server.csr)签名,获取服务端签名(server.crt)
1
openssl x509 -req -days 365 -in server.csr -CA ca.crt -CAkey ca.key -CAcreateserial -out server.crt
注:本测试在Ubuntu24上的Chrome中,只要是未被公共信任的证书,即使已经加入到系统的信任链中,浏览器也会提示安全风险。但是在Postman中能够正常工作。所以应该是浏览器的安全设置问题。
为了取消报错并在本地使用自签名证书,关闭Chrome的签名认证,在Chrome启动时加入参数 --ignore-certificate-errors。 比如在Ubuntu中,更改/usr/share/applications/google-chrome.desktop,在这里我使用的是canary所以更改/usr/share/applications/google-chrome-canary.desktop
1 | Exec=/usr/bin/google-chrome-canary --ignore-certificate-errors %U |
SpringBoot启用SSL
将server.crt,server.key拷贝到resource目录下。
pom.xml
1 | server: |
创建TomcatConfg.java来创建一个新的Tomcat来接受http请求。
1 |
|
并在spring security中配置之允许使用https协议,并将http协议跳转到https协议端口
1 |
|
Springboot 添加信任证书
如果只想添加信任证书能够访问其他https服务,而不是自身启动https,可以只添加证书到信任链中。
方法1. 将证书添加到Java信任库
首先获取需要信任的证书ca.crt
将ca.crt导入到Java信任库中
1 | keytool -import -trustcacerts -keystore $JAVA_HOME/lib/security/cacerts -noprompt -alias my-cert -file ca.crt |
方法2. 将证书添加到Springboot中
该方法并没有成功
创建JKS信任库
1 | keytool -import -trustcacerts -keystore server.jks -storepass 1234 -alias my-cert -file ca.crt |
将server.jks 添加到resource目录下
在application.yml
1 | ssl: |
问题:即使将key-store设置为空,但启动的时候springboot仍然去/home/amber/.keystore (No such file or directory)去拿key-store。一直解决不了。如果设置trust-store,springboot就默认启动ssl也会去找key-store,即使设置为空也还是去找。
Nginx 启用 SSL
配置Nginx
1 | sudo vim /etc/nginx/nginx.conf |
1 | server { |
后端配置了两个websocket服务ws://localhost:8080/echo 和 ws://localhost:8080/chat
Nginx监听8082端点,并设置SSL服务,将/ws/*转发给后端localhost:8080/*对应的服务。即访问wss://localhost:8082/ws/echo会解析SSL并转发给ws://localhost:8080/echo